
Want instant sunshine on your patio or balcony? With Coreopsis in Pots, you’ll turn small spaces into color magnets—easy, cheerful, and endlessly bloom-happy.
You’ll learn how to pick, plant, and style containers so your bright daisies pop all season long.
Isn’t it amazing how a little pot of flowers can lift your whole mood? That’s the magic of Coreopsis in pots. These bright, cheerful blooms bring a splash of sunshine to patios, porches, and even apartment balconies.
These low-maintenance beauties are more than just pretty faces and they’re hardy, happy, and practically made for container life.
Whether you’re a gardening newbie or a seasoned green thumb, you’re going to love growing Coreopsis in pots. Let’s dig into everything you need to know!
,Perennial Tickseed")
How To Grow Coreopsis in Pots
Growing Coreopsis in Pots
 Perennial, yellow flowers, 1 - Size Container")
Dive into the world of Coreopsis in pots, a fantastic way to add a pop of color to your outdoor spaces.
In this blog post, we’re covering everything you’ll need to know to grow these lively, daisy-like blooms successfully in containers.
We’ll explore topics such as selecting the perfect pot, the best Coreopsis varieties for container gardening, and how to care for your Coreopsis from planting to bloom.
Let’s get started and turn your patio into a kaleidoscope of colors with Coreopsis!
Getting to Know Coreopsis (Tickseed)
 Perennial, yellow flowers, 1 - Size Container")
First things first, let’s introduce you to Coreopsis, popularly known as tickseed.
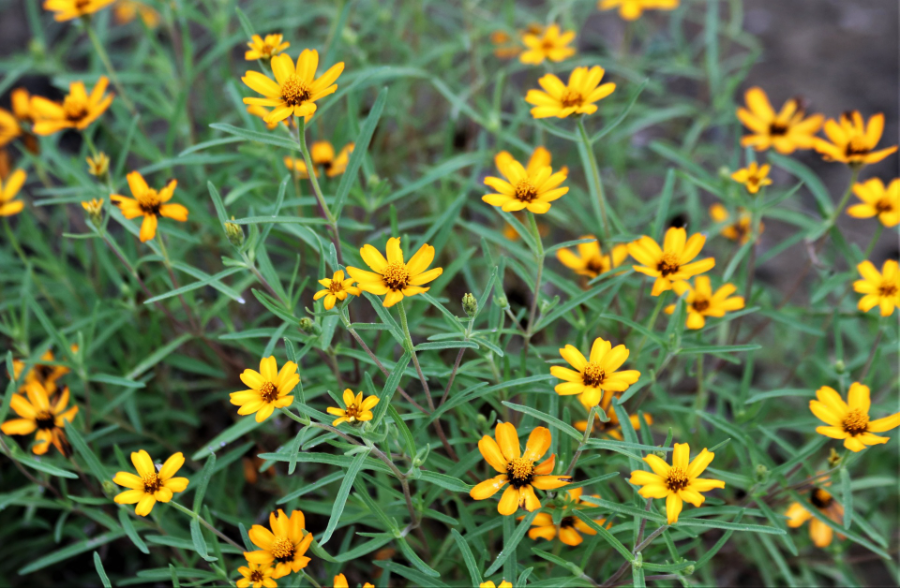
These cheerful perennial plants hail from the daisy family and are native to North and Central America.
Distinguished by their vibrant, daisy-like flowers, Coreopsis offers a delightful mix of colors ranging from golden yellow to pink and bicolor.
They’re quite a sight when in full bloom! One fascinating tidbit is their nickname ‘tickseed.’ The seeds of this plant resemble ticks, hence the unusual name.
Coreopsis are generally a hardy, relatively low-maintenance plant, and their adaptability makes them an excellent choice for novice gardeners or those looking for reliable color in their garden.
 Perennial, yellow flowers, 1 - Size Container")
Coreopsis Plant Care Reference Guide
| Characteristic | Details |
|---|---|
| Common Name | Coreopsis (Tickseed) |
| Botanical Name | Coreopsis spp. |
| Native Habitat | North and Central America |
| Plant Type | Perennial or annual (variety dependent) |
| Growth Pattern | Clumping, upright habit |
| Mature Size | 6 inches to 4 feet tall |
| Watering | Moderate; allow top inch of soil to dry between waterings |
| Light/Sun Exposure | Full sun (6+ hours daily) |
| Soil Type | Well-draining; sandy or loamy preferred |
| Soil pH | 6.0 to 7.0 (slightly acidic to neutral) |
| Temperature | Ideal range: 60°F–85°F (15°C–29°C) |
| Humidity | Low to moderate; good air circulation preferred |
| Bloom Time & Flower Color | Late spring to fall; yellow, red, pink, bicolor |
| Potential Problems | Aphids, spider mites, powdery mildew, root rot (from overwatering) |
| Repotting | Every 2–3 years or when rootbound |
| Hardiness Zones (USDA) | Zones 4–9 (variety dependent) |
The Perks of Potting Coreopsis
Now, why should we consider growing Coreopsis in pots? Well, the benefits are numerous!
For starters, container gardening allows for greater control over your plant’s environment.
You can easily manage the soil, water, and light conditions. Got a small space? No worries!
Pots are perfect for balconies, patios, or indoor settings with plenty of sunlight.
Plus, it’s easier to protect your plant from pests or move it to a better spot if the conditions aren’t quite right.
Growing Coreopsis in pots also offers an aesthetic advantage.
Picture yourself sipping your morning coffee or enjoying a sunset, surrounded by pots of blooming Coreopsis, their vivid colors painting stunning scenery. Sounds lovely, right?
Moreover, growing Coreopsis in containers makes it easier to create dynamic garden displays.
You can move the pots around according to your mood or the season.
In a nutshell, potting Coreopsis opens up a world of gardening possibilities, regardless of the size of your garden or your gardening experience.
It’s a fantastic way to bring more beauty, color, and life to your surroundings!
Understanding Coreopsis

Let’s embark on an engaging journey of understanding Coreopsis better, shall we?
Imagine vibrant flowers, resembling miniature suns or colorful stars, dancing lightly in the breeze.
That’s the charming sight of a Coreopsis plant in bloom!
This humble perennial has more to it than meets the eye, making it a favorite amongst both seasoned gardeners and green-thumb newbies.
In this section, we’ll dive deeper into the world of Coreopsis.
Coreopsis, with its bright, daisy-like blossoms, is a dream for those who appreciate sun-kissed, fuss-free perennials.
Hailing from North America, these beauties have a knack for thriving even under less-than-ideal conditions like drought conditions and poor soils.
They bring joy through their lengthy bloom times and aren’t picky about soil quality, making them a delight in almost any setting.
We’ll explore everything from its origin and distinct features to its different varieties, growth habits, and ideal growing conditions.
So, get ready to gain some intriguing insights and fascinating facts about this delightful plant that can add a dash of color and charm to your garden or home.
The Tickseed Nickname

Ah, the intriguing backstory of Coreopsis, also known as Tickseed. So, how did it earn such an unusual common name, you may ask?
The term Tickseed comes from the appearance of the plant’s seeds, which resemble ticks, the tiny critters that gardeners are all too familiar with.
It’s a rather amusing comparison but one that has stuck over the centuries!
The Colorful Array of Coreopsis Varieties
Dive into the kaleidoscope of Coreopsis perennial varieties and prepare to be mesmerized.
They’re an incredibly diverse group, each variety offering a unique blend of color and charm.
From the sunny ‘Moonbeam’ with its pale-yellow flowers, to the vibrant ‘Mercury Rising’, flaunting wine-red blooms, there’s a Coreopsis to match every mood and aesthetic!
Touching the Sky: Coreopsis Growth Height
Ever wondered how tall a Coreopsis plant can grow? Well, you’re in for a surprise!
On average, most Coreopsis plants will grow between 1 to 3 feet tall. However, some varieties can reach up to 4 feet!
It’s quite a sight to behold, especially when the plants are adorned with their stunning flowers, towering elegantly over other foliage in the garden.
There are dwarf varieties of Coreopsis Tinctoria that make a compact plant.
While many coreopsis varieties reach heights of 18 to 24 inches, there are also charming dwarf tickseed forms that stand just 6-12 inches tall.
These petite versions are perfect for creating visual interest in rock gardens, or as delightful borders along paths or walkways.
The Coreopsis Comeback: Blooming Seasons

Now, let’s talk about when you can expect your Coreopsis to come back into bloom.
The majority of Coreopsis plants are perennials, meaning they come back year after year, typically in late spring to early summer.
However, some varieties are known to show off their vibrant blooms all the way into the early fall, gracing your garden with their cheerful presence for a longer duration.
You can almost count on Coreopsis to keep your garden party going!
Coreopsis also makes great cut flowers that can last for up to 2 weeks after being cut.
Choosing Your Coreopsis and Pot

Ready to dive into the wonderful world of Coreopsis? Great! This is where the real fun begins.
Choosing the right Coreopsis variety and the perfect pot for it might seem like a daunting task, but don’t worry, we’ve got your back.
In this section, we’ll go through a delightful journey together, exploring different types of Coreopsis and pairing them with the most suitable pots.
We’ll also share some handy tips and factors to consider when making your choices.
This way, not only will your Coreopsis thrive, but it will also look absolutely stunning in its new pot home.
Let’s set off on this botanical adventure, shall we?
Mindful Selection: Choosing Your Coreopsis Variety
When it comes to choosing your Coreopsis variety for a potted display, think of it as a personal partnership.
It’s about finding a balance that fits your specific conditions and aesthetic preferences perfectly.
Will it be the steadfast perennial variety like Coreopsis verticillata that returns year after year or the vivid and vibrant annual varieties like Coreopsis tinctoria that charm their way into your garden for a season?
Each variety has its unique appeal and growth patterns.
We’ll explore the world of Coreopsis, considering factors such as plant longevity (annual vs. perennial), your climate zone, sunlight requirements, and the kaleidoscope of colors these beauties offer.
Making the Right Pick: Coreopsis Varieties and Their Unique Traits
 Perennial, Size-#1 Container Coreopsis verticillata 'Zagreb', Golden Yellow Flowers")
Choosing the right variety of Coreopsis involves several factors that will have a huge influence on your plant’s growth and your overall gardening experience. Let’s delve deeper:
Plant Longevity: Annuals vs. Perennials – Annual Coreopsis varieties, like the Coreopsis tinctoria, offer a dazzling but brief display, flourishing for a season before they bid farewell.
On the other hand, perennial Coreopsis, such as the Coreopsis verticillata, are loyal companions that come back year after year, bringing consistency and familiarity to your garden.
The native species, Coreopsis grandiflora and Coreopsis verticillata, are winter hardy in USDA plant hardiness zones 4-9.
Climate Compatibility: The beauty of Coreopsis is in its adaptability. Different varieties thrive in different climate zones.
We’ll be looking at the types of Coreopsis that best match your local climate, ensuring your plant has the best chance of flourishing.
Sunlight Requirements: Much like humans, plants need a good balance of light. Coreopsis is a sun-loving plant, but different varieties have varying light requirements.
We’ll go into how much sunlight your chosen variety needs and how to ensure it gets just the right amount.
Color Choices: Lastly, but by no means least, we have color. The world of Coreopsis is a riot of color, from bright yellows and oranges to subtle pinks and whites.
This variety can add a unique touch to your pot, whether you’re after a vibrant burst of color or a more subdued palette.
With all these aspects in mind, you’ll be equipped to make the best choice for your Coreopsis and your garden.
The Perfect Home: Choosing the Right Pot for Your Coreopsis
,Perennial Tickseed")
Selecting the right pot for your Coreopsis is just as essential as picking the plant itself. Here are some specifics to bear in mind when choosing the perfect home for your plant:
Pot Size – Coreopsis are fairly adaptable, but they still appreciate room to grow.
As a general rule, pick a pot that’s at least 12-18 inches in diameter. This should provide enough space for a mature plant and its root system.
Material – Pots come in all sorts of materials, each with its pros and cons. Terra-cotta pots are popular due to their breathability which is beneficial for preventing waterlogging.
However, they can dry out quickly in hot weather. Plastic pots, while less breathable, retain moisture well and are lightweight. So consider your local climate and watering habits when deciding.
Drainage – Coreopsis, like many plants, doesn’t appreciate soggy feet. Be sure your chosen pot has adequate drainage holes to prevent water buildup that can lead to root rot.
If you love a pot that doesn’t have holes, consider adding some yourself or use it as a decorative outer pot with your Coreopsis in a well-draining inner pot.
Weight Considerations – If you plan to move your Coreopsis around to chase the sun, consider a lightweight pot. If your Coreopsis will be standing against strong winds, a heavy pot can provide stability.
Color and Style – Last but not least, don’t forget the aesthetics! Choose a pot that complements your Coreopsis colors and suits your overall garden design.
With these considerations in mind, you’ll be well on your way to choosing a pot that is not only functional but also enhances the natural beauty of your Coreopsis.
How to Plant Coreopsis in Pots
 Perennial, Size-#1 Container Coreopsis verticillata 'Zagreb', Golden Yellow Flowers")
Are you ready for some fun? It’s time to roll up your sleeves and get your hands a little dirty because we’re about to plant some Coreopsis!
In this section, we’ll walk you through every step of the process, from preparing your pot and plant to placing that final pat of soil around the stem.
By the time we’re done, you’ll have all the knowledge you need to give your Coreopsis a fantastic start in its new home.
Whether you’re a seasoned gardener or just getting started, this guide is sure to make the process of planting Coreopsis in pots a breeze.
So, grab your tools, and let’s dig in, shall we?
The Journey Begins: Planting Coreopsis in Pots

You’re about to embark on a fascinating journey that will transform your living space. Here’s how you do it:
• Start by ensuring your pot has excellent drainage; Coreopsis doesn’t like soggy feet.
• Fill the pot partially with a well-draining potting mix. A blend of coco coir and perlite works wonders.
• Carefully take your Coreopsis out of its nursery pot, taking care to minimize root damage.
• Position the plant in the center of your pot. The top of its root ball should be level with the soil surface.
• Backfill the pot with more of your potting mix until the root ball is covered.
• Pat the soil down gently but firmly and water the plant thoroughly.
The Soil Duo: Coco Coir and Perlite
The right soil blend can make all the difference.
Coco coir provides excellent water retention, ensuring your Coreopsis has a consistent supply of moisture.
Perlite, on the other hand, enhances aeration, helping the roots breathe and preventing waterlogging.
The Buddies: Choosing Companion Plants
Companion planting can maximize the health and beauty of your Coreopsis.
Companions should have similar light and watering requirements and ideally contribute something beneficial.
For Coreopsis, consider low-growing plants that can act as a living mulch, maintaining soil moisture and temperature while adding an extra layer of visual interest.
Varieties of sedum or creeping thyme could make excellent companions.
Coreopsis Care Guide
 Perennial, Size-#1 Container Coreopsis verticillata 'Zagreb', Golden Yellow Flowers")
Ah, now we’ve reached the really fun part! After you’ve planted your Coreopsis in pots, it’s time to nurture these babies.
This section will serve as your practical guide to the day-to-day care of your new garden members, making sure they stay healthy and happy.
We’ll touch on all the essentials, from watering and feeding to how much sunlight your Coreopsis need, and how to keep them pest-free.
Let’s transform you into a genuine Coreopsis whisperer!
Basking in the Sunlight: Coreopsis Sunlight Needs
Did you know that Coreopsis absolutely loves sunlight? Indeed, they are sun-loving beauties!
Generally, they thrive best with full sun exposure of at least six hours a day.
But don’t worry, they can also tolerate partial shade, especially in warmer climates. Let’s give our Coreopsis a golden tan, shall we?
Quenching Their Thirst: Watering Your Coreopsis
The Goldilocks rule applies here: not too much, not too little, but just right.
While Coreopsis are drought-tolerant, they still need regular watering, especially during the first year.
We’ll talk about how to find that sweet spot in watering that promotes healthy growth without causing root rot.
The Perfect Home: Coreopsis Soil Requirements

Good drainage is the key here. Your Coreopsis will love well-drained soil, ideally with a slightly acidic to neutral pH.
We’ll discuss how you can mix and match soil components, and even touch on the importance of soil amendments.
Food for Blooms: Fertilizing Coreopsis in Pots
A well-fed Coreopsis is a happy Coreopsis! These plants aren’t heavy feeders, but an occasional snack can help.
We’ll dive into the best types of fertilizer for your Coreopsis and when and how often to apply them to boost their vibrancy.
Grooming your Stars: Pruning and Deadheading Coreopsis
Pruning and deadheading not only keep your Coreopsis looking tidy but also encourage more blooming.
Let’s learn the art of snipping and deadheading to keep our Coreopsis pots continuously bursting with color.
Defense Tactics: Dealing with Common Pests and Diseases
Unfortunately, pests and diseases can sometimes crash the party. But don’t fret!
We’ll discuss how to identify common issues, such as mildew or aphids, and arm you with practical, organic solutions to keep your Coreopsis healthy and pest-free.
Basking in the Sunlight: Coreopsis Sunlight Needs
To have the best blooming results, place your Coreopsis pot in a location that receives at least six hours of sunlight daily.
Full sunlight enhances the vibrant colors of the blooms and encourages more robust growth.
However, in areas with intense summer heat, some afternoon shade could be beneficial to prevent the plants from wilting or getting sunburned.
Quenching Their Thirst: Watering Your Coreopsis
While Coreopsis is relatively drought-resistant once established, it is crucial to maintain consistent watering during the first year of growth.
The rule of thumb is to water the plants deeply, ensuring the water penetrates the roots but allowing the soil to dry out a bit between watering sessions.
Overwatering or waterlogged soil can lead to root rot, a condition detrimental to Coreopsis.
The Perfect Home: Coreopsis Soil Requirements
Coreopsis prefers well-drained soil to prevent waterlogged roots. You can achieve this by using a good-quality potting mix and adding some organic matter, like compost, to improve the soil structure.
If your soil is clayey or heavy, consider adding coarse sand or fine gravel to enhance drainage.
A pH of around 6.0 – 7.0 is ideal for these plants.
Food for Blooms: Fertilizing Coreopsis in Pots
While Coreopsis is not a heavy feeder, it can benefit from a light application of balanced slow-release granular fertilizer in the spring.
Too much fertilizer can lead to lush foliage at the expense of blooms, so moderation is key.
An organic compost top dressing in the fall can also help replenish nutrients and boost the overall health of your Coreopsis.
Grooming your Stars: Pruning and Deadheading Coreopsis
Regular pruning and deadheading of spent flowers can prolong the blooming period of your Coreopsis and keep the plant looking tidy.
Deadheading, or the process of removing faded flowers, prevents the plant from wasting energy on seed production and stimulates new growth.
In late fall or early spring, consider cutting back the entire plant by about one-third to one-half to encourage bushier growth.
Defense Tactics: Dealing with Common Pests and Diseases

Like most plants, Coreopsis can be susceptible to certain pests and diseases.
Aphids, spider mites, and powdery mildew are among the common issues you may encounter.
Regularly inspect your plants, especially under the leaves, for signs of these pests.
For mild infestations, a strong stream of water can knock off pests, while organic pesticides or insecticidal soap can be used for more serious issues.
Encouraging beneficial insects, like ladybugs and lacewings, can also help naturally control pest populations.
If you notice any diseased or infested plant parts, remove them promptly to prevent the problem from spreading.
Regular watering, proper spacing, and good air circulation can help prevent fungal diseases like powdery mildew.
Coreopsis Spiller-Thriller-Filler Container Combination

Coreopsis, with its vibrant, daisy-like blooms, steps into the spotlight in the ‘thriller’ role of the ‘spiller-thriller-filler’ container ensemble.
The taller varieties of Coreopsis captivating flowers add height and become an appealing central point in your pot display.
Now, imagine combining this with the cascading beauty of ‘spiller’ plants like trailing Lobelia or Ivy, adding an element of softness and a delicate texture as they tumble down the sides of the pot.
As for ‘fillers’, compact plants like Heuchera or sweet Alyssum are a fine choice and perfectly complement and fill out the arrangement, providing a dense splash of foliage or bloom.
Together, these elements create a dynamic, visually intriguing pot display!
Coreopsis Winter Care
So, you’ve mastered the art of caring for your Coreopsis during the blooming season, but what about when the winter months come knocking?
Chill out, we’ve got you covered. In this section, we’ll walk you through the essentials of winter care for Coreopsis in pots, from preparing your plants for the colder months to the best ways to protect them from freezing temperatures.
By following these steps, you can ensure your Coreopsis will spring back to life once the cold retreats!
Getting Your Coreopsis Winter-Ready: Preparation Steps
Don’t be caught off guard when the first frost arrives.
Preparing your Coreopsis for the winter season is all about timing and a little TLC.
Start by gradually reducing watering as the days get shorter and temperatures dip.
This helps harden off your plants and prepares them for the drier conditions of winter.
Coreopsis in outdoor pots can lose 2 zones of hardiness so take precautions and consider moving them to a more protected area like a garage.
Secondly, apply a light layer of mulch around the base of your Coreopsis.
This helps insulate the roots and protect them from sudden temperature changes.
Lastly, if your Coreopsis is a perennial type, you might need to do some light pruning.
Trim back the foliage to about a third of its height. This might seem drastic, but it’s a good way to focus the plant’s energy on its roots, getting it ready for the big sleep!
Winter Survival Guide for Coreopsis: Staying Strong in the Cold
 - 3 Inch Root Young Plant Ready for Planting | Hardy & Long Blooming Perennial - Easy to Grow (1 Pack)")
So, you’ve prepared your Coreopsis for the winter. Now what? Helping your Coreopsis survive the winter is about consistent care and vigilance.
First, find a location that offers some protection against harsh winter conditions.
An unheated garage or a covered porch can do the trick, but make sure your Coreopsis still gets some light.
Continue watering your plant sparingly throughout the winter, just enough to keep the soil from drying out completely.
Keep a watchful eye for pests or diseases, as stressed plants can become susceptible.
And remember, winter care doesn’t end when the snow melts. As spring approaches, slowly reintroduce your Coreopsis to outdoor conditions, taking care not to expose it to sudden cold snaps.
It’s a delicate dance, but with these tips, your Coreopsis will be ready to burst into spring blooms when the time comes.
Propagating Coreopsis
 - 3 Inch Root Young Plant Ready for Planting | Hardy & Long Blooming Perennial - Easy to Grow (1 Pack)")
Time for the fun part of propagation. In this section, we’re going to explore how you can multiply your Coreopsis collection.
Propagation may sound like a complex process but with Coreopsis, it’s as exciting as it is rewarding.
Be it through division, stem cuttings, or even seeds, there are several ways to ensure that your little Coreopsis family continues to grow.
We’re not just talking about creating new plants; it’s about nurturing life and witnessing the birth of a new generation right in your pots.
Are you ready to play nature’s accomplice? Stick with us and we’ll guide you through this delightful journey of propagating Coreopsis.
Propagating Coreopsis from Seeds: Sprouting New Life
 Single Package of 1,000 Seeds Heirloom Wildflowers")
Starting Coreopsis from seeds can be an engaging and rewarding process.
If you’ve got patience and a knack for playing with the miracle of life, this method will fit you like a glove.
• Purchase quality Coreopsis seeds from a trusted supplier.
• Start indoors for a head start on the growing season. In late winter or early spring, sow the seeds in a seed tray filled with a quality seed-starting mix.
• Sprinkle the seeds over the soil’s surface, then lightly cover them with additional soil. Coreopsis seeds need light to germinate, so don’t bury them deep.
• Maintain even moisture, but avoid soggy conditions.
• Place the tray in a warm, well-lit spot. Seedlings should emerge within 2 to 3 weeks.
• Once seedlings develop two sets of true leaves, they can be transplanted into individual pots.
Propagating Coreopsis by Division: Doubling Down on Beauty
 Single Package of 1,000 Seeds Heirloom Wildflowers")
Dividing Coreopsis is a quicker way to increase your collection. Plus, it’s a great way to rejuvenate an older, overcrowded plant.
• Choose a mature, healthy Coreopsis plant that’s at least two years old. Early spring or late summer is the best time to do this.
• Gently remove the plant from its pot, preserving as much of the root system as possible.
• Using a clean, sharp knife, divide the plant into sections, ensuring each section has healthy roots and at least one growth point.
• Replant each division into its own pot filled with a high-quality potting mix.
Propagating Coreopsis from Stem Cuttings:
Propagating from stem cuttings can be a bit tricky, but it’s a fantastic way to clone your favorite Coreopsis variety.
• In early summer, choose a healthy, non-flowering shoot.
• Cut a 4-6 inch long piece, making sure it includes at least one pair of leaves.
• Remove the lower leaves and dip the cut end into rooting hormone (optional but helpful).
• Plant the cutting into a pot filled with a mixture of perlite and peat moss.
• Keep the cutting in a well-lit area but out of direct sunlight. Maintain even moisture until roots develop on the young plants, usually within 2 to 3 weeks.
• Once a healthy root system is established, you can treat the cutting as a mature plant.
Common Problems With Coreopsis in Pots and Their Solutions
")
Let’s dive into some troubleshooting, shall we? Just like every other plant, Coreopsis may encounter a few bumps on the road to vibrant growth.
But don’t fret, these are often easily resolved with a bit of know-how and attention.
This section is all about identifying common issues with Coreopsis in pots and equipping you with practical solutions.
From pests to diseases, we’ve got the remedies to keep your Coreopsis blooming year after year.
So, let’s troubleshoot together and ensure your Coreopsis plants stay happy and healthy!
Battling Yellowing Leaves
First off, let’s tackle the case of the yellowing leaves. This common hiccup may make your Coreopsis look less than stellar, but rest assured, we’ve got this.
The main culprits here are usually overwatering or a nutrient deficiency.
To get to the root of the problem, we’ll delve into the telltale signs of each issue and ways to get your Coreopsis back in the green.
Alright, time to do some plant detective work. Yellow leaves can be a sign of a few things.
Too much water? Possibly. Not enough nutrients? Could be. Let’s figure out what’s up.
Overwatering: Coreopsis plants, while not exactly desert-dwellers, don’t appreciate their roots being constantly wet.
If you’ve been generous with the watering can, you might be drowning your Coreopsis in kindness (and water).
Overwatered Coreopsis may show signs like yellowing leaves, especially if the leaves also feel unusually soft or mushy.
The solution? Let the plant dry out a bit. Check the top inch of soil before you water and only give it a drink if that top inch is dry.
Nutrient Deficiency: If overwatering isn’t the issue, the plant might be lacking some essential nutrients, most commonly nitrogen.
Signs of a nitrogen deficiency include yellowing leaves, usually starting with the older, lower leaves and progressing up the plant.
The remedy? A balanced fertilizer will usually set things right, but make sure not to go overboard. Too much fertilizer can create other problems.
Remember, your Coreopsis is pretty resilient. With some care and attention, it’ll bounce back from these yellow-leaf blues in no time.
Preventing and Healing Sunburned Leaves
Next, we turn our attention to sunburned leaves. Even though Coreopsis adores the sun, they can still get a little too much of a good thing.
So, what to do when your Coreopsis shows signs of sun stress, like whitening or browning leaves?
We’ll share tips for preventive measures and how to nurse your plant back to health if it does get a sunburn.
You might not think that plants can get sunburned, but they can!
Especially when they’re exposed to sudden increases in sunlight, which can cause damage to their delicate leaves.
When Coreopsis leaves get too much sun, they can become discolored, often showing patches of white or pale yellow, or even crispy brown spots.
But don’t worry, we have some helpful strategies to prevent this from happening and ways to help your sunburned Coreopsis bounce back.
Prevention is Key: The best way to avoid sunburn is to gradually increase your Coreopsis’s exposure to sunlight, especially if it’s been in a shaded location.
This process, known as ‘hardening off’, allows the plant to adapt to the brighter conditions and protect itself from potential sunburn.
If you’re growing Coreopsis in pots, the flexibility of being able to move your pots around can be a lifesaver during the height of summer when the sun is most intense.
After Sun Care: If your Coreopsis has suffered a bit of a sunburn, the first step is to get it out of the sun and into a shaded area.
This will prevent further damage while the plant recovers. If the sunburn is extensive, you may need to trim away the worst-affected parts of the plant.
This will allow the plant to focus its energy on new, healthy growth instead of trying to repair damaged tissues.
In the future, if you expect a hot, sunny day, consider moving your potted Coreopsis to a partially shaded area or providing some sort of shade, like a patio umbrella or shade cloth, to protect it from the sun’s harsh rays.
Regular monitoring and proactive sun management can help you keep your Coreopsis happy and sunburn-free!
Addressing Common Pests and Diseases
 - 3 Inch Root Young Plant Ready for Planting | Long Blooming Yellow Flowers, Easy to Grow Perennial (1 Pack)")
Every rose has its thorns, and in the world of gardening, those thorns often take the form of pests and diseases.
While Coreopsis are generally robust and resistant, they’re not immune to all plant troubles.
In this section, we’re going to explore some common problems that might show up on your Coreopsis: aphids, spider mites, and the fungal foe known as powdery mildew.
But don’t worry, we’re not leaving you in the lurch. We’ll also share practical advice on how to combat these issues and keep your Coreopsis in pots thriving.
Knowledge is power, so let’s jump in and arm ourselves with some plant-protecting insights!
Aphids:
Aphids are small sap-sucking insects that can be found on many garden plants.
They’re often found clustered on the new growth of plants. These tiny pests can be of various colors, black, green, yellow, and even pink, and have pear-shaped bodies.
Telltale signs of an aphid infestation include curling or yellowing leaves, stunted growth, and a sticky substance known as honeydew which can lead to sooty mold.
Aphid Treatments: There are several ways to tackle aphids. For mild infestations, you can rinse the plants with a strong spray of water to knock the aphids off.
For heavier infestations, you can use insecticidal soaps or neem oil, which are organic and safe to use.
More severe cases might require systemic insecticides.
Spider Mites:
Spider mites are tiny creatures, related to spiders, that can wreak havoc on plants.
They’re hard to see with the naked eye, but you might notice fine webbing on the plant or yellow, stippled leaves.
If left unchecked, they can cause severe damage and even kill plants.
Spider Mite Treatments: Like aphids, a strong spray of water can remove many mites.
Regularly spraying the plant with water can also help to increase humidity, which deters spider mites.
For more stubborn infestations, consider using miticides or oils like neem oil.
Powdery Mildew:
This is a common fungal disease that appears as a white powdery substance on the leaves and stems of plants.
If left untreated, it can cause the leaves to yellow and curl up, and it can slow down the growth of the plant.
Powdery Mildew Treatments: To manage powdery mildew, prune off affected parts of the plant and dispose of them properly to avoid spreading the spores.
Fungicides, including both store-bought and homemade options, can help control the spread of powdery mildew.
As a preventive measure, ensure good air circulation around your Coreopsis and avoid overhead watering which can create a favorable environment for the fungus.
Baking soda treatment for powdery mildew
Baking soda is a great home remedy for treating powdery mildew on your Coreopsis plants. Here’s a simple step-by-step guide to preparing and using a baking soda spray:
Create Your Mixture: Combine 1 tablespoon of baking soda with a half teaspoon of liquid soap (preferably a mild, organic one) in 1 gallon of water.
Stir thoroughly until the baking soda is completely dissolved.
Pour into a Spray Bottle: Pour the baking soda mixture into a spray bottle. Make sure your spray bottle is clean and hasn’t been used for other chemicals that could harm your plants.
Spray the Plants: Thoroughly spray the affected Coreopsis plants with the baking soda mixture. Make sure you cover the tops and bottoms of the leaves, as the powdery mildew can affect all parts of the plant.
Repeat as Necessary: Repeat the process every week or after rain, as the solution will wash off.
Please remember, this solution works best as a preventative measure and during the early stages of powdery mildew.
If the mildew has progressed significantly, it may be necessary to seek out stronger fungicides or consider removing heavily affected plants to protect others.
And as always, while baking soda is generally safe, it’s wise to test the mixture on a small portion of your plant first to ensure it doesn’t cause any harm.
Remember, early detection is key for any pest or disease issue.
By regularly checking your Coreopsis and acting at the first signs of trouble, you can keep these common problems in check!
Frequently Asked Questions
, Non GMO & Heirloom Seeds, Scientific Name: Coreopsis tinctoria, Great Home Garden Gift")
Ever been mid-way through potting your Coreopsis and wondered about a particular detail?
Or maybe after reading through this comprehensive guide, you still have a couple of lingering questions?
Well, you’re in the right spot. In this section, we’ll tackle some of the most frequently asked questions about growing and caring for Coreopsis in pots.
From knowing when to water to deciphering puzzling changes in your plant, we’ve got you covered! So, let’s dive in and get those queries answered, shall we?
Q: Do coreopsis do well in containers?
A: Absolutely! Coreopsis adapts well to container life. They just need a pot with ample room for their root system, a well-draining soil mix, and regular watering and feeding.
Q: Where is the best place to plant coreopsis?
A: Coreopsis loves sunlight. So, the best place to plant them is where they’ll get at least 6 hours of direct sunlight daily. They’re adaptable and can withstand a variety of soil types, but they prefer well-draining soil.
Q: Does coreopsis come back year after year?
A: Yes, most Coreopsis varieties are perennials, meaning they’ll bloom and add color to your garden year after year. However, you might need to do some winter prep in colder regions to ensure their survival.
Q: Do coreopsis flowers like sun or shade?
A: Coreopsis plants are sun lovers! They thrive in full sun exposure, but they can also tolerate part shade. However, for the best flowering results, a sunny spot is your go-to.
Conclusion
")
Alright, folks, we’ve journeyed through the ins and outs of growing Coreopsis in Pots together.
We’ve dug into everything from the initial choice of variety and pot, the planting process, and nurturing care routines, to tackling any potential issues head-on.
As we wrap up, let’s take a moment to reflect on what we’ve learned, and look forward to the vibrant blooms that await in our own container gardens.
After all, isn’t that the beauty of gardening, watching the fruits (or in this case, flowers) of our labor flourish?
Let’s conclude this fruitful exploration, and get ready to create our own burst of color with Coreopsis!
Summarizing the Joys of Coreopsis in Pots
- Growing Coreopsis in pots is straightforward.
- Use a well-draining potting mix and ensure your container has adequate drainage holes.
- Place the pot in a sunny location, as Coreopsis thrives in full sun.
- Water when the top inch of soil is dry and feed with a balanced fertilizer every 6-8 weeks.
In a nutshell, we’ve come to realize the delight that is growing Coreopsis in pots.
Not only do these bright, cheery plants add a much-needed splash of color to our homes, but they’re also surprisingly easy to care for, thanks to their resilient nature.
Having them in pots adds a level of versatility – move them around, make them the star of your patio, or even keep them indoors for a natural touch of brightness.
Your Turn to Brighten Up Your Space
And now, it’s your turn! I wholeheartedly encourage you to embark on your own Coreopsis adventure.
Whether you’re a seasoned gardener or just getting your hands dirty for the first time, there’s something uniquely satisfying about nurturing these radiant plants.
Don’t be daunted and remember, every green thumb has to start somewhere.
And what better way to start than with Coreopsis in pots? Happy gardening!
Ready to upgrade your backyard? These expert guides will help you grow beauty, food, and function right outside your door.
🌼 Backyard Gardening Guides
- 🏡 Backyard Gardening Ideas (Pillar Guide)
- 🌳 Red Tip Photinia Privacy Hedge
- 🌸 Planting Dahlia Seeds
- 🪴 Best Soil for Dahlias in Pots
- 🫐 Growing Blueberries in Pots
- 🌿 Cold Hardy Tea Plant
- 🧄 Growing Goji Berries in Pots
- 🌱 How to Grow Creeping Thyme
- 🌺 Growing Balloon Flowers from Seed
- 🌼 Growing Penstemon in Pots
- 🐝 Growing Echinacea in Pots
- 🪻 Plant Creeping Phlox
- 🌞 Care for Verbena in Pots
- 🌾 Growing Poppies in Pots
- 🌷 Dahlia Care in Pots
- See all articles in our Backyard Gardening category

 Steve S. is the creator of