
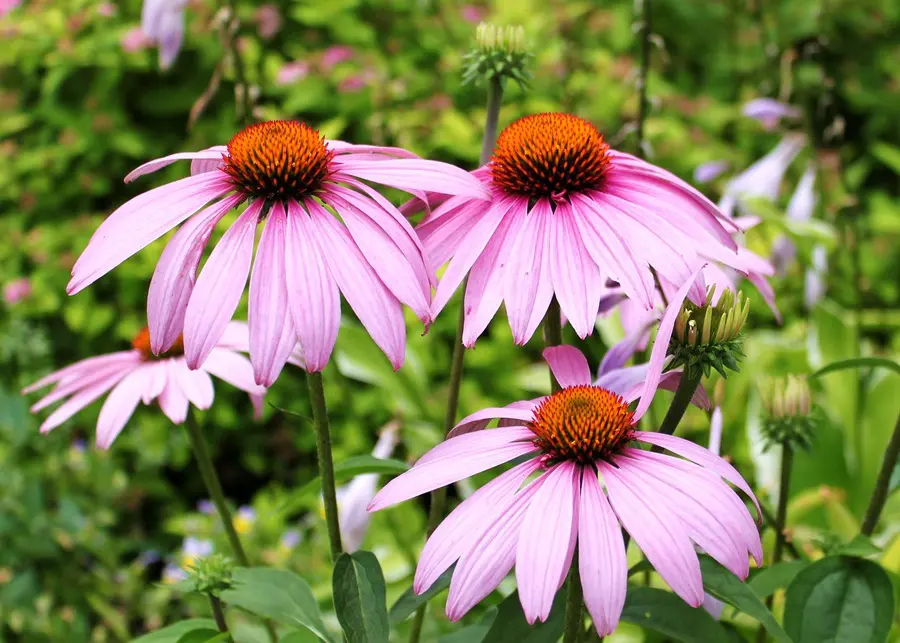
Want cheerful color without a big garden? Growing Echinacea In Pots lets you turn a sunny step, balcony, or patio into a pollinator magnet.
You’ll enjoy bold, long-lasting blooms, easy upkeep, and a container display that looks good from summer through fall.
If you love low-stress gardening with high visual payoff, this one’s for you.
With the right soil, sunlight, and care, you’ll have beautiful, low-maintenance flowers that attract pollinators and add charm to any container garden.
Growing Echinacea In Pots
- Growing Echinacea in pots requires a deep, well-draining container and a mix of coco coir and perlite.
- Place the pot in full sun, water when the top inch of soil dries out, and fertilize sparingly.
- Compact varieties like PowWow Wild Berry and Cleopatra are ideal for container gardening.
Whether you’re a seasoned gardener or a beginner green thumb, let’s dive into Echinacea cultivation and turn your pots into stunning blooms of wellness and beauty.
Introduction: Growing Echinacea In Pots
 Perennial, Size-#1 Container Echinacea p. 'PowWow Berry', Rose-Purple Flowers")
In this guide, we’ll navigate through the origins of this delightful plant, discuss the myriad of varieties you can choose from, and explore the ample benefits that potted Echinacea can bring to your life.
From the perfect pot selection to the intricacies of plant care, we’ll be with you every step of the way.
We’ll tackle common problems and provide handy solutions, and give you tips on harvesting and using your Echinacea.
So, without further ado, let’s embark on this journey together and fill our pots with the magic of Echinacea!
The Tale of Echinacea: A Brief History and Origin
Isn’t it fascinating how the history of a plant can span centuries and continents?
The tale of Echinacea, a popular herbaceous flowering plant, is one such riveting story.
Native to the prairies of North America, Echinacea, also known as coneflowers, caught the eye of early Native Americans.
They cherished it for its medicinal properties, using it to treat a wide array of ailments.
Europeans discovered this ‘prairie jewel’ in the 17th century, and since then, it has become a staple in gardens across the globe.
Now, we can enjoy the beauty and benefits of Echinacea right in our homes.
What Is Echinacea?
 Perennial, Size-#1 Container Echinacea p. 'PowWow Berry', Rose-Purple Flowers")
According to Wikipedia: Echinacea is a genus of herbaceous flowering plants in the daisy family. It has ten species, which are commonly called coneflowers. They are found only in eastern and central North America, where they grow in moist to dry prairies and open wooded areas. They have large, showy heads of composite flowers, blooming in summer.
The generic name is derived from the Greek word ekhinos, meaning sea urchin, due to the spiny central disk. These flowering plants and their parts have different uses. Some species are cultivated in gardens for their showy flowers. Echinacea purpurea is used in traditional medicine. Although commonly sold as a dietary supplement, there is insufficient scientific evidence that Echinacea products are effective or safe for improving health or treating any disease.
Echinacea Plant Care Reference Guide
| Characteristic | Details |
|---|---|
| Common Name | Echinacea / Coneflower |
| Botanical Name | Echinacea spp. |
| Native Habitat | Central and Eastern North America |
| Plant Type | Herbaceous perennial |
| Growth Pattern | Upright, clumping |
| Mature Size | 1 to 4 feet tall, 1 to 2 feet wide |
| Watering | Allow top inch of soil to dry out; water deeply |
| Light/Sun Exposure | Full sun to partial shade |
| Soil Type | Well-draining; coco coir and perlite mix ideal in pots |
| Soil pH | 6.0 to 7.0 (slightly acidic to neutral) |
| Temperature | 65–75°F (18–24°C) optimal |
| Humidity | Low to moderate |
| Bloom Time & Flower Color | Summer to early fall; purple, pink, white, yellow, orange |
| Potential Problems | Aphids, spider mites, powdery mildew, root rot from overwatering |
| Repotting | Every 1–2 years or when rootbound; early spring is best |
| Hardiness Zones (USDA) | Zones 3–9 |
A Blossoming Palette: Different Types of Echinacea Plants
Variety is truly the spice of life, especially when it comes to Echinacea!
This genus is home to nine distinct species, each with its own unique charm.
The most commonly known type is Echinacea purpurea or the purple coneflower.
Yet, there’s a whole spectrum waiting to be explored, from the sunny yellow Echinacea paradoxa to the snowy white Echinacea pallida.
With their large, daisy-like flowers and spiky central cone, all Echinacea varieties can add a dash of natural glamour to your indoor or outdoor garden.
A Pot Full of Benefits: Growing Echinacea in Pots
Cultivating Echinacea in pots? Now that’s an idea filled with potential.
Firstly, it’s a huge space-saver.
Even the smallest apartment can accommodate a pot or two, making it possible for anyone to grow their own Echinacea.
Secondly, the ease of care and maintenance is a significant advantage.
You can move your pots as per sunlight needs, and monitor water and soil conditions closely.
Lastly, let’s not forget the sheer versatility in placement.
Echinacea pots can brighten up a living room, add charm to a balcony, or even serve as a stylish centerpiece on a dining table.
Growing Echinacea in pots is a decision that’s as practical as it is aesthetically pleasing.
Choosing the Right Echinacea Variety for Pot Cultivation
 Perennial, Size-#1 Container Echinacea p. 'PowWow Berry', Rose-Purple Flowers")
Let’s embark on a fun and exciting journey – selecting the right Echinacea variety for your pot cultivation. It’s like matching a pair of shoes to an outfit.
Just as every fashion ensemble needs the perfect footwear, every pot deserves the right plant.
And with the wide range of Echinacea varieties available, the decision can be both exciting and a tad bit overwhelming.
But don’t worry, we’re here to guide you through this process. We’ll cover important factors to consider, including climate, pot size, and your personal aesthetic preference.
Plus, we’ll share recommendations for Echinacea varieties best suited for pot cultivation.
By the end of this section, you’ll be well-equipped to make an informed choice and start your adventure in growing Echinacea in pots. Let’s dive right in!
Factors to consider: climate, coneflower size, aesthetic preference
When choosing the right Echinacea variety for pot cultivation, it’s important to consider a few key factors.
First off, your local climate plays a crucial role. Echinacea plants generally thrive in temperate climates and need plenty of sunlight.
Also, the size of the coneflower is essential to consider, especially if you’re working with limited space.
Larger varieties might not be suitable for small pots and vice versa.
Finally, there’s your aesthetic preference. Are you drawn to the traditional purple coneflowers or do you fancy the more exotic, vibrant varieties?
These considerations will help steer you towards the perfect match for your potted garden.
Recommended varieties for pot cultivation
 Plants – Two (2) Live Plants – Non-GMO - Not Seeds - Each 4\" to 8\" Tall – in 4\" Inch Pots – Hardy Flowering Perennial, Pollinator Favorite")
For pot cultivation, compact varieties of Echinacea are often recommended. PowWow Wild Berry with a height of 2-3 feet and Pow Wow White Coneflower which have a mature height of 2 feet are great choices.
Pow Wow Wild Berry Coneflower
 Perennial, Size-#1 Container Echinacea p. 'PowWow Berry', Rose-Purple Flowers")
Pow Wow White Coneflower
 – Hardy Perennial Coneflower 3-Inch Pot Plant for Summer Blooms | Fragrant Flowers, Deer Resistant & Easy to Grow (1 Pack)")
Echinacea Cleopatra Yellow Compact Short Coneflower
Echinacea Cleopatra is only 16-24 inches tall making it a great choice for pots, garden beds, and small spaces.

Echinacea LAKOTA ‘Santa Fe’ (Coneflower)
This beauty, the Echinacea LAKOTA ‘Santa Fe’ is perfect for pots with a mature size of 12-16 inches high and x 16-18 inches wide.
 Perennial, pink-orange flowers, 1 - Size Container")
Remember, it’s all about what resonates with you – it’s your garden after all!
Preparing for Planting Coneflowers in Pots
Before you jump into the planting process, it’s important to prepare.
This step includes acquiring your chosen Echinacea seeds or plants, finding a suitable location with ample sunlight, and ensuring you have all the necessary supplies on hand.
Choosing the right pot for coneflowers
When it comes to pots, size and material matter. An ideal pot for coneflowers should be at least 12-18 inches in diameter with good drainage.
Ceramic or terracotta pots are great choices as they allow the roots to breathe and prevent waterlogging.
Preparing the potting mix of coco coir and perlite
The last step before planting is to prepare your potting mix. A blend of coco coir and perlite is a fantastic option.
Coco coir is a peat moss alternative that retains moisture well, while perlite improves aeration and drainage.
This combination will give your coneflowers the right balance of water and air, setting them up for success.
Detailed Guide to Growing Echinacea from Seed in Pots
 Perennial, mulit color, 1 - Size Container")
Alright, now that we’ve chosen our Echinacea variety and prepared all the essentials, it’s time to get our hands dirty and delve into the heart of the matter, growing Echinacea from seed in pots!
I assure you, the process is both fun and rewarding.
It doesn’t matter if you’re an experienced gardener or just starting your green-thumb journey, this guide will break down each step, making it simple and easy to follow.
From the initial planting process to caring for your blooming Echinacea, we’ll cover it all. So, let’s jump in and start sowing!
Step-by-step planting process: How to Grow Echinacea from Seed Indoors
We’re kicking off our planting journey with the first exciting step – sowing the seeds.
Planting Echinacea indoors is a great way to get a head start on the growing season, especially if you live in a colder climate.
Here’s your friendly guide on how to do it:
• Begin by filling your pots with a quality potting mix. Remember our recommended coco coir and perlite combo.
• Place 2-3 Echinacea seeds on the surface of the soil, lightly pressing them in.
• These seeds love some light to germinate, so no need to bury them too deep.
• Water the seeds gently. You don’t want to flood them out, just keep the soil evenly moist.
• Place your pot in a warm, bright location. A sunny window is usually an ideal spot.
• Patience is key! In 10-20 days, you should see the first signs of your little Echinacea seedlings.
Stratifying Echinacea seeds
Stratifying Echinacea seeds is a process that mimics the natural conditions these seeds would experience in the wild, enhancing their chances of successful germination.
In nature, Echinacea seeds go through a cold winter period before the warmth of spring triggers their sprouting.
When you stratify Echinacea seeds, you’re essentially recreating this cycle.
Here’s how:
• Begin by soaking the seeds for about 24 hours in warm water.
• After this soak, drain the seeds and place them in a zip-top bag with moist sand or a moist paper towel.
• Seal the bag and pop it into your refrigerator for about 30 days.
• Remember to keep an eye on the moisture level in the bag. You want it damp, not waterlogged.
• After the cold treatment, your seeds are ready to plant!
This extra step may require a bit of patience, but the higher germination rates are well worth the effort, helping your potted Echinacea garden flourish.
Ideal planting time for echinacea seeds
Timing is everything, right? When it comes to sowing Echinacea seeds, late winter to early spring is typically the best time.
This way, by the time the warmer months roll around, your seedlings will be ready for the great outdoors!
Caring for Potted Echinacea
Let’s discuss the TLC your potted Echinacea needs.
Regular watering, monitoring sunlight exposure, and occasional pruning are all part of the deal.
But don’t worry, Echinacea are quite forgiving plants, making them perfect for any skill level.
Watering requirements
When it comes to hydration, Echinacea likes a drink, but not a soaking!
Water your plants deeply, then allow the top inch of the soil to dry out before watering again.
This will keep them happy and prevent issues like root rot.
Sunlight and temperature needs
Sun lovers at heart, Echinacea thrive in full sun. They can handle partial shade, but the more light they get, the more blooms they’ll produce.
As for temperature, Echinacea are pretty hardy, but they appreciate temperatures between 65 and 75 degrees Fahrenheit for optimal growth.
Pruning and maintenance tips: Do Coneflowers Come Back Every Year?
Absolutely! Echinacea are perennial plants, meaning they’ll grace your garden with their presence year after year.
When it comes to maintenance, remove spent flowers to encourage new blooms.
At the end of the growing season, you can cut back the plants, leaving about 2 inches above the ground.
But don’t worry if you forget – they’re sturdy plants and will bounce back beautifully next spring!
Repotting Echinacea: A Step-by-Step Guide
 Perennial, pink-orange flowers, 1 - Size Container")
The art of repotting Echinacea doesn’t just mean swapping out an old pot for a new one.
It’s a chance to breathe new life into your beloved perennial, to ensure it has the optimal environment for robust growth.
This guide will provide you with a step-by-step approach to repotting Echinacea, using the excellent potting mix of coco coir and perlite.
By following these steps, you’re on the path to not just keeping your Echinacea alive, but truly allowing it to thrive.
Step 1: Choosing the Right Time
The ideal time to repot Echinacea is in the early spring, just before the new growth season begins.
However, any time between late spring and early summer can also work well.
Step 2: Prepare Your Potting Mix
Create a fast-draining potting mix using two parts coco coir and one part perlite.
This combination will retain enough moisture for the Echinacea’s needs without risking waterlogged roots.
Step 3: Selecting a Suitable Pot
Choose a larger container, at least 2 inches bigger in diameter than the current one, to allow for growth.
The pot should be deep enough to accommodate the long taproots of Echinacea and have adequate drainage holes.
Step 4: Removing the Echinacea from its Current Pot
Gently remove the Echinacea from its current pot, ensuring minimal damage to the fibrous root system.
You can achieve this by turning the pot sideways and easing the plant out.
Step 5: Placing the Echinacea in the New Pot
Place enough of your coco coir and perlite mix into the new pot so that the top of the root ball will sit at the same level as the rim of the pot.
Then, position your Echinacea plant in the center of the pot.
Step 6: Filling the Pot
Fill the remainder of the pot with the coco coir and perlite mix, ensuring that the top of the root ball is level with the soil surface.
Pat down the mix lightly around the base of the plant to remove any air pockets.
Step 7: Aftercare
Water your newly repotted Echinacea thoroughly, letting the excess water drain away.
Place it in a sunny spot and monitor the moisture level of the soil over the next few days, watering as needed.
By following these steps, you’re on your way to a flourishing Echinacea plant ready for a summer full of beautiful flowers.
Remember, patience is key. It may take a bit of time for your plant to adjust to its new pot, but with proper care, it will thrive.
Enjoy your journey in growing this hardy and stunning plant!
Troubleshooting Common Problems Growing Echinacea
 Perennial, pink flowers, 1 - Size Container")
There’s a certain joy that comes with watching your Echinacea sprout and grow, filling your pot with a vibrant display of color.
But let’s face it, even the most experienced gardeners encounter a hiccup or two along the way.
It’s all part of the gardening journey! In this section, we’ll dive into some of the most common issues you might come across while growing Echinacea in pots.
From diseases and pests to other potential problems like root rot or wilting, we’re here to equip you with the knowledge to diagnose and resolve these issues.
So, don’t stress! With a little troubleshooting, your Echinacea will be back to their blooming best in no time.
Identifying and Treating Common Diseases and Pests
While Echinacea plants are generally sturdy and resilient, they can occasionally fall prey to diseases and pests, particularly when growing conditions are not ideal.
Aphids, for instance, are small insects that may infest your plant, causing curling and yellowing leaves.
Luckily, they can be controlled easily using insecticidal soap or a strong blast of water.
Spider mites can be a nuisance for Echinacea plants, as these tiny pests feed on plant juices, causing the leaves to turn yellow, brown, or spotted.
You might also notice a fine, silk-like webbing on the plant. If left untreated, spider mites can lead to significant plant damage, or even death.
To control spider mites, the first step is to increase humidity around your plant as these pests thrive in dry conditions.
You can do this by regularly misting your Echinacea or placing a tray of water near your plant.
For a more direct approach, use a strong spray of water to knock the mites off the plant.
If the infestation persists, you can resort to using insecticidal soap, neem oil, or a plant-safe miticide.
It’s also beneficial to introduce natural predators, like ladybugs or predatory mites, if the plant is outdoors.
As always, preventive care, such as proper watering and regular check-ups, is the best way to keep your Echinacea healthy and pest-free.
Another common issue is Powdery Mildew, a fungus that manifests as a white, powdery substance on the leaves.
This typically happens due to poor air circulation or damp conditions. If you spot Powdery Mildew, remove the affected leaves and ensure your plant has ample airflow.
A fungicide can also be used in severe cases.
Addressing Other Potential Issues: Root Rot and Wilting
Root rot and wilting are common problems that arise due to improper watering.
Root rot often happens when the plant is waterlogged, causing the roots to become deprived of oxygen and decay.
The first sign is usually yellow, wilting leaves. To avoid root rot, ensure your pot has good drainage and don’t overwater.
If root rot has set in, you’ll need to remove the plant from the pot, trim off the affected roots, and repot in fresh soil.
Wilting, on the other hand, can be a sign of either overwatering or underwatering. If your Echinacea is wilting despite regular watering, check the root system.
Dry, brittle roots could indicate underwatering, while mushy, decaying roots suggest overwatering.
Adjust your watering schedule accordingly, and your Echinacea should perk up soon.
Uses of Echinacea
 Perennial, white flowers, 1 - Size Container")
Embrace the versatility of Echinacea! It’s not just a pretty face in your garden.
This resilient plant has a wealth of uses, from medicinal applications to decorative purposes.
In this section, we’ll dive deep into the various roles Echinacea can play in your life, beyond being a vibrant addition to your pot garden.
Let’s explore the magic of Echinacea together and discover how this fantastic plant can benefit your health, boost your garden’s appeal, and even provide some handy gardening tips.
Ready to unlock the potential of your potted Echinacea? Let’s go!
Medicinal Uses of Echinacea
Echinacea, often found in the aisles of health stores, has a long history of medicinal use.
One of its popular forms is Echinacea tea, lauded for its potential health benefits.
As a general disclaimer, remember that while Echinacea is considered beneficial for certain conditions, you should always consult with a healthcare professional before starting any new treatment.
The plant is traditionally known for its immune-boosting properties and is commonly used as an aid to combat the common cold.
Echinacea tea, specifically, is a soothing way to potentially harness these benefits.
Ornamental Uses of Echinacea
Next, let’s turn to the vibrant charm of Echinacea. As an ornamental plant, Echinacea really steals the show.
Its coneflowers, with their stunning, vibrant petals, and the crown-like center, can transform any space into a mini botanical paradise.
They come in a rainbow of colors, from the classic purple to fiery orange and sunny yellow, adding an artist’s palette to your garden.
Additionally, their height, ranging from a compact 1 foot to a striking 4 feet, can be used to create a visually captivating multi-layered effect in your pot garden.
Additional Tips for Success in Growing Echinacea from Seed Indoors
Growing Echinacea from seed indoors can seem like a daunting task, but with a few additional tips, you’ll be seeing sprouts in no time!
First, patience is key. Echinacea seeds can take a little while to germinate, so don’t worry if you don’t see green shoots popping up immediately.
Second, remember that Echinacea seeds need a bit of a chill before they’re ready to grow.
This is known as stratification, a simple process involving storing your seeds in a fridge for a few weeks before planting.
Finally, once your seedlings have emerged, make sure they get plenty of light.
A sunny windowsill is a great spot. And, in time, you might just be able to brew your own Echinacea tea from the flowers you’ve grown!
Follow these tips, and your seed-to-plant journey will be a breeze!
Harvesting, Usage, and Additional Tips
 Perennial, pink & green flowers, 1 - Size Container")
Imagine the satisfaction of seeing the vibrant petals of your Echinacea bloom right there in your pot, and the joy of knowing you’ve reached the harvesting stage.
Well, we’re here to guide you through this rewarding process!
This section will give you the ins and outs of harvesting your Echinacea, optimal timing, and methods to ensure you get the most from your plant.
We’ll also delve into some fantastic ways you can utilize your Echinacea, be it for medicinal purposes or as a delightful addition to your home decor.
And, of course, we have a few extra tips to share to make your Echinacea growing journey even more successful. So let’s dive right into it!
Harvesting Echinacea: When and How
As the proud cultivator of your Echinacea, you’ll want to reap the rewards at just the right time.
Your Echinacea will generally be ready to harvest when the flowers are fully open, typically in late summer.
Don’t be hasty – wait for the morning dew to dry, and then snip the stems about an inch below the flower heads.
Keep in mind that leaving some flowers can invite beneficial pollinators and potentially provide you with seeds for future planting.
Storing and Preserving Echinacea
So, you’ve harvested your Echinacea, but how do you ensure its freshness over time?
Air drying is a simple and effective method. Hang the cut stems upside down in a dark, well-ventilated area.
Once dry, you can store the petals and seeds in airtight jars, away from heat and light.
Remember, correctly stored Echinacea can last up to a year, making it perfect for winter teas or as a garnish in your favorite recipes.
Using Echinacea In Spiller, Thriller, Filler Arrangements
 Perennial, pink-orange flowers, 1 - Size Container")
Are you dreaming of creating that perfect potted display? You know, the kind that stops people in their tracks and becomes the talk of the neighborhood.
If so, let’s dive into the world of ‘Spiller, Thriller, Filler’ arrangements, starring our favorite: Echinacea.
This technique involves choosing three different types of plants to create a balanced and beautiful pot.
Let’s see how Echinacea, with its impressive coneflowers, can play the lead role in such an arrangement.
Thriller: Echinacea
The ‘thriller’ is your focal point, the plant that provides the height and drama.
Echinacea fits this bill perfectly with its tall stems and vibrant flowers. Go for an eye-catching variety like Echinacea purpurea or ‘PowWow Wild Berry’ with its hot pink flowers for a show-stopping display.
Filler: Sedum ‘Autumn Joy’
‘Fillers’ are the plants that surround the ‘thriller’, adding body and texture to the arrangement.
Consider Sedum ‘Autumn Joy’. This succulent has a dense, mounded habit and fleshy, light green leaves, which contrast beautifully with Echinacea’s tall, slender shape and dark green foliage.
In the fall, its leaves turn a rich bronze, matching the fading Echinacea blooms and ensuring your pot stays colourful throughout the season.
Spiller: Ivy (Hedera helix)
Finally, the ‘spiller’ is a trailing plant that cascades over the edge of the pot, softening the arrangement’s overall look and adding a touch of elegance.
Ivy (Hedera helix) is a classic choice. Its delicate, trailing vines and small, lobed leaves will spill beautifully over your pot’s edge, providing a lovely contrast to Echinacea’s bold flowers and Sedum’s chunky texture.
By selecting these three plant types with thought and care, you’ll create a pot arrangement that’s not only balanced and beautiful but also has plenty of visual interest throughout the year. Happy planting!
Winter Care for Potted Echinacea: Overwintering Echinacea in Pots
There’s a slight chill in the air and a crunch of leaves underfoot – yes, winter is on its way!
And as much as we love cozying up by the fire with a hot cup of cocoa, we know our outdoor friends, the plants, have a different relationship with the colder months.
One such plant that deserves our special attention is Echinacea.
Now, you might be wondering, How do I prepare my potted Echinacea for winter?
Well, sit back, as we’re about to unravel the mysteries of overwintering Echinacea in pots.
From temperature considerations to watering adjustments and even a little cozy protection, we’ll cover everything you need to know to ensure your potted Echinacea braves the winter and bounces back in full glory come spring.
Winter Care for Potted Coneflowers: How to Protect Your Plants
Winter can be a challenging time for many garden plants, and coneflowers are no exception.
While they’re known for their hardiness, taking a few extra steps to protect your potted coneflowers during the cold months can ensure their survival and vibrant return in the spring.
Location matters: First off, consider moving your potted coneflowers to a more sheltered location.
This could be against a south-facing wall that absorbs heat during the day and releases it at night, providing a slightly warmer microclimate.
Mulching: A light mulch can serve as an insulating blanket, protecting the root system from freezing temperatures.
Straw, leaf mold, or pine needles work well. Just be sure to remove the mulch in early spring to prevent rot as temperatures rise.
Avoiding excess moisture: One common winter threat to coneflowers is waterlogged soil which can lead to root rot.
Ensure your pots have proper drainage and avoid the temptation to overwater.
Wrap it up: For extremely cold climates, consider wrapping your pots in burlap or bubble wrap.
This provides an extra layer of insulation against freezing temperatures.
Coneflowers and Space: Do Coneflowers Spread in Pots?
When we talk about plants spreading, it typically refers to how they grow in the ground.
But what about in pots? Coneflowers, or Echinacea, are generally well-behaved in pots. They won’t send out runners or become invasive like some plants can.
However, coneflowers are known for their deep and robust root systems.
Over time, your coneflower will continue to grow and develop within its pot. You might notice the plant becoming more dense and producing more stems from the base.
What this means for you as a pot gardener is that your coneflower will need a bit more room to spread its roots compared to some other potted plants.
So when choosing a pot, opt for something a little larger than you might think necessary.
This will allow your coneflower the space it needs to flourish. And remember, as your plant matures, it might be necessary to upgrade its pot size to ensure continued healthy growth.
Propagation tips for Echinacea: Growing Echinacea from Seed
![Greenwood Nursery/Live Perennial Plants - Magnus Coneflower + Echinacea Purpurea - [Qty: 1x Pint Pot] - (Click for More Options/Quantities)](https://m.media-amazon.com/images/I/41DZ+UF0Q-L._SL500_.jpg "Greenwood Nursery/Live Perennial Plants - Magnus Coneflower + Echinacea Purpurea - [Qty: 1x Pint Pot] - (Click for More Options/Quantities)")
Introduction to Propagation of Echinacea
One of the best parts about gardening is the magic of propagation, and when it comes to echinacea, propagation from seed is a rewarding process.
Whether you’ve been gifted a handful of seeds or collected your own from an existing plant, these little treasures can be transformed into a thriving pot of vibrant echinacea blooms with just a little patience and know-how.
So, if you’re curious about growing echinacea from seed, you’re in the right place! Here is a step-by-step guide for propagating echinacea:
Seed Collection and Preparation
Seed collection: If you’re collecting seeds from an existing echinacea plant, the best time to do so is in late summer to early fall, after the flowers have faded and the cone-like centers have dried out.
You’ll want to carefully remove the entire seed head and let it dry out a bit more in a cool, dry place.

You can buy Echinacea seeds on Amazon
Stratification: Echinacea seeds benefit from a process called stratification.
This involves simulating a winter-like cold period which helps to break the seed’s dormancy and improve germination.
You can stratify echinacea seeds by placing them in a sealed plastic bag with moistened sand or a paper towel and then storing them in the refrigerator for about 2-3 weeks.
Planting Echinacea Seeds
• Preparation of the potting mix: Start by preparing your potting mix of coco coir and perlite, ensuring it’s well-draining to provide the best results for your echinacea seeds.
• Planting the seeds: After stratification, sow the seeds on top of your potting mix. Don’t bury them deep into the soil; they need light to germinate.
• Germination: Place the pots in a sunny spot and keep the soil moist. Patience is key here – echinacea seeds can take anywhere from 10 to 30 days to germinate.
Care of New Echinacea Plants
• Watering and sunlight: Newly germinated echinacea seedlings will need regular watering but ensure you’re not overwatering to prevent root rot.
The seedlings will also need plenty of sunlight – about 6-8 hours a day is ideal.
• Transplanting: When your echinacea seedlings have developed their second set of true leaves, they’re ready to be transplanted into larger containers.
This is also a good time to start introducing them to the great outdoors, starting with a few hours each day in a sheltered location.
• Maturing: Echinacea plants are generally low-maintenance. They’ll continue to grow and mature over the next year, eventually producing the beautiful flowers they’re known for.
Remember, propagation is a journey, and each plant can have its own timeline.
Enjoy the process and the unique experience each seedling brings to your gardening adventure.
Dividing Echinacea Plants

As your echinacea plants mature and grow over the years, there will come a time when they may benefit from being divided.
This process helps to rejuvenate older plants, manage their size and also provide you with additional plants for other parts of your garden or to share with friends.
Here’s a simple step-by-step guide on how to go about dividing your echinacea plants:
When to Divide
Ideal Time: Dividing echinacea is best done in early spring or late autumn when the plant is in its dormant phase.
During this period, the plant’s energy is focused on the root system, which makes it the perfect time for division.
How to Divide
Prepare the new location or pot: Before you begin, prepare the new location or pot where you’ll be transplanting the divisions.
If you’re using a pot, ensure it’s filled with a well-draining mix of coco coir and perlite.
Remove the plant from the ground or pot: Gently remove the echinacea plant from its location.
If it’s in the ground, use a shovel to carefully dig around the plant, taking as much of the root system with you as you can.
Divide the plant: Once the plant is out of the ground, you’ll be able to see the clumps of echinacea.
Using a sharp and clean knife or a pair of garden shears, divide the plant into smaller sections, ensuring that each division has a good amount of roots and a few shoots attached.
Replant the divisions: Immediately replant the echinacea divisions in the prepared location or pot.
The top of the root ball should be level with or slightly below the soil level.
Water and Care: After planting, give the new divisions a good watering and continue to care for them as you would with a mature echinacea plant. Ensure they receive enough sunlight and water.
Dividing echinacea is a great way to keep your plants healthy and vigorous, and it allows you to multiply your plants without spending any extra money. So don’t be hesitant to give it a go!
Growing Echinacea In Pots FAQs

Let’s shift gears a bit, shall we? I know that you’ve probably got a lot of questions buzzing around your head about growing echinacea in pots. It’s completely natural, especially if you’re new to this whole gardening thing.
So, let’s dive into some of the most frequently asked questions about this topic.
Whether you’re wondering about the best time to plant echinacea or curious if these beauties will survive the winter in pots, we’ve got your answers right here!
Let’s get those queries sorted out, one by one.
Q: Does Echinacea grow well in pots?
A: Absolutely! Echinacea can thrive wonderfully in pots.
You just need to provide the right growing conditions such as plenty of sunlight, a deep enough pot to accommodate their long taproots and a well-draining potting mix like a blend of coco coir and perlite.
Remember, echinacea, also known as coneflower, is a resilient plant that adapts well to various conditions.
Q: Will coneflowers survive winter in pots?
A: Yes, with some extra care, coneflowers can survive winter in pots. Overwintering echinacea in pots involves moving your pots to a sheltered location or indoors if possible, adding a layer of mulch for extra insulation, and reducing watering.
Don’t worry if the foliage dies back; it’s a part of their life cycle, and they’ll spring back with new growth come early summer.
Q: What time of year do you plant Echinacea?
A: Ideally, you’d plant echinacea seeds indoors 8-10 weeks before the last frost date, which usually falls in late spring or early summer depending on your location.
For young plants or mature plants, you can plant them after the danger of the last frost has passed when the soil has warmed up sufficiently.
Q: What kind of potting mix for Echinacea?
A: Echinacea needs a well-draining potting mix to prevent waterlogging and root rot.
A good mix to use is a combination of coco coir and perlite. Coco coir is excellent for retaining moisture, while perlite aids in drainage and prevents soil compaction in pots.
Q: How tall do coneflowers get in pots?
A: The height of coneflowers in pots can vary depending on the specific variety, but on average, you can expect them to reach about 2-4 feet tall.
Remember, the pot’s size can also influence the overall growth and height of your coneflower plants, so ensure they have plenty of room to grow!
Growing Echinacea In Pots Final Thoughts

As we wrap up our journey through the world of potted echinacea, remember that the key to growing any plant successfully is understanding its needs and providing the best possible environment.
Whether you’re a seasoned gardener or just getting started, I hope this guide has given you the tools and knowledge to confidently grow and care for your own echinacea in pots.
As you’ve discovered, echinacea is more than just a beautiful flower; it’s a versatile, resilient, and beneficial plant that’s worthy of any garden, balcony, or sunny spot in your home.
Let’s go ahead and grow some echinacea – your garden is waiting!
Recap of Key Points
- Growing Echinacea in pots requires a well-draining container filled with fertile soil.
- Choose a location with full sun to partial shade for optimal growth.
- Keep the soil consistently moist but not soggy, and allow the top inch to dry out between waterings.
- Fertilize sparingly for best flower production.
In our exploration of growing echinacea in pots, we’ve journeyed through various stages from selecting the right variety, understanding its history, and learning the best ways to plant, care for, and propagate it.
We’ve discussed factors such as climate, coneflower size, and the aesthetics of the plant.
You’ve learned about the ideal planting time for echinacea seeds, sunlight and temperature needs, and the importance of a proper watering schedule.
We also tackled some common problems like dealing with pests and diseases and how to overwinter your potted echinacea.
Let’s not forget the harvesting techniques and the numerous uses of echinacea that include medicinal and ornamental purposes.
Let’s Get Planting!
You’re now armed with all the information you need to grow echinacea in pots successfully. So why wait?
Get your pots, seeds, or plants, and potting mix ready. Whether you’re a novice or an experienced gardener, the joy and satisfaction that comes from seeing those first sprouts or beautiful flowers are immense.
You’ve got this! Remember, each plant is a learning experience, and each small success is a step towards a greener, more vibrant living space.
Start your echinacea pot garden today, and embrace the adventure of gardening!
Ready to upgrade your backyard? These expert guides will help you grow beauty, food, and function right outside your door.
🌼 Backyard Gardening Guides
- 🏡 Backyard Gardening Ideas (Pillar Guide)
- 🌳 Red Tip Photinia Privacy Hedge
- 🌸 Planting Dahlia Seeds
- 🪴 Best Soil for Dahlias in Pots
- 🫐 Growing Blueberries in Pots
- 🌿 Cold Hardy Tea Plant
- 🧄 Growing Goji Berries in Pots
- 🌱 How to Grow Creeping Thyme
- 🌺 Growing Balloon Flowers from Seed
- 🌼 Growing Penstemon in Pots
- 🐝 Growing Echinacea in Pots
- 🪻 Plant Creeping Phlox
- 🌞 Care for Verbena in Pots
- 🌾 Growing Poppies in Pots
- 🌷 Dahlia Care in Pots
- See all articles in our Backyard Gardening category

 Steve S. is the creator of