
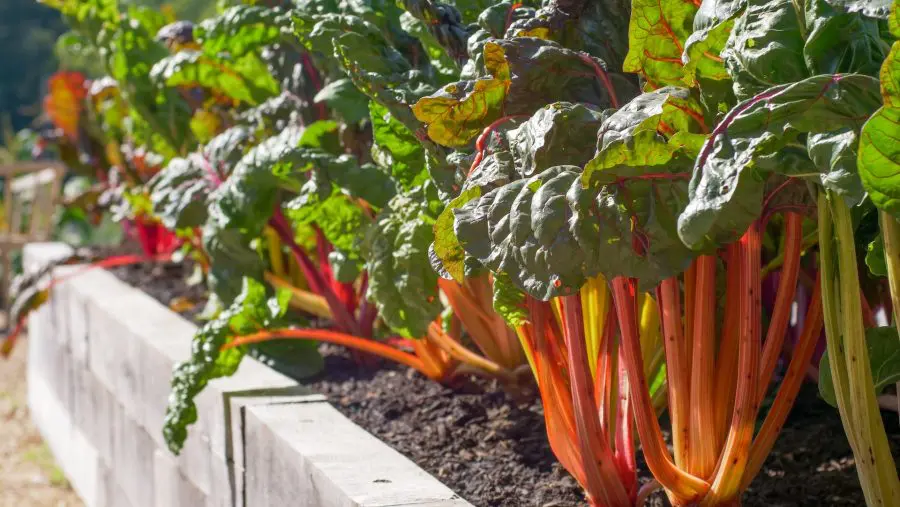
Looking to add a tangy twist to your garden? Discover the ins and outs of growing rhubarb in pots, a simple way to enjoy this garden favorite, no matter your space!
How To Grow Rhubarb in Pots
- Growing Rhubarb in pots is an effective way to cultivate this perennial if you have limited garden space.
- Select a large pot, at least 18 inches in diameter, and use well-draining soil enriched with compost.
- Place the pot in a sunny location and keep the soil consistently moist.
- Fertilize moderately throughout the growing season.
So, you’ve got a hankering for some homegrown rhubarb pie, but your garden space is more like a postage stamp than a sprawling estate? No worries!
Growing rhubarb in pots is your golden ticket to enjoying this tangy treat right from your own balcony or windowsill. Let’s dig in and get those green thumbs working!
")
Growing Rhubarb in Pots Indoors or Out
Growing rhubarb in pots is a convenient and space-saving way to cultivate this perennial plant. All you need is a deep container with drainage holes, well-draining soil rich in organic matter, and a sunny location. It’s ideal for those with limited garden space or who want to grow rhubarb indoors.
Ready to turn that small patio or sunny windowsill into a rhubarb-growing haven? You’re in the right place!
In this post, we’ll walk you through everything you need to know about growing rhubarb in pots.
From choosing the perfect container and soil to mastering the art of rhubarb care, we’ve got you covered.
We’ll even tackle some common challenges and how to keep your potted rhubarb happy through the winter. So, let’s roll up those sleeves and get started!
Brief Overview of Growing Rhubarb in Pots
Rhubarb is that tangy, vibrant plant that’s the star of so many pies and jams.
But did you know you don’t need a sprawling garden to grow it? That’s right, rhubarb thrives in pots just as well as it does in the ground.
The key is to give it what it loves: good soil, plenty of sunlight, and a little TLC.
Growing rhubarb in pots is like having your own mini-farm right on your patio, balcony, or even indoors. It’s a game-changer, especially if you’re tight on space.
Importance of Container Gardening for Rhubarb
Now, you might be wondering, “Why would I want to grow rhubarb in a container when I could just plant it in the ground?”
Well, container gardening isn’t just a trend; it’s a versatile approach that has some real perks.
First off, you have complete control over the soil quality. No more worrying about poor drainage or soil that’s too acidic or alkaline.
You get to create the perfect environment for your rhubarb right from the get-go.
And let’s not forget about pest management. It’s much easier to deal with unwanted critters when your plant is in a pot rather than in the ground.
Plus, containers make it super easy to move your rhubarb around to catch the best light or even bring it indoors when the weather turns chilly.
So, whether you’re an apartment dweller with just a windowsill or someone with a yard looking for more control over your plants, container gardening offers a flexible, manageable way to grow rhubarb that’s hard to beat.
Rhubarb Plant Care Reference Guide
| Characteristic | Details |
|---|---|
| Common Name | Rhubarb |
| Botanical Name | Rheum rhabarbarum |
| Native Habitat | Cool temperate regions of Asia, particularly Siberia and Mongolia |
| Plant Type | Perennial vegetable (grown for edible stalks) |
| Growth Pattern | Clumping, with large leaves and thick red or green stalks |
| Mature Size | Up to 2–3 feet tall and wide |
| Watering | Keep soil consistently moist but not soggy; avoid waterlogging |
| Light/Sun Exposure | Full sun (6–8 hours daily); can tolerate partial shade |
| Soil Type | Rich, well-draining soil with compost or organic matter |
| Soil pH | Slightly acidic to neutral (6.0–7.0) |
| Temperature | Prefers 60–75°F; requires a winter chill period for dormancy |
| Humidity | Average; avoid overly humid conditions to prevent rot |
| Bloom Time & Flower Color | Late spring; small greenish-white flowers (usually removed to promote stalk growth) |
| Potential Problems | Crown rot, leaf spots, stalk borers, and overwatering issues |
| Repotting | Every 2–3 years or when roots outgrow container; divide crowns if needed |
| Hardiness Zones (USDA) | Zones 3–8 |
Why Grow Rhubarb in Pots?
")
Ever find yourself daydreaming about the tangy goodness of a homemade rhubarb pie but think you don’t have the space to grow your own rhubarb? Think again!
In this section, we’re diving into all the compelling reasons why growing rhubarb in pots is not just doable, but downright smart.
Whether you’re short on garden space or just love the idea of plucking fresh rhubarb from your own container garden, we’ve got some insights that’ll make you want to grab a pot and start planting today!
Space-Saving Benefits
So, you’re living in an apartment or maybe a house with a yard the size of a postage stamp. No problem!
One of the coolest things about growing rhubarb in pots is that it’s a real space-saver.
You can place your pot on a sunny balcony, a patio, or even inside near a well-lit window.
It’s like having a mini garden that doesn’t demand a lot of real estate. And hey, if you ever move, your rhubarb can easily move with you. It’s gardening on the go, and who wouldn’t love that?
Control Over Soil Quality
Let’s talk dirt, shall we? One of the biggest headaches of traditional gardening is dealing with the soil you’ve got, whether it’s too sandy, too clayey, or just plain poor quality.
But when you’re growing rhubarb in pots, you’re the master of your soil domain. You can mix the perfect soil blend that your rhubarb will absolutely love.
Want to go organic? You got it. Need to adjust the pH level? Easy peasy. It’s like being a soil chef, crafting the perfect recipe for your rhubarb to thrive.
Easier Pest Management
Pests are the uninvited guests that every gardener dreads. But guess what?
Managing pests is a whole lot easier when your rhubarb is in a container.
For starters, it’s simpler to spot any issues early on, like those pesky aphids or leaf spots.
And if you do have to treat your plant, you can do so without affecting the other plants in your garden.
Plus, lifting the pot off the ground can often deter a whole host of creepy crawlies from making themselves at home in the first place.
So there you have it. Three rock-solid reasons why growing rhubarb in pots is a win-win situation.
Whether you’re a gardening newbie or a seasoned pro, container gardening offers a level of convenience and control that’s hard to beat.
Indoor vs. Outdoor Container Growing
")
Ready to take the plunge and start growing rhubarb in pots, but can’t decide between setting up shop indoors or letting your plants bask in the great outdoors? You’re not alone!
In this section, we’ll break down the pros and cons of both options.
Whether you’re leaning towards a cozy indoor setup or dreaming of an outdoor rhubarb oasis, we’ve got the lowdown to help you make an informed decision.
So, let’s get into it and find the perfect home for your future rhubarb harvest!
Benefits of Indoor Growing
Imagine stepping into your kitchen and snipping off a few rhubarb stalks right from a pot on your windowsill. Sounds dreamy, right?
Growing rhubarb indoors offers that level of convenience. First off, you don’t have to worry about the weather.
Come rain, snow, or heatwave, your rhubarb is safe and snug indoors.
Plus, you can control the temperature and humidity to create the perfect growing conditions.
And let’s not forget about pests or rather, the lack of them. Indoors, your rhubarb is less likely to fall victim to bugs and other critters. It’s like your rhubarb is living in a cozy, controlled bubble!
Advantages of Outdoor Growing
Now, if you’re someone who loves the feel of the sun on your face and the wind in your hair, outdoor rhubarb growing might be more your speed.
There’s something incredibly satisfying about seeing your plants thrive in their natural environment.
The sun provides an abundance of natural light, and you might find that your rhubarb grows faster and stronger outdoors.
Plus, there’s the added benefit of natural pollinators like bees and butterflies, which can help your garden ecosystem.
It’s like your rhubarb is part of a bigger, beautiful outdoor tapestry.
Factors to Consider for Both
Alright, so both indoor and outdoor growing have their perks, but there are some things you’ll need to consider for both.
Light is a big one. Rhubarb loves the sun, so whether you’re growing it indoors or out, make sure it gets plenty of light.
Soil quality is another universal factor; rhubarb needs well-draining soil rich in organic matter, no matter where it’s planted.
And don’t forget about water. Rhubarb isn’t too picky, but it does like consistent moisture.
So, whether you’re reaching for the watering can or relying on Mother Nature, keep that soil from drying out too much.
So, whether you’re setting up a pot next to your kitchen window or placing it on your sunny patio, each option has its own set of advantages.
Your choice will depend on your lifestyle, your preferences, and the kind of gardening experience you’re looking for.
Choosing the Right Container
")
So, you’re all set to grow some rhubarb, but wait a minute. What about the container?
It’s not just a matter of grabbing any old pot and calling it a day. The right container can make or break your rhubarb-growing adventure.
In this section, we’ll guide you through the maze of options, from materials to drainage and even the ideal size for your rhubarb to flourish.
Trust us, your future rhubarb pie will thank you for paying attention to these details. Let’s dive in!
Material Considerations
Alright, let’s talk container materials. You’ve got options, from classic terra cotta to modern plastic and even chic ceramic.
Each has its pros and cons. Terra cotta is breathable, which is great for root health, but it can dry out quickly.
Plastic retains moisture well but may not offer the same breathability.
And ceramic? It’s a looker but can be heavy and pricey. Think about your lifestyle and where you’ll be placing the pot.
If you’re planning to move it around a lot, you might want to opt for something lightweight.
Importance of Drainage Holes
Okay, let’s get this straight: drainage holes are non-negotiable.
Excess water needs a way to escape, or else you risk root rot. Most pots come with drainage holes, but if you fall in love with one that doesn’t, you can usually drill some yourself.
Just make sure to place a saucer underneath to catch any runoff. It’s a small detail that makes a big difference in your rhubarb’s well-being.
Depth and Width Requirements
Last but not least, let’s talk size. Rhubarb has pretty deep roots, so you’ll need a pot that’s at least 12 to 18 inches deep.
As for width, aim for a pot that’s about as wide as it is deep. This gives the rhubarb enough room to spread out and grow comfortably.
Think of it like choosing a comfy bed; you wouldn’t want to sleep in something too small, right? Your rhubarb feels the same way about its home.
So there you have it, the ABCs of choosing the perfect container for your rhubarb.
From the material to the all-important drainage and size, these factors will set the stage for a successful rhubarb-growing journey. Happy planting!
Soil and Planting
Ready to get your hands dirty? Great, because now we’re diving into the nitty-gritty of soil and planting.
And that starts with the right soil mix and planting techniques. In this section, we’ll demystify the soil puzzle and guide you through the planting process step-by-step.
By the end, you’ll be a rhubarb-planting pro, ready to cultivate a pot full of deliciousness. Let’s get started!
Soil Type and pH
First things first, let’s talk about the ground your rhubarb will call home.
Rhubarb prefers well-draining soil with a slightly acidic to neutral pH range—think 6.0 to 7.0.
You can easily test your soil’s pH with a kit from your local garden store. If you find your soil is too acidic or too alkaline, you can adjust it with lime or sulfur.
It’s like making sure the water temperature is just right before you dive into a pool; your rhubarb wants its soil to be just as inviting.
Organic Matter and Compost
Now, who doesn’t love a nutrient-rich meal? Your rhubarb is no different.
Mixing in some organic matter or compost into your soil can provide those essential nutrients your plant craves.
Think of it as giving your rhubarb a multivitamin. A good rule of thumb is to mix in about one-third compost to two-thirds soil.
This will not only feed your rhubarb but also improve soil structure, making it easier for those roots to spread out and get comfy.
Planting Depth and Spacing
Alright, let’s get that rhubarb in the ground or rather, the pot! Planting depth is crucial here.
You’ll want to plant the rhubarb crown about 2 inches below the soil surface.
As for spacing, if you’re planting more than one crown in a pot, give them about 2 to 3 feet of space to spread out.
It’s like giving each plant its own room to grow without bumping elbows with its neighbor.
Coco Coir and Perlite Recommendation
Last but not least, let’s talk about some soil additives that can really make a difference: coco coir and perlite.
Coco coir helps retain moisture, making it a great addition if you live in a hot or dry climate.
Perlite, on the other hand, improves drainage and aeration. Adding a bit of each to your soil mix can create the ideal growing conditions for your rhubarb.
Advantages of coco coir
")
Coco coir is like the Swiss Army knife of gardening materials, and it’s got some serious advantages that can make your rhubarb-growing journey a whole lot smoother. Let’s break it down:
Moisture Retention
First off, coco coir is a champ at holding onto water. This means you won’t have to water your plants as often, which is a real lifesaver if you’re the forgetful type or if you live in a hot, dry climate. It’s like having a built-in water reservoir for your plants.
Aeration
While it’s great at holding water, coco coir also provides excellent aeration.
This means that while the water stays, the air can still circulate around the roots.
Pest and Disease Resistance
Coco coir is naturally resistant to bacterial and fungal growth, which means less worry about diseases like root rot. It’s like having a built-in security system for your plants.
Sustainability
Made from the husks of coconuts, coco coir is a renewable resource. So, you can feel good about your choice from an environmental standpoint. It’s like shopping at a thrift store; you’re doing good while getting something great!
pH Neutral
Coco coir generally has a neutral pH level, which is great for rhubarb since it prefers slightly acidic to neutral soil.
You won’t have to fuss too much with soil amendments to get the pH just right.
Easy to Work With
Lightweight and easy to handle, coco coir is a breeze to mix into your soil or use as a soilless medium. It’s like the user-friendly version of gardening materials.
So, whether you’re a gardening newbie or a seasoned pro, adding coco coir to your potting mix can offer a range of benefits that make it easier to grow healthy, happy rhubarb plants.
You can mix 25% perlite with it and have a fast-draining growing medium with good water-holding capabilities your rhubarb will love.
So there you have it, the down-low on soil and planting for your potted rhubarb.
From the right pH to the perfect planting depth, these details will set you up for a bountiful harvest. Happy gardening!
Rhubarb Care
")
So you’ve got your rhubarb planted in the perfect pot with the ideal soil mix. High five!
But hold on, the journey doesn’t end here. Just like a pet or a houseplant, your rhubarb needs ongoing care to truly thrive.
In this section, we’ll cover everything from sunlight to watering and even how to feed your rhubarb so it grows up strong and tasty.
Consider this your go-to guide for all things rhubarb care. Let’s keep those green thumbs busy!
Light Requirements
Let’s kick things off with light, the lifeblood of any plant.
Rhubarb loves a good sunbath and thrives in full sun, which means at least 6 to 8 hours a day.
If you’re growing it indoors, a sunny windowsill is your best bet. If that’s not possible, consider using grow lights.
It’s like making sure you get enough vitamin D; your rhubarb needs its daily dose of sunshine to grow strong and healthy.
Watering Schedule
Next up, let’s talk water. Rhubarb likes its soil to be consistently moist but not waterlogged.
A good rule of thumb is to water it when the top inch of soil feels dry to the touch.
If you’re growing it outdoors, you might need to water it more often in hot, dry weather.
Think of it like staying hydrated on a hot day; your rhubarb needs that extra sip to keep cool.
Temperature and Humidity
Now, onto temperature and humidity. Rhubarb is pretty hardy and can tolerate a range of temperatures, but it prefers it a bit on the cooler side.
Aim for daytime temperatures between 60 and 75°F and slightly cooler at night.
As for humidity, rhubarb isn’t too picky, but if you’re growing it indoors, you might want to mist it occasionally.
Fertilization
Last but not least, let’s talk food. Your rhubarb will appreciate a balanced fertilizer applied in the early spring and then again midway through the growing season.
If you’ve added compost to your soil, you might not need to fertilize as often.
Just be careful not to overdo it; too much fertilizer can lead to lots of leaves but fewer stalks.
So there you have it, your comprehensive guide to rhubarb care.
From the right amount of light to the perfect watering schedule, these tips will help you grow a rhubarb plant that’s not just surviving, but thriving. Happy gardening!
Harvesting and Yield
")
It’s the moment we’ve all been waiting for, harvest time! After all that TLC you’ve given your rhubarb, it’s finally time to reap the rewards.
But hold on, there’s a bit of an art to harvesting rhubarb, and the yield can vary depending on a few factors.
In this section, we’ll guide you through the when, how, and what to expect when it comes to harvesting your potted rhubarb.
When to Start Harvesting
Alright, let’s talk timing. If you’ve planted a new rhubarb crown, you’ll want to give it a full year to establish itself before you start harvesting. Patience is key here.
For established plants, the best time to harvest is late spring to early summer when the stalks are about 12 to 18 inches long.
How to Harvest
Now, onto the fun part, actually harvesting those juicy stalks!
The best way to do this is to grab the stalk at the base and give it a gentle but firm twist while pulling it away from the crown.
Whatever you do, don’t cut the stalks with scissors or a knife, as this can leave a stub that’s prone to rot.
Think of it like pulling a carrot out of the ground; you want to get it out cleanly to keep the rest of the plant healthy.
Yield Expectations
So, what can you expect in terms of yield? Well, that can vary depending on the age of your plant and the care you’ve given it.
A well-tended, mature rhubarb plant can yield up to 4 to 5 pounds of stalks over the harvest season.
Keep in mind that you should never harvest more than one-third of the plant at a time to keep it healthy for future growth.
There’s the lowdown on harvesting and what to expect from your rhubarb yield.
With a little patience and the right technique, you’ll be well on your way to enjoying your very own homegrown rhubarb.
Whether it’s pies, jams, or just a fresh stalk to munch on, the rewards are definitely worth the wait!
Common Challenges and Solutions
")
So you’re well on your way to becoming a rhubarb-growing guru, but let’s be real. Sometimes things don’t go as smoothly as we’d like.
Whether it’s pesky pests or mysterious leaf spots, growing rhubarb in pots can come with its own set of challenges. But don’t sweat it!
In this section, we’ll tackle some of the most common issues you might encounter and offer solutions to get you back on track.
It’s like having a troubleshooting guide for your rhubarb, and trust me, it’s a lifesaver. Let’s dive in and solve those garden mysteries!
Crown Rot
Crown rot can be the bane of many a gardener’s existence.
If you notice that your rhubarb plant is wilting or the leaves are turning yellow, crown rot could be the culprit.
This usually happens when the soil is too wet or poorly draining. The fix?
Make sure your pot has good drainage and try not to overwater.
If the problem persists, you might need to remove the affected parts and treat the soil with a fungicide.
It’s like noticing a leak in your house; you want to address it ASAP before it causes more damage.
Leaf Spots
Spotted leaves on your rhubarb can be a sign of a fungal infection. These spots are usually brown or black and can make your plant look like it’s wearing polka dots.
Not the fashion statement you want it to make! To tackle this, remove the affected leaves and make sure your plant has good air circulation.
You can also use a fungicide as a preventive measure. Think of it like treating a stain on your favorite shirt; act quickly, and you can save the day.
Pests like Stalk Borers and Beetles
Now let’s talk about uninvited guests like stalk borers and beetles.
These pests can wreak havoc on your rhubarb, munching away at the stalks and leaves.
If you notice holes or a sawdust-like substance on your plant, it’s time to take action.
You can use insecticides, but if you prefer a more natural approach, consider introducing beneficial insects like ladybugs to your garden. It’s like hiring a security guard to keep the riff-raff out.
So there you have it, solutions to some of the most common challenges you might face when growing rhubarb in pots.
With a little vigilance and the right treatment, you can keep your rhubarb plant healthy and thriving. After all, every problem has a solution, and your rhubarb is counting on you to find it!
Overwintering Rhubarb in Pots
")
Winter is coming, and no, we’re not talking about a TV show!
When the temperatures start to drop, it’s time to think about how to keep your potted rhubarb happy through the chilly months.
Overwintering might sound like a complicated term, but it’s really just about giving your rhubarb a cozy winter break.
In this section, we’ll guide you through the steps to ensure your rhubarb wakes up refreshed and ready to grow when spring rolls around.
It’s like tucking your plants in for a long winter’s nap, and your rhubarb does need a dormant period.
Preparing for Winter
As the days get shorter and the air gets crisp, it’s time to start prepping your rhubarb for its winter hibernation.
First off, you’ll want to cut back any remaining stalks and leaves, leaving just the crown. This helps the plant focus its energy on root growth.
Next, give it a good watering; think of it as a final drink before bedtime.
If your pot is small enough, you might even consider bringing it indoors to a cool, dark place like a garage or basement.
Mulching Techniques
Now, let’s talk mulch. You will want to do this if your plant is growing outdoors.
Mulching is like giving your rhubarb a cozy blanket to snuggle under during the winter months.
A good layer of organic mulch like straw or wood chips can do wonders for insulating the soil and protecting the roots from freezing temperatures.
Aim for a layer about 4 to 6 inches thick, covering the entire surface of the soil.
This not only keeps the cold out but also helps retain moisture, so you won’t have to water as often.
It’s like adding an extra layer of insulation to your house; it keeps the warmth in and the cold out.
So there you have it, your step-by-step guide to overwintering rhubarb in pots.
With a little prep work and the right mulching technique, your rhubarb will be all set to brave the winter elements and come back even stronger in the spring. Happy overwintering!
FAQs
You’ve got questions, we’ve got answers! Whether you’re a rhubarb rookie or a seasoned pro, there’s always something new to learn about growing this tangy treat in pots.
In this FAQs section, we’ll tackle some of the most burning questions that gardeners like you often have.
From the basics to the nitty-gritty, consider this your quick go-to guide for all things rhubarb.
So, let’s get those question marks turned into exclamation points, shall we?
Q: Is rhubarb easy to grow in pots?
A: Absolutely! Rhubarb is pretty low-maintenance and adapts well to container gardening.
As long as you choose the right pot, soil, and spot for sunlight, you’re off to a great start.
Q: How long does it take to grow rhubarb in pots?
A: Rhubarb typically needs a year to establish itself before you can start harvesting.
After that, you can expect to harvest stalks from late spring to early summer. It’s a bit like planting a tree; it takes time to grow, but the rewards are worth the wait.
Q: Does rhubarb come back every year in pots?
A: Yes, rhubarb is a perennial plant, which means it will come back year after year as long as it’s well taken care of.
Just make sure to overwinter it properly, and you’ll have rhubarb for years to come. It’s the gift that keeps on giving!
Q: Does rhubarb grow well in pots?
A: It sure does! Rhubarb actually thrives in pots, especially if you’re short on garden space.
Containers offer better control over soil quality and make it easier to manage pests. It’s like having a mini garden that you can place anywhere.
Q: Can I grow rhubarb in a 5-gallon bucket?
A: You bet! A 5-gallon bucket can work as a container for rhubarb, provided it has good drainage.
Just make sure to drill some holes in the bottom if it doesn’t already have them.
Q: How big of a container do you need to grow rhubarb?
A: Aim for a container that’s at least 12 to 18 inches deep and about as wide.
Rhubarb roots like to spread out, so giving them ample space is key.
Q: What do you do with potted rhubarb in the winter?
A: Overwintering is essential for potted rhubarb. Cut back the stalks and leaves, and consider adding a layer of mulch for insulation.
If possible, move the pot to a cooler, sheltered location like a garage or basement.
Conclusion
Well, folks, we’ve covered a lot of ground, haven’t we?
From picking the perfect pot to mastering the art of harvesting, you’re now armed with all the know-how to become a rhubarb-growing superstar.
Whether you’re a gardening newbie or a seasoned green thumb, we hope this guide has been as fun to read as it was for us to put together.
So go ahead, roll up those sleeves, and get planting. Your future rhubarb pies are counting on you!
Summary of Key Points
Let’s do a quick recap, shall we? We started off by choosing the right container, making sure it’s got good drainage and is made of a material that suits your lifestyle.
Then we dived into the soil mix, emphasizing the importance of pH levels and organic matter.
We covered the ins and outs of rhubarb care, from light requirements to fertilization, and even tackled common challenges like pests and diseases.
And let’s not forget about the grand finale, harvesting those delicious stalks!
It’s like we’ve been on a road trip, and these are the scenic spots we’ve visited along the way.
Encouragement to Try Growing Rhubarb in Pots
If you’ve made it this far, you’re clearly interested in growing your own rhubarb, and we couldn’t be more thrilled!
Trust us, there’s nothing quite like the satisfaction of harvesting your own homegrown produce.
And if you have or want an indoor garden growing rhubarb is a great place to start; it’s forgiving, versatile, and oh-so-tasty.
So why not give it a try? Roll up those sleeves, get your hands a little dirty, and experience the joy of growing something from scratch.
It’s like baking your own bread; once you’ve tasted the homemade version, you’ll wonder why you ever settled for store-bought. Happy gardening!
Sustainable Apartment Gardening
🏙️ Apartment Gardening
Turn your apartment into a thriving garden! Explore easy guides for veggies, herbs, fruits, and flowering plants—all grown indoors.
-
- 🥕 Harvesting Carrots in Containers
- 🍅 Growing Tomatoes Indoors For Beginners
- 🌱 The Best Vegetables To Grow Indoors
- 🥔 How To Grow Potatoes In A 5-Gallon Bucket Indoors
- 🧄 Growing Garlic Indoors In Pots
- 🥬 How To Grow Bok Choy Indoors
- 🫘 Growing Green Beans In Pots
- 🧅 Growing Leeks In Containers
- 🥕 How To Grow Carrots Indoors
- See all articles in our Apartment Gardening category

 Steve S. is the creator of