
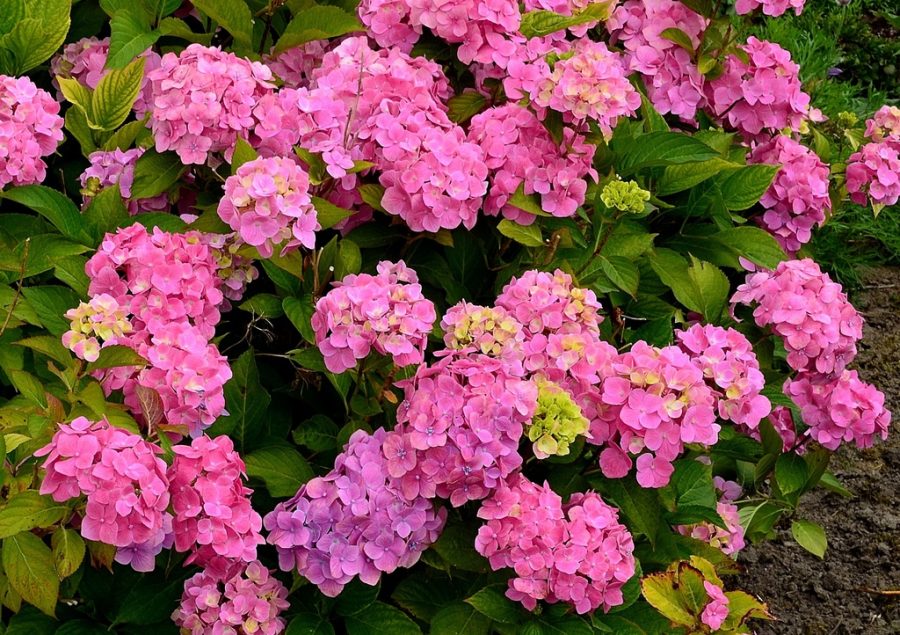
Want patio-worthy blooms without a big garden? With Hydrangea Care In Pots, you can turn a balcony, porch, or sunny nook into a showpiece.
You’ll enjoy lush, photo-ready flowers you can move for the perfect look, protect during heat waves, and style to match your space.
Let’s make those containers the star of your outdoor room. Hydrangea care in pots is easy and incredibly rewarding.
Whether you’re working with a small patio, a backyard nook, or a sunny balcony, potted hydrangeas bring bold color and classic charm.
This guide walks you through all the essentials, from pot size and watering tips to sunlight and fertilizer for vibrant blooms.
Hydrangea Care In Pots
Are you ready to immerse yourself in the vibrant world of hydrangeas? Growing these beauties isn’t limited to expansive gardens.
Yes, you heard that right! Hydrangea care in pots is not only possible but also incredibly rewarding.
Whether you’re looking to bring a splash of color to your balcony or create a blooming focus point for your patio, potted hydrangeas could be your perfect choice.
Let’s delve into the exciting adventure of hydrangea care in pots and turn that gardening dream into a delightful reality.
Introduction To Hydrangea Care In Pots

Looking to bring a burst of life to your urban balcony, a cozy corner, or a small patio?
Well, we’ve got some delightful news for you. You don’t need a sprawling garden to cultivate hydrangeas.
Hydrangea care in pots is an exciting journey you can embark on, right at your own home.
This article is your step-by-step guide, covering everything from choosing the right hydrangea variety to pot selection, watering techniques, and more.
We’re not just skimming the surface, we’re diving deep to make you an expert in potted hydrangea care. Ready? Let’s get started!
Understanding Hydrangeas: The Floral Beauties
First things first, what are Hydrangeas, you ask? Picture a bush graced with large clusters of flowers, showcasing an array of stunning colors from blues and purples to pinks and whites.
These are Hydrangeas, known for their spectacular flower heads, heart-shaped leaves, and innate ability to elevate any space with their undeniable charm.
Their name originates from the Greek words ‘Hydro’ (water) and ‘Angos’ (jar), signifying their thirst for water.
Hydrangeas bring the magic of four seasons, as they display different hues and changes throughout the year, making them a gardener’s delight!
Hydrangea Plant Care Reference Guide
| Characteristic | Details |
|---|---|
| Common Name | Hydrangea |
| Botanical Name | Hydrangea spp. |
| Native Habitat | Asia and the Americas |
| Plant Type | Flowering shrub |
| Growth Pattern | Upright, bushy, rounded |
| Mature Size | 3–6 ft. tall and wide (variety dependent) |
| Watering | Keep soil consistently moist but not soggy |
| Light/Sun Exposure | Morning sun, afternoon shade |
| Soil Type | Rich, well-draining soil |
| Soil pH | 5.5–6.5 (affects bloom color) |
| Temperature | 40°F to 85°F optimal range |
| Humidity | Moderate to high; avoid dry air indoors |
| Bloom Time & Flower Color | Spring to fall; pink, blue, purple, white (pH-dependent) |
| Potential Problems | Root rot, powdery mildew, aphids, wilting from under/overwatering |
| Repotting | Every 2–3 years or when rootbound |
| Hardiness Zones (USDA) | Zones 5–9 (varies by type) |
A World of Hydrangeas: Unfolding the Varieties

Hydrangeas are not one-size-fits-all, and their diversity is part of their appeal. Let’s explore:
Shrub Hydrangeas: These sturdy plants bloom heartily, with some varieties producing gorgeous white flowers. They’re perfect for a standalone statement or as part of a floral ensemble in your pot.
Bigleaf Hydrangeas: Renowned for their large, round flower heads, Bigleaf Hydrangeas are a sight to behold. Their colors can range from pink to blue, depending on the soil pH.
Panicle Hydrangeas: These standouts feature cone-shaped clusters of flowers that start white and gradually become pink as the season progresses. An excellent choice for late summer color.
Smooth Hydrangeas: Known for their lush white flowers, these plants are easy to care for, making them perfect for beginners.
Mountain Hydrangeas: Similar to the Bigleaf variety but more cold-hardy. Their lace-cap flowers are a visual treat.
Oakleaf Hydrangeas: Named for their unique, oak leaf-shaped foliage, these hydrangeas also boast spectacular fall colors.
The Perks of Potting: Benefits of Growing Hydrangeas in Pots

Growing Hydrangeas in pots? Yes, it’s a thing! And it’s catching on for good reasons.
Not only does it add an aesthetic touch to your space, but it also allows you the flexibility to move them around based on sunlight exposure or temperatures.
Plus, growing Hydrangeas in pots can also help manage their size and keep them compact, which is a bonus for those limited in space.
Embracing the Outdoors: Overview of Hydrangea Care in Pots Outdoors
The outdoors can be a Hydrangea’s happy place.
When tending to these beauties outdoors, focus on good quality potting soil, ample watering, appropriate sunlight, and seasonal pruning.
We’ll explore each of these aspects in detail further in the post, so stay tuned!
Inviting the Green Indoors: Overview of Hydrangea Care in Pots Indoors
Hydrangeas indoors? Absolutely! With a little care, they can thrive inside as well as they do outside.
Good light, correct watering and humidity levels, and the right potting mix are crucial.
Let’s delve into the nuances of indoor Hydrangea care, demystifying myths, and sharing practical tips that will pave the way for your indoor gardening success.
Hydrangea Size

Ah, the beauty of Hydrangeas! But how large do these stunning bloomers grow, you wonder?
Well, we’re diving into that right here. When it comes to size, Hydrangeas are as diverse as their stunning color palette.
From compact options perfect for a petite pot on your patio to sizable shrubs that can command attention in a large garden, there’s a Hydrangea for every space.
Let’s delve into understanding the range of Hydrangea sizes and what it means for your potted plant project.
Are you ready to explore the fascinating world of Hydrangea sizes? Let’s get started!
Best Hydrangea for Pots: The Tantalizing Top Picks

In the vibrant world of Hydrangeas, choosing the best fit for your pots can be an exhilarating journey.
What we’re looking for is a Hydrangea variety that doesn’t just survive, but truly thrives in its potted environment.
For pot-loving Hydrangeas, it’s all about balance – a harmony of size, adaptability, and stunning visual appeal.
Several varieties perform exceptionally well in pots, but if we had to name one star performer, the ‘Endless Summer’ Hydrangea steals the show.
This repeat bloomer brings joy all summer long.
Large Potted Hydrangea: A Bold Statement

When you have the space and the desire to make a statement, consider the majesty of a large potted Hydrangea.
The Panicle Hydrangea, for instance, is an outstanding choice for bigger pots.
These Hydrangeas can handle a bit more sun, and their blossoms, ranging from pure white to a rosy pink as they age, are truly show-stopping.
These potted giants can make an unassuming corner of your patio or garden the new center of attention.
Dwarf Hydrangea for Pots: Compact Charms

Have a smaller space but still crave the magic of Hydrangeas? Dwarf Hydrangea varieties are here to save the day.
This Panicle Hydrangea variety is perfect for smaller pots and limited spaces.
Don’t be fooled by their compact size; these dwarf Hydrangeas are known for their lush, full blooms that are sure to bring a sparkle to any space they inhabit.
The Best Hydrangea for Pots
 Shrub, RB pink or blue, #3 - Size Container")
When it comes to hydrangeas, picking the perfect variety for your pot can be quite an adventure.
While all hydrangeas are truly wonderful, if we have to play favorites, then the Bigleaf hydrangeas (Hydrangea macrophylla) might steal the show for container gardening.
Known for their broad, vibrant leaves and bountiful blooms, these hydrangeas adapt well to pot life and add an artistic flair to your patio or indoor space.
The Majesty of Large Potted Hydrangeas

Size can truly make a statement, especially in the world of hydrangeas.
Imagine a large pot hosting a lush Hydrangea paniculata or Oakleaf hydrangea, its bountiful blooms a spectacle of color and beauty.
Large potted hydrangeas not only create a focal point in your garden or patio but can also serve as a natural screen or divider.
The beauty is, despite their grandeur, these plants are surprisingly easy to care for, demanding only sunlight, water, and your admiration.
The Charm of Dwarf Hydrangea for Pots

Dwarf hydrangeas, like the Hydrangea macrophylla ‘Pia’, offer all the allure of their larger siblings but in a more compact size, making them ideal for pot cultivation.
 Shrub, dwarf habit with pink flowers, #2 - Size Container")
These mini versions are a delightful choice for those with limited space or those who prefer a container garden.
The smaller stature doesn’t compromise the stunning blooms – expect a spectacular summer display from these petite beauties.
Just like the larger varieties, these small wonders crave sunlight and a good drink but will reward your efforts with breathtaking bloom clusters.
Hydrangeas, known for their vigorous root growth, require ample space to thrive.
It’s recommended to select a pot with a minimum width of 24 inches, roughly about 2 feet, which also has efficient drainage holes at the base.
If a hydrangea is housed in a smaller or medium-sized pot, you’ll find yourself needing to upgrade its living space within a span of two to three years.
Hydrangea Care
 Shrub, RB purple, #2 - Size Container")
Ah, the journey of caring for your hydrangeas, it’s a joy that rewards you with stunning blooms in a symphony of colors.
Whether you’ve chosen a large variety for your patio or a delightful dwarf for your indoor garden, caring for these plants in pots brings its own unique set of steps to ensure they thrive.
In this section, we’ll be walking hand in hand, leaf by leaf, through the essentials of hydrangea care, from the right potting mix to watering, light requirements, and even pruning tips.
So, tie up your gardening apron, slip on those gloves, and let’s dive into the lush world of hydrangea care!
Hydrangea Care in Pots Outdoors
Finding the Perfect Location: The Secret Hideaway for Your Hydrangea.
Hydrangeas in outdoor pots flourish in a location where they receive morning sun and afternoon shade.
That morning kiss of sunshine gives them the energy they need to produce their vibrant blooms, while the afternoon shade protects them from scorching.
It’s a bit like choosing the perfect vacation spot, you want that sunny beachfront but also the relaxing, shady palm tree!
Watering and Fertilizing: Hydrangea’s Preferred Spa Treatment
Just like us, Hydrangeas love a good spa day! However, instead of a bubble bath and facial, they prefer deep watering and rich fertilization.
Ensure the soil is thoroughly moist but not soggy, think a well-wrung-out sponge.
Also, feed them with a slow-release fertilizer specifically formulated for Hydrangeas, it’s their preferred delicacy!
Hydrangea Care in Pots Indoors
Creating the Perfect Indoor Climate: Hydrangea’s Dream Home
Moving indoors, the climate conditions shift a bit for our hydrangea pals. The key to indoor hydrangea care is finding a spot that mirrors their natural outdoor preferences.
A bright room that offers filtered light, such as near a south or east-facing window, works wonders.
And they’re not fans of dry air, so maintaining a humid environment is vital. You might consider using a pebble tray or a humidifier if your indoor air tends to be dry.
Indoor Watering and Fertilizing: Room Service for Your Hydrangeas
Even indoors, Hydrangeas are pretty thirsty plants! Water them when the top inch of soil feels dry to the touch, making sure to drain away any excess water to avoid root rot.
And don’t forget their favorite meal – slow-release fertilizer for Hydrangeas. Even indoor hydrangeas need a well-balanced diet to bloom beautifully!
Hydrangea Light Requirements
Have you ever wondered how much sunlight your hydrangeas need? Well, you’re not alone.
One of the most frequently asked questions in the world of hydrangeas is about light requirements.
Whether you’re growing them inside or out in the garden, understanding how much light hydrangeas need is vital for their overall health and blooming success.
In this section, we’ll be exploring indoor and outdoor light requirements for your hydrangeas.
Indoor Light Requirements
If you’re growing hydrangeas indoors, aim for a balance between too much and too little light.
They do enjoy bright, indirect light. However, direct, strong sunlight for prolonged periods can be harsh and result in scorched leaves.
So, where should you place them? An east or north-facing window is typically a good spot.
Just make sure your hydrangea is receiving plenty of light, but not sitting under harsh, direct sunlight.
Outdoor Light Requirements
In the great outdoors, hydrangeas prefer a spot with morning sun and afternoon shade.
This preference can help protect them from the more intense afternoon sun which can cause wilting.
In general, hydrangeas can tolerate a range of sunlight conditions from full sun to partial shade.
However, the exact light requirement may vary slightly depending on the variety.
For example, panicle and smooth hydrangeas can handle more sun, while bigleaf and mountain hydrangeas thrive in partial shade.
Always remember to adjust your watering as needed since more sun often means more water.
Hydrangea Water Requirements
 Shrub, RB pink or blue, #3 - Size Container")
Let’s dive into the hydrangea’s love affair with water. Just as we humans need to hydrate, so do our hydrangea friends!
Whether outdoors or in, their thirst is legendary, so if you’re considering hydrangea care in pots, strap in for a deep dive into the watering needs of these showy bloomers.
We’ll explore everything from how often to water them, to signs of over and underwatering.
Yes, too much of a good thing can also be harmful. Ready to make a splash? Let’s get started!
Understanding the Hydrangea’s Thirst: How Often to Water
Let’s think about hydration from the perspective of your hydrangea.
We know they love a good drink, but how often should you be reaching for that watering can?
Well, it’s a bit like asking how much you should drink each day – it depends!
Factors like weather, soil, and pot size all play a part.
As a rule of thumb, hydrangeas in pots outdoors require more frequent watering than their indoor counterparts, especially during hot, dry spells.
An inch of water per week is a good starting point. But remember, this isn’t a hard and fast rule.
Your hydrangea will be your guide. Look out for wilting leaves, they’re the plant’s way of whispering I’m thirsty.
Overwatering vs Underwatering: Know the Signs
Imagine going from being parched to feeling like you’re underwater – not ideal, right?
Hydrangeas can feel the same way if they’re over or under-watered.
Being able to recognize the signs is like speaking the hydrangea’s language.
Overwatered hydrangeas may have yellowing leaves and can look like they’re wilting, despite the soil being wet.
This can lead to root rot, which is a serious issue.
On the flip side, underwatering can make the plant look droopy, with the leaves turning a duller shade of green.
But here’s the catch, these symptoms can look similar to those of overwatering.
The key difference is the soil. If it’s dry, then it’s time to give your hydrangea a good drink.
Remember, balance is key, and your hydrangea will thank you for it!
Hydrangea Soil
 Shrub, dwarf habit with pink flowers, #2 - Size Container")
Soil, the unsung hero of gardening, plays a pivotal role in our hydrangea care journey.
Let’s imagine it as the comfy bed where your hydrangeas stretch out their roots and relax after a long day of photosynthesis.
The right soil mix isn’t just about keeping your hydrangeas upright. It’s about providing a perfect home for your plant’s roots, ensuring they have access to all the nutrients, water, and air they need to thrive.
In this section, we’ll delve into the world of hydrangea-friendly soils, revealing the secrets that will keep your potted hydrangeas happy and healthy.
Buckle up, it’s time to get our hands a little dirty!
Perfect Harmony: Coco Coir and Perlite
Coco coir and perlite might sound like a curious mix but trust me, your hydrangeas will thank you.
Coco coir, a byproduct of the coconut industry, makes for an excellent growing medium.
It retains water superbly, helping to keep your hydrangeas hydrated.
Now, blend in perlite, and you’ve got a well-draining mix that ensures your hydrangeas won’t be sitting in waterlogged soil.
It’s like a balanced diet for your plants – hydration without the risk of waterlogging.
Choosing the Best Potting Mixes
Selecting the right potting mix for your hydrangeas isn’t a decision to be made lightly.
It’s like picking the perfect mattress – get it wrong, and you’re in for some restless nights.
You want a blend that’s rich in organic matter to feed those hungry hydrangeas and ensure robust growth.
Look for a mix that contains a good balance of coco coir or peat moss, compost, or well-rotted manure, and don’t forget some form of grit or sand for excellent drainage.
The Magic of pH: Hydrangea Color Change
Did you know that the pH level of your soil can actually change the color of some hydrangeas?
It’s like a science experiment right in your pot! Alkaline soils (pH above 7) will tend to produce pink hydrangeas, while more acidic soils (pH below 7) will yield blue flowers.
For those who love to play with color, soil pH can be your artist’s palette. Just remember, always adjust pH levels slowly and carefully to avoid shocking your plants.
Adjusting Soil pH: Fine-Tuning Your Green Thumb
Have you ever wished you could switch up the color palette of your garden on a whim?
With hydrangeas, you’re in luck! Adjusting your soil’s pH level can turn your hydrangeas into living mood rings.
But, don’t be too hasty. This isn’t a process you want to rush.
Slow and steady does it, so gently amend your soil with lime to raise the pH or introduce sulfur to lower it.
It’s kind of like adjusting the thermostat—tiny changes can make a world of difference!
Color Changes Based on pH: The Nature’s Mood Ring
Isn’t it fantastic that you can actually dictate the color of your hydrangeas just by tweaking the soil’s pH?
It’s as if you’re an artist and nature is your canvas. In alkaline soil (pH over 7), hydrangeas usually bloom pink.
On the other hand, if your soil is more acidic (pH less than 7), you can expect your hydrangeas to display blue flowers.
So, are you feeling blue or pink today? Your hydrangeas are ready to reflect your mood!
Hydrangea Pot Size

Get ready to play the matchmaker because in this section we’ll be discussing the perfect pairing between your hydrangeas and their pots.

That’s right, we’re diving into Hydrangea pot size. The size of the pot is no trivial matter as it can significantly impact your hydrangea’s growth, blooming, and overall health.
We’re covering everything from the ideal pot size for different hydrangea varieties, to why size matters in the first place, and tips for when it might be time for a breakup also known as repotting.
Let’s get started, shall we?
Sizing It Up: Choosing the Right Pot Size for Your Hydrangea
Alright, let’s get straight to it. How big should your pot be? Well, when it comes to hydrangeas in pots, size does matter.
As a general rule of thumb, you want to choose a pot that is at least 1.5 to 2 times the size of the root ball of your hydrangea.
This gives your plant enough space to spread its roots and grow.
However, be cautious about choosing a pot that is too large, as this could lead to overwatering. It’s all about finding the right balance!
Taking It All In: Factors to Consider when Choosing a Pot Size
When you’re picking out the perfect pot for your hydrangea, there’s more to consider than just size.
You also need to think about the material of the pot—plastic pots can cause the soil to stay damp for longer, while terracotta pots are more breathable but may require more frequent watering.
You also want to consider the drainage of the pot. Hydrangeas prefer well-draining soil, so a pot with good drainage holes is essential.
Last but not least, consider the future growth of your plant. Will it need to be repotted in the coming years?
Anticipating these needs can save you some time and effort down the line.
Hydrangea Fertilizer

It’s time to talk about another important aspect of hydrangea care in pots, fertilizer.
Think of fertilizer as a multivitamin for your hydrangea, giving it the essential nutrients it needs to bloom beautifully.
When you add fertilizer, you’re making sure your hydrangea gets all the nutrients it might not get from the potting soil alone.
From nitrogen to phosphorous and potassium, let’s dive into what your hydrangea craves and how to best meet its needs.
So, let’s make your hydrangea the talk of the town, shall we?
Hydrangea Fertilizer Spikes: Feeding Made Easy

Ever heard of fertilizer spikes? These handy garden helpers are like a slow-release vitamin for your hydrangea.
They’re designed to deliver a balanced supply of nutrients over time, feeding your plant right at its roots.
Easy to use and mess-free, they can make fertilizing your hydrangeas as simple as planting a seed.
Best Time to Fertilize: When to Share the Good Stuff
When it comes to hydrangea care, timing is everything, especially for fertilizing.
The ideal time to give your hydrangea its nutritional boost is in early spring, just as new growth is starting.
A second feeding in mid-summer can help sustain your plant during its blooming period, but avoid fertilizing late in the season.
You wouldn’t want to stimulate tender new growth just as winter is approaching, right?
Signs of Over-fertilization: Reading Your Hydrangea’s Signs
As with all good things, moderation is key. While fertilizer is essential for healthy hydrangea growth, too much of it can cause harm.
If your hydrangea’s leaves are turning yellow or browning at the edges, or the plant seems to be wilting despite regular watering, it might be signaling that it’s had a bit too much of a good thing.
It’s like your plant’s way of saying, I’m full, no more dessert, please!
Liquid Fertilizer: Quick Boost on Tap
Sometimes, your hydrangeas might need a little quick pick-me-up, and that’s where liquid fertilizer comes into play.
Liquid fertilizers are a great way to give your hydrangeas a swift nutritional boost.
")
They’re absorbed directly and start working immediately, sort of like a power smoothie for your plants.
Use it sparingly though, think of it as a special treat rather than the main course in your hydrangea’s diet.
Always follow the instructions on the bottle to avoid overdoing it and remember, a little goes a long way.
Temperature and Humidity
 Shrub, dwarf form with white flowers, #3 - Size Container")
Welcome to the next important topic in your hydrangea care journey, understanding your gorgeous green companions’ temperature and humidity requirements.
Hydrangeas, like us humans, prefer certain environmental conditions.
Ensuring that they’re in their comfort zone will go a long way in keeping them happy and thriving.
We’ll go over the temperature range hydrangeas enjoy and the ideal humidity conditions that make these blooms truly feel at home.
So, let’s get your hydrangeas the perfect spa-like atmosphere they deserve!
Potted Hydrangea Temperature Tolerance: The Heat of the Moment
So, what’s the weather preference for your potted hydrangea? Here’s a hint: they like it just right!
Not too hot, not too cold, think Goldilocks. Hydrangeas are hardy plants, generally tolerating temperatures between 40 and 85 degrees Fahrenheit. That’s a pretty wide range, huh?
This makes them suitable for most climates, but always keep an eye out for extreme weather conditions.
If temperatures drop below freezing or get too hot, your hydrangeas may need a little extra care to protect them from damage.
It’s all about maintaining balance and not letting those temperature swings get too wild.
Hydrangea Humidity: The Moisture Matters
Indoor Humidity Control: A Houseplant’s Hydration
Here’s the inside scoop on hydrangeas: they love a good amount of humidity.
If you’re growing your hydrangeas indoors, maintaining an environment with about 50-60% humidity will keep your plants happy.
Not sure how to achieve this? Try placing your pots near a humidifier or grouping your hydrangeas with other plants.
Plants are social creatures too, you know! They create a microclimate that helps maintain humidity.
Alternatively, you can place a tray filled with water and pebbles beneath your pots – as the water evaporates, it will create a humid environment.
Just make sure your pots aren’t sitting directly in the water, we don’t want their roots to get soggy!
Outdoor Humidity Considerations: Al Fresco and Atmospheric
As for your outdoor hydrangeas, they’re pretty good at adapting to various humidity levels.
While they enjoy some moisture in the air, they’re generally flexible when it comes to humidity.
However, in particularly dry climates or during dry spells, you might need to water them more frequently.
On the other hand, if you’re in a region with very high humidity, ensure good air circulation around your plants to prevent fungal diseases.
So, there you have it, with some smart humidity control, your hydrangeas can truly flourish!
Hydrangea Maintenance

Hey there, fellow hydrangea enthusiast! Welcome to the world of hydrangea maintenance, a delightful space where you’ll get to know your plants even better.
In this section, we’ll explore the ins and outs of keeping your hydrangeas happy and healthy, from regular pruning to dealing with pests and diseases.
Whether you’re tending to your hydrangeas in pots indoors or showing off your green thumb outdoors, we’ve got the tips and tricks you need to help your hydrangeas thrive.
Remember, a little care goes a long way in the plant world, so let’s roll up our sleeves and get started!
Watchful Eyes: Regular Inspection for Pests and Diseases
Believe me when I say, keeping a keen eye on your hydrangeas is one of the best favors you can do for them.
Regularly checking your hydrangeas for signs of pests and diseases can save you a lot of trouble down the line.
Look out for any discoloration, unusual spots, or nibbled leaves that might signal an unwelcome visitor or illness.
If you spot anything suspicious, take action quickly. There are plenty of organic and chemical treatments available, so you can choose one that suits your plant parenting style.
Remember, the sooner you spot and treat the problem, the better your hydrangea’s chances of recovery.
In Tune with the Seasons: Seasonal Care Routine
As the seasons change, so do the needs of your hydrangeas. The seasonal care routine is a fantastic guide to help you know what your hydrangea needs at different times of the year.
• In spring, look out for new growth and start your fertilizing schedule.
• As summer rolls in, focus on regular watering and deadheading spent blooms to encourage new growth.
• When autumn arrives, it’s time to stop fertilizing and let your hydrangea prepare for winter dormancy.
• Finally, in winter, keep your hydrangea insulated if outdoors, or in a cool, bright place if indoors.
• And of course, always keep an eye out for any seasonal pests or diseases.
It’s a bit like a dance, really – you and your hydrangea, in step with the seasons!
Pruning Hydrangea
 Shrub, dwarf form with white flowers, #3 - Size Container")
It’s time to put on those gardening gloves and get a little hands-on, as we delve into the art and science of pruning hydrangeas.
Yes, you heard it right, pruning is indeed a form of art, as much as it is about science.
And for our hydrangeas, it’s a touch of tender love and care they’ll appreciate.
Whether it’s controlling the size, promoting vigorous growth, or simply maintaining their breathtaking beauty, learning to prune your hydrangea in pots correctly is a skill every gardener should master.
So, shall we learn more about the snip, snip, snip that keeps our hydrangeas happy? Let’s dive in!
The Art of Deadheading
Call it the haircut for your hydrangeas, but deadheading is all about keeping your blooming buddies neat and tidy.
Deadheading is the practice of removing spent blooms, which can encourage new growth and sometimes, more blooms!
For hydrangeas, this simple yet vital task can keep your plant looking fresh and also helps focus the plant’s energy on healthier blooms.
So, next time when you spot a faded flower, get your pruners ready!
Sculpting Size and Shape: Pruning for Aesthetics
Think of this as giving your hydrangea a makeover. Pruning for size and shape is like a cosmetic touch-up that enhances the physical appearance of your potted hydrangea.
With careful cuts, you can control the overall size of your plant and shape it into a pleasing form.
Remember, the goal here is to maintain a balance between aesthetics and the health of your hydrangea.
A little patience, an artistic eye, and a sharp pair of pruners will go a long way!
Pruning According to Hydrangea Type: Knowing Your Blooms
Just like how every human is unique, each hydrangea type has its own specific pruning needs and schedules.
Certain types bloom on old wood (last season’s stems), while others bloom on new wood (the current season’s stems).
Understanding this is the key to successful pruning. For instance, Bigleaf and Oakleaf hydrangeas, which bloom on old wood, should be pruned immediately after they flower.
Meanwhile, Smooth and Panicle hydrangeas that bloom on new wood can be pruned in late winter or early spring.
So, before you make the first cut, take a moment to know your hydrangea!
Repotting Hydrangeas
 Shrub, dwarf form with white flowers, #3 - Size Container")
All set to take your hydrangea game to the next level? Well, you’ve arrived at just the right spot!
Our next stop is all about mastering the art of repotting hydrangeas.
Whether you’ve got a hydrangea that’s outgrowing its current home or you’re simply looking to freshen things up, repotting can make a world of difference.
In the following section, we’ll delve into the why, when, and how of repotting, so you’ll have all the information you need to keep your potted hydrangeas happy and thriving.
Grab your gardening gloves, it’s time to dive in!
Signs a Hydrangea Needs Repotting: Time to Upgrade?
Let’s start by understanding when to give your hydrangea a new home.
Have you noticed your hydrangea looking a bit under the weather lately? Is the growth slowing down?
These could be signs that it’s time for repotting. Other tell-tale signs include water quickly running through the pot or roots starting to escape through the drainage holes.
Remember, a happy hydrangea is one that has enough room to stretch its roots!
Step-by-step Repotting Process: Transplanting Made Easy
So, your hydrangea is giving you signals that it’s ready for a change. Now what?
No worries, we’ve got you covered with an easy, step-by-step process to repot your hydrangea without causing undue stress to the plant.
From choosing a new pot and preparing the potting mix, to gently removing the hydrangea from its old pot and placing it in the new one, we’ll guide you through each step.
By the end, you’ll feel like a pro ready to tackle the repotting process with ease!
Here’s a simple step-by-step guide for repotting your hydrangea:
Gather Your Supplies: You’ll need a larger pot with good drainage, fresh potting soil (ideally one that’s well-suited to hydrangeas), a trowel or small shovel, and a watering can.
Don’t forget your gloves if you don’t want to get your hands dirty!
• Prepare the New Pot: Fill your new pot about a third of the way with fresh potting soil.
• Remove the Hydrangea from Its Current Pot: This is where things can get a bit tricky, but don’t worry!
Gently tip the pot sideways and try to slide the hydrangea out. If it’s stubborn, you can tap the bottom of the pot to loosen things up or run a knife around the edge of the pot to help dislodge the root ball.
• Inspect and Prune the Roots if Needed: If you see any dead, diseased, or extremely tangled roots, now’s the time to prune them. Don’t go overboard though – just clean up what’s necessary.
• Place the Hydrangea in the New Pot: Set your hydrangea in the center of the new pot.
The top of the root ball should be about an inch below the rim of the pot.
Add or remove soil underneath the root ball until it’s at the right height.
• Fill in Around the Roots: Use your potting soil to fill in the space around the root ball. Gently firm the soil down, but be careful not to pack it too tightly.
• Water Thoroughly: After repotting, give your hydrangea a good drink. Water until moisture comes out of the drainage holes in the bottom of the pot.
• Monitor the Plant: For the next few weeks, keep a close eye on your hydrangea.
It might go through a bit of transplant shock and look a little wilted at first, but don’t panic! Keep it in a slightly shaded area and maintain regular watering.
And that’s it! With a little patience and care, your hydrangea should bounce back and begin to flourish in its new pot in no time.
Propagating Hydrangeas
 Shrub, RB pink or blue, #3 - Size Container")
Got a thing for hydrangeas and are keen to grow more of them from the one you already have?
Then you’ve landed on the right page. This section is all about propagating hydrangeas, a rewarding process that allows you to multiply your favorite blooms.
We’ll delve into the basics, from the best time of year to start propagating, to the different methods you can use, including layering and cuttings.
With a bit of patience, you’ll soon have a collection of baby hydrangeas, ready to take on the world!
Whether you’re planning on creating an all-hydrangea flower bed or gifting a few to your friends, let’s get this propagation party started!
Propagation Methods
 Shrub, RB pink or blue, #3 - Size Container")
Stem Cuttings: The Power of a Single Branch
Growing hydrangeas from stem cuttings is one of the simplest ways to multiply your plants.
This method involves taking a young, healthy branch from your hydrangea, planting it in good-quality soil, and letting nature take its course.
With time, you’ll see that single branch morph into an entire hydrangea bush, brimming with vibrant blooms.
Hydroponic Rooting: Water, the Cradle of Life
If you’re into exploring different plant propagation methods, why not try rooting hydrangea stem cuttings in water?
This method, known as hydroponic rooting, lets you watch as new roots gradually form from your cuttings.
Plus, it’s a fantastic way to propagate hydrangeas if you don’t have soil or a garden space readily available.
Division: Split and Conquer
A more traditional method for multiplying your hydrangeas is by division. This involves digging up a mature hydrangea, splitting it into several smaller plants, and replanting them.
Although it might seem a little drastic, rest assured that hydrangeas are hardy plants that recover quickly, ready to grace your garden with even more beautiful blooms.
Layering: Rooting While Still Attached
Layering is a hands-off, fuss-free way to propagate your hydrangeas. This method involves bending a low-hanging branch to the ground, covering a section with soil, and letting it develop roots while still attached to the parent plant.
Once the branch has established its own root system, you can sever the connection and enjoy your new hydrangea plant.
From Seed to Bloom: A Labor of Love
Growing hydrangeas from seed requires time, patience, and a fair bit of commitment.
The process is more complex and takes longer than other methods, but the joy of seeing a plant grow from a tiny seed into a blooming hydrangea is a reward in itself.
Tips for Successful Propagation: Your Green Thumb Guide
In this section, we’ll go over some essential tips for propagating hydrangeas.
We’ll cover aspects like choosing the right cuttings, the best time for propagation, and how to care for your newly propagated hydrangeas. Stay tuned to grow your hydrangea collection successfully!
Here are some valuable tips to guide you through the process of hydrangea propagation:
• Choosing the right cuttings: Make sure to select healthy, vigorous stems for cuttings. Avoid using older, woody stems, and instead opt for semi-mature stems – these are typically the ones that have grown in the current season.
• Best time for propagation: The best time to take cuttings or perform division and layering is during late spring or early summer. This gives your new plants the entire growing season to establish themselves before winter arrives.
• Prepare the cuttings: When taking cuttings, make a clean cut just below a leaf node (where leaves attach to the stem). This area is rich in growth-stimulating hormones.
• Rooting medium: For stem cuttings and division, use well-draining soil or a potting mix with a high percentage of perlite or vermiculite. For hydroponic rooting, fresh, clean water is all you need.
• Care for your cuttings: Keep your cuttings moist but not overly wet, and locate them in a warm, brightly lit place, but out of direct sunlight.
• Patience is key: Remember, propagation isn’t an overnight process. It might take several weeks to a couple of months for cuttings to establish new roots. Resist the temptation to tug at your cuttings to see if they’ve rooted.
• Fertilize carefully: Once your cuttings have formed roots, a diluted liquid fertilizer can help boost growth. Be cautious not to over-fertilize, though, as this can harm young plants.
• When propagating from seeds, ensure they have a cold stratification period. This process simulates winter and helps break seed dormancy, increasing the chances of successful germination.
• Finally, remember that not every cutting or seed will be successful, and that’s okay. Don’t get disheartened. With practice, you’ll get the hang of hydrangea propagation.
With these tips in hand, you’re set to grow your own hydrangea forest, one cutting at a time!
Hydrangea Problems

Ah, the joys of gardening! It’s a beautiful sunny day, you have a refreshing beverage by your side, and you’re ready to tend to your hydrangeas.
But then, you notice something off – the leaves aren’t as vibrant, the blossoms aren’t as bountiful, or maybe there’s an unfamiliar spot on the stems.
When it comes to growing hydrangeas in pots, understanding common problems and how to address them is crucial.
In this section, we’ll shed light on potential hydrangea problems, from pests to diseases, and even environmental issues.
We’ll arm you with the knowledge to troubleshoot like a pro and keep your hydrangeas thriving.
Remember, it’s not about eliminating all problems (although that would be nice); it’s about learning, adapting, and growing – just like our favorite plants.
Let’s dive in and decipher these hydrangea mysteries together.
Problems with Hydrangeas in Pots: Unveiling Common Issues
If you’re noticing some struggles with your potted hydrangeas, don’t fret; it’s a common part of the growing process.
You’re on the journey to mastering hydrangea care in pots! In this experience, you may encounter issues such as leaf yellowing, droopy flowers, or even slow growth.
Many factors could contribute to these, including improper watering, incorrect soil pH, inadequate sunlight, or over-fertilization.
But the good news? Most of these issues are fixable with a few tweaks in your care routine.
Potted Hydrangea Wilting: Saving Your Thirsty Friends
Nothing brings a frown faster than seeing your lush, beautiful hydrangeas wilting in their pots.
Usually, this is a big red flag that your hydrangeas are screaming out for a drink. However, wilting could also be a sign of overwatering.
Yes, too much of a good thing can be harmful. The key is to ensure that your watering routine matches the needs of your specific hydrangea variety and its environment.
Are they in full sun or shade? Are they indoors or outdoors? Remember, balance is the name of the game here.
Pests and Diseases: Keeping Trouble at Bay
Say hello to the less-than-glamorous side of gardening: pests and diseases.
No matter how well you care for your hydrangeas, you may have to deal with pesky pests like aphids, spider mites, or powdery mildew.
And that’s okay! Pests are a part of nature, and learning to manage them effectively is an essential skill in your gardening toolkit.
Regular inspection of your plants can help you catch potential problems early and nip them in the bud.
After all, being proactive is the best pest control! And when it comes to diseases, remember that prevention is better than cure.
Proper watering, good air circulation, and a clean environment can go a long way in keeping your hydrangeas disease-free.
Pests: Uninvited Guests and How to Handle Them
• Aphids: These small, sap-sucking insects can cause hydrangea leaves to turn yellow and stunt growth.
To treat aphids, you can try spraying your hydrangeas with a mixture of water and a few drops of dish soap. For larger infestations, consider using a ready-to-use insecticidal soap or neem oil.
• Spider Mites: Tiny but mighty harmful, spider mites can cause speckled discoloration on hydrangea leaves. You can treat them similarly to aphids using soapy water or insecticidal soap or neem oil.
Increasing humidity around your hydrangeas can also discourage mites.
• Slugs and Snails: If you see holes in your hydrangea leaves, slugs or snails might be the culprits.
Try using a natural deterrent like crushed eggshells or diatomaceous earth around your pots.
Alternatively, there are eco-friendly slug and snail baits available.
Diseases: Prevent and Cure
• Powdery Mildew:
This fungus causes a white, powdery coating on leaves. To prevent it, ensure good airflow around your hydrangeas and avoid watering the foliage.
If your hydrangeas already have powdery mildew, you can treat it with a homemade spray of 1 tablespoon baking soda, 1/2 teaspoon liquid soap, and a gallon of water.
• Leaf Spot:
Brown or purple spots on your hydrangea leaves could be a sign of a fungal infection known as leaf spot.
To treat it, remove and dispose of any affected leaves and avoid watering from above. If the infection persists, you might need to use a fungicide.
• Root Rot:
Overwatering can cause root rot, a condition that leads to wilting and yellowing leaves.
If you suspect root rot, you might need to repot your hydrangea in fresh, well-draining soil. Cut back any rotten roots before doing so.
Remember, treating pests and diseases is all about observation, patience, and timely intervention.
So, keep a keen eye on your beloved hydrangeas and act quickly when something seems off. Happy gardening!
Hydrangea Care In Pots FAQ
 Shrub, RB purple, #3 - Size Container")
Welcome to the FAQ section, where we answer some of the burning questions you may have about growing and caring for hydrangeas in pots.
From watering to the best place for your hydrangea pot, we cover a range of questions to help you keep your hydrangeas healthy and blooming.
So, grab a cup of tea, sit back, and let’s dive into the fascinating world of hydrangea care.
Q. Do Hydrangeas do well in pots?
A. Absolutely! Hydrangeas can thrive in pots with the right care. They require a good-quality potting mix, regular watering, and a suitable pot size to accommodate their growth. Also, it’s crucial to place them in a location that gets morning sun and afternoon shade for the best results.
Q. How long can Hydrangeas live in pots?
A. With appropriate care, hydrangeas can live for many years in pots. It all comes down to the proper maintenance practices like watering, feeding, pruning, and repotting when necessary.
Q. Where is the best place for a potted Hydrangea?
A. The best place for a potted hydrangea is in a spot that receives morning sun and afternoon shade. Hydrangeas can get sunburnt with too much afternoon sun, especially in hotter climates.
Q. How do you keep potted Hydrangeas blooming?
A. Keep your potted hydrangeas blooming by providing them with consistent moisture, regular feeding with a balanced fertilizer, and proper pruning. Ensuring the plant isn’t crowded and has good airflow can also help prevent disease and promote blooming.
Q. Do you cut off dead Hydrangea blooms?
A. Yes, you should. This process is called deadheading, and it encourages new blooms by redirecting the plant’s energy from maintaining the dead blooms to producing new ones.
Q. When can I put my potted Hydrangea outside?
A. You can put your potted hydrangea outside after the last frost in spring when temperatures are consistently above freezing. Hydrangeas prefer cooler temperatures, so it’s best to move them outdoors in the cooler spring or fall months.
Hydrangea Care In Pots Final Thoughts
 Shrub, RB purple, #3 - Size Container")
In the wonderful world of gardening, the charm of hydrangeas is hard to resist! They have a certain magnetism that draws us in, with their cloud-like clusters of blooms and rich green leaves.
Whether you’ve recently decided to dip your toes into this hydrangea adventure or you’ve been a fan for years, it’s evident that caring for these gems in pots can elevate your garden’s aesthetics while also giving you an enriching gardening experience.
So, let’s wrap up what we’ve learned about hydrangea care in pots and keep these guidelines handy for the days of gardening ahead.
Summary of Key Points
- Caring for Hydrangea in pots involves selecting a large container with good drainage, using well-draining soil.
- Place the pot in a location that receives morning sun and afternoon shade.
- Water the plant thoroughly when the top inch of soil feels dry.
- Fertilize with a balanced formula during the growing season.
From our colorful journey through the world of hydrangeas, it’s clear that these captivating beauties require some attention, but oh, the rewards!
We’ve covered everything from understanding the different varieties of hydrangeas, the right type of pot, soil preferences, watering, and fertilizing needs, to nuances like temperature and humidity tolerance.
We also dove into maintenance, pruning, repotting, propagation, and finally, troubleshooting common problems.
Remember, the essence of hydrangea care in pots revolves around providing the right conditions, especially in terms of pot size, soil, watering, and sunlight.
Proper fertilization and regular inspection for pests and diseases will ensure your hydrangea thrives, whether indoors or outdoors.
Encouragement for New Hydrangea Growers
If you’re just starting out on your hydrangea journey, it’s totally okay if it feels a bit overwhelming.
Keep in mind that the world of gardening is not about perfection, but about learning, growth, and enjoyment.
You’re at the beginning of a fantastic journey, and every bit of effort you put into it is a step towards creating your own little hydrangea heaven.
Every hydrangea has its own personality, so take the time to get to know your plant and observe its growth habits.
Don’t be afraid to ask questions, seek advice, and learn from your experiences – both the successes and the not-so-successful. It’s all part of the ride.
Remember, a garden is a friend you can visit any time and hydrangeas make splendidly loyal, vibrant, and enduring friends.
So here’s to all the joy, color, and fulfillment your new hydrangea friends will bring into your life!
Read more: Backyard Gardening Ideas: Easy Garden Ideas For Beginners
Ready to upgrade your backyard? These expert guides will help you grow beauty, food, and function right outside your door.
🌼 Backyard Gardening Guides
- 🏡 Backyard Gardening Ideas (Pillar Guide)
- 🌳 Red Tip Photinia Privacy Hedge
- 🌸 Planting Dahlia Seeds
- 🪴 Best Soil for Dahlias in Pots
- 🫐 Growing Blueberries in Pots
- 🌿 Cold Hardy Tea Plant
- 🧄 Growing Goji Berries in Pots
- 🌱 How to Grow Creeping Thyme
- 🌺 Growing Balloon Flowers from Seed
- 🌼 Growing Penstemon in Pots
- 🐝 Growing Echinacea in Pots
- 🪻 Plant Creeping Phlox
- 🌞 Care for Verbena in Pots
- 🌾 Growing Poppies in Pots
- 🌷 Dahlia Care in Pots
- See all articles in our Backyard Gardening category

 Steve S. is the creator of