
Want a burst of elegant color without a big garden? With Bearded Irises In Pots, you can stage dramatic blooms on a patio, balcony, or sunny stoop—and move them wherever they look best.
You’ll love the flexibility: rotate containers for perfect photos, refresh displays seasonally, and keep your favorite varieties right at eye level.
If you’re thinking about growing Bearded Irises in Pots these striking flowers aren’t just for garden beds. They thrive in containers, too.
Whether you’re working with a patio, balcony, or sunny window box, potted bearded irises can add bold color and elegance to small spaces.
This guide will show you how!
How To Grow Bearded Irises In Pots
- To grow bearded irises in pots, use a container at least 12 inches wide with drainage holes.
- Fill it with well-drained soil, plant rhizomes near the surface, and place in full sun.
- Water only when the top inch is dry.
- Fertilize lightly in spring for vibrant blooms.
Introduction to Bearded Irises In Pots
 Bearded Iris Pretty Flowering Mix, Live Rhizomes, Roots, Plants")
If you’re fascinated by the thought of those lush, radiant bearded irises gracing your personal space but are short on garden space, don’t worry!
Growing bearded irises in pots is not just doable, but it also brings an element of versatility to your gardening.
With pots, you can move them around, arrange them for maximum effect, and control their environment easily.
In this guide, we’ll get up close and personal with these captivating blooms and explore the world of potted irises together.
Ready to dive in? Let’s get started!
Introduction to Bearded Irises
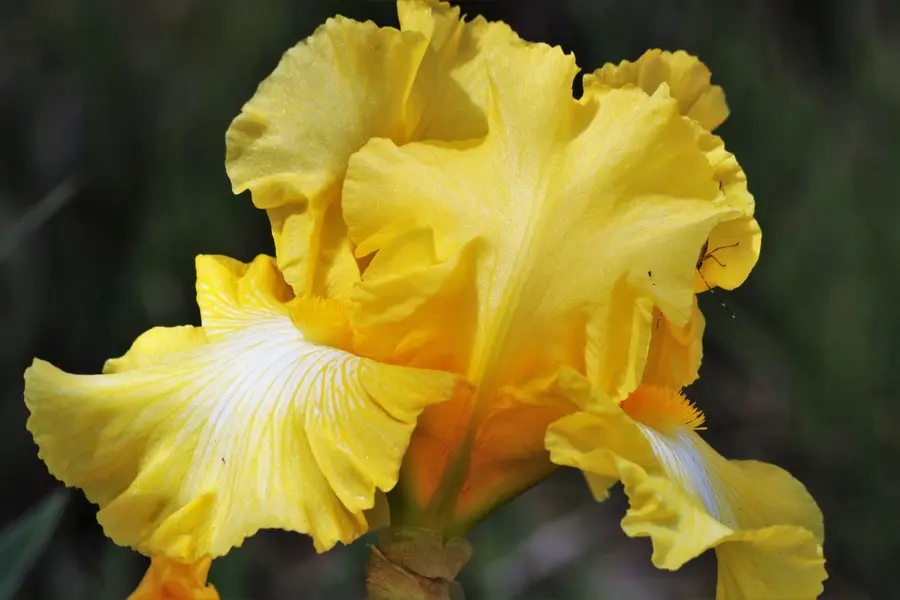
So, what’s the deal with Bearded Irises? Named for the Greek goddess Iris, these perennial beauties truly live up to their divine origins.
Bearded Irises are known for their distinctive ‘beards’, the fuzzy streaks running down the middle of the lower petals, or falls, in iris-speak.
And if you’re in love with the tall varieties of irises, you’re in for a treat as many bearded irises are tall bearded irises.
Why Grow Bearded Irises in Pots?
Well, I’m glad you asked. When you opt for growing irises in pots, you’re signing up for a bunch of benefits.
Not only do they save on garden space, but they also allow you to control their growing environment.
Too much sun or a bit of frost coming up? No worries, just move your pot.
Plus, they make it easier to prevent common issues such as wet soil or heavy clay soils that can lead to root or rhizome rot.
Understanding the Anatomy of Bearded Irises
Bearded irises have a unique anatomy that adds to their charm.
With sword-like leaves, these distinct flowers are six-petaled wonders. Three upper petals called standards rise upwards, while the three lower falls descend.
The beard that each fall presents is actually a row of short, upright hairs that guide pollinators into the flower.
It’s all a pretty smart system, right?
Bearded Iris Plant Care Reference Guide
| Characteristic | Details |
|---|---|
| Common Name | Bearded Iris |
| Botanical Name | Iris germanica |
| Native Habitat | Southern Europe, Mediterranean regions |
| Plant Type | Rhizomatous perennial |
| Growth Pattern | Clumping, upright foliage |
| Mature Size | 12 to 36 inches tall and wide |
| Watering | Water when top inch of soil is dry; avoid soggy soil |
| Light/Sun Exposure | Full sun (6+ hours daily) |
| Soil Type | Well-drained mix of coco coir and perlite |
| Soil pH | Neutral to slightly acidic (6.5–7.0) |
| Temperature | Thrives between 60–75°F (15–24°C) |
| Humidity | Low to moderate |
| Bloom Time & Flower Color | Late spring to early summer; purple, yellow, white, pink, more |
| Potential Problems | Rhizome rot, iris borer, leaf spot |
| Repotting | Every 3–4 years; divide crowded rhizomes |
| Hardiness Zones (USDA) | Zones 3–10 |
Ideal Conditions for Growing Bearded Irises
If you’re keen on growing these beauties, understanding their ideal growing conditions is crucial.
They love well-drained soil so remember, we don’t want any soggy feet.
A mix of well-drained soil coco coir, and perlite will do wonders here. Don’t try to use garden soil in a pot as it will compact too much.
They also need a good 6 hours of direct sunlight daily, so keep that in mind when choosing where to place your pots.
Bearded Iris Hardiness Zone
When it comes to their hardiness zone, bearded irises are pretty tough cookies.
They’re usually hardy in USDA zones 3 through 10, which covers a wide range of climates.
So, whether you’re facing a frosty winter or a hot summer, your bearded irises are likely to thrive.
Bearded Iris Colors
The color spectrum of bearded irises is a joy to explore. From the deepest purples to the softest pinks, the most vibrant yellows to crisp whites, there’s a bearded iris for every palette preference.
Want to create a gradient effect with your potted irises? Go ahead, let your creativity run wild!
When Do Bearded Irises Bloom

The bloom season for bearded irises typically falls between late spring and early summer.
It’s when they put on their best show, dressing up your spaces with a vibrant burst of color.
Bearded Iris Sun or Shade
Here’s the scoop, bearded irises love the sun! Yes, full sun exposure is ideal for these pretty perennials, as it promotes healthier and more abundant blooms.
So, while they can tolerate some shade, make sure they get plenty of sun for most of the day.
And remember, if the weather gets too hot, the advantage of potted irises is that you can always move them to a cooler spot!
Detailed Guide to Growing Bearded Irises in Pots

Now that we’re acquainted with the fabulous bearded irises and their requirements, let’s get our hands a little dirty, shall we?
In this section, we will guide you through the process of growing bearded irises in pots, step-by-step.
From choosing the perfect pot to finally planting the iris, we’ve got you covered.
Don’t worry if you’re new to this; gardening is a journey of learning and enjoying.
So, grab your gardening gloves, and your favorite pot, and let’s jump right in!
How to Plant Bearded Iris
Let’s start with the basics, how to plant a bearded iris. It’s really quite simple once you know the ropes.
The most crucial thing to remember is that the rhizome, which is like a fleshy bulb, should be close to the soil surface.
It might seem unusual, but it’s this exposure to the sun that helps the iris to thrive and bloom beautifully.
Choosing the Right Pot
Next up, you need to pick the perfect home for your iris, the pot.
This is where our iris will be living, so we need to get it right. Iris plants love good drainage.
Hence, choose a pot with plenty of drainage holes. The size of the pot also matters.
Too small and your iris will feel cramped, too big and it will feel lost.
A good rule of thumb is to go for a pot that’s about 12-16 inches in diameter and about 8-10 inches deep.
This will give the bearded iris rhizomes plenty of room to spread out and grow.
Soil – Coco Coir and Perlite Mix
Now, about the soil. We’ve already talked about how irises don’t like their feet wet, right?
That’s where our soil mix comes in. A mix of coco coir and perlite is just what your iris needs.
The coco coir holds moisture without getting soggy, the perlite ensures good air circulation, and the garden soil provides nutrients.
It’s the perfect blend to keep the root system happy and promote a stunning bloom season.
Planting Bearded Irises in Pots: A Step-by-Step Guide
Alright, now that we have all the pieces of the puzzle, let’s put them together.
• Begin by filling your chosen pot about halfway with your soil mix.
• Place the iris rhizome in the center of the pot, making sure the roots spread out.
• Add more soil around the roots, but remember to keep the top of the rhizome at or slightly below the soil level.
• Water thoroughly but make sure the water drains out – no puddles allowed here!
• Finally, place your potted iris in a sunny position.
There you go! You’ve just planted your first bearded iris in a pot! Now, it’s time to care for it and watch it grow into a beautiful flower.
Caring for Bearded Irises in Pots: Bearded Irises Care

We’ve successfully navigated the planting phase together, and now it’s time to ensure our bearded irises are well taken care of in their new potted homes.
Just like us, plants also need attention and love to thrive and be their best selves.
This section is all about nurturing our green friends. We will dive into the specific water requirements of bearded irises, figure out their dietary needs in terms of fertilizers, and discuss their sunbathing habits.
Ready to play the caring gardener? Let’s go!
Watering – Bearded Iris Water Requirements
So, let’s begin with water, the essence of life for all plants.
Bearded irises, with their natural resilience, are somewhat drought-tolerant and do not appreciate too much moisture.
Overwatering can lead to rhizome rot, a common fungal disease among irises.
A good rule to follow is to water thoroughly, then allow the top inch of soil to dry out before the next watering.
Remember, we want a happy medium between soggy and dry so think moist.
And in hot weather, monitor the soil more frequently to prevent it from drying out completely.
Fertilizing
When it comes to feeding your bearded irises, less is more.
These perennials are low-maintenance and can do well with limited nutrients.
However, for the best blooms, you might want to spoil them a little.
An application of a low-nitrogen fertilizer in early spring and again in late summer should do the trick.
Just be careful not to overdo it, as too much nitrogen can lead to lush leaves but fewer blooms and make the plant more susceptible to diseases like leaf spot.
Sunlight Requirements – Bearded Iris Sun Exposure
Let’s talk about sunlight. Your bearded irises love soaking up the sun. In fact, they need at least 6 hours of full sun each day to thrive and bloom to their fullest.
So place your pot in an open sunny position. However, in very hot climates, some afternoon shade won’t hurt.
And remember, one of the benefits of growing irises in pots is the ability to move them around to find that sweet spot of sunlight exposure.
Keep an eye on your plant and adjust as needed.
After all, caring for your irises is a bit like caring for a friend and it’s all about understanding their needs and making little adjustments to keep them happy.
Bearded Irises Care Advanced Tips and Common Issues

Now that we’ve covered the basics of bearded iris care, let’s step up our gardening game a bit, shall we?
After all, when we strive to be the best, we must be ready to go the extra mile.
In this section, we’ll dive into some advanced tips for bearded iris care and tackle some common issues you might encounter along the way.
From dividing and repotting to pruning, deadheading, and dealing with pesky pests and diseases, we’ve got your back.
So, roll up your sleeves, and let’s get into it!
Dividing and Repotting Bearded Irises
As your bearded irises grow, you’ll notice that the clump starts to get crowded and the center begins to die out.
That’s your plant’s way of telling you it’s time for a little more space.
Generally, you should consider dividing your iris plants every three to four years.
The best time to do this is usually in late summer to early fall, after flowering, but before the cold weather sets in.
To divide, carefully remove the iris from the pot and gently separate the rhizomes.
Each piece should have a fan of leaves and a portion of the rhizome.
Then, repot using fresh soil, just like you did when planting. And voila!
You’ve not only given your plant more space but also created new plants to grow or share with friends!
Pruning
Pruning your bearded iris isn’t complicated. Just trim back the sword-like leaves to about six inches in the fall.
This helps prepare the plant for winter and reduces the risk of pests and diseases.
Deadheading
Deadheading, or removing spent flowers, is another care task that you’ll want to keep up with.
Doing this encourages the iris to focus its energy on growing stronger and creating more beautiful blooms for the following year, rather than producing seed pods.
Dealing with Common Pests and Diseases
Unfortunately, even with the best care, irises can occasionally fall victim to pests and diseases.
The most common pest is the iris borer, a caterpillar that tunnels into the rhizome.
As for diseases, irises are susceptible to leaf spot and rhizome rot.
Regular inspection, proper watering, and maintaining good air circulation by not overcrowding your pots can go a long way in prevention.
If you do notice signs of pests or diseases, don’t panic.
For iris borers, you can handpick them off. For leaf spot or rhizome rot, you can use a fungicide.
Just remember, the best solution is always prevention, so keep an eye on your irises and enjoy the journey of growing these beautiful flowers.
Growing Bearded Irises from Seed

For those of you who love to watch the entire process unfold from the very beginning, growing bearded irises from seed can be an exciting and rewarding journey. Let’s get started on this path!
Stratification
You need to provide a period of cold treatment for the seeds, also known as stratification.
In nature, iris seeds undergo this process naturally during winter. At home, you can mimic this by placing your pot in a plastic bag and keeping it in the refrigerator for about 12 to 14 weeks.
Sowing the Seeds
Starting bearded irises from seed requires some patience, but the results can be truly unique and delightful.
To sow the seeds, fill a pot with well-drained soil and place the seeds on top.
Lightly cover the seeds with about a quarter-inch of soil. Remember our key iris growing concepts is good drainage and good air circulation.
Germination
After the cold period, it’s time for germination. Place the pot in a warm, well-lit area and keep the soil slightly moist.
Soon enough, you’ll begin to see sprouts! Bearded iris seeds can take anywhere from several weeks to a few months to germinate, so patience is key.
Seedling Care
Once the seedlings are a few inches tall, they can be transplanted into individual pots.
Continue caring for them just like you would for an adult bearded iris, with lots of sun, good drainage, and occasional feeding.
Growing bearded irises from seed can be a slow process, but it’s incredibly rewarding to see the unique characteristics of each iris flower as they bloom.
Plus, you’ll have the satisfaction of knowing you brought these beautiful flowers to life right from their humble beginnings as seeds.
Propagating Bearded Irises by Division

If you’re looking for a faster way to multiply your iris collection, division is the way to go.
Division of bearded irises is not only a propagation method but also a crucial part of their regular care. Let’s go through the process step by step.
When to Divide
The best time to divide bearded irises is in late summer to early fall, after the blooming period but before the onset of cold weather.
This allows the newly divided rhizomes to establish themselves before the winter dormancy.
Digging Up the Clump
Start by digging up the entire clump of irises. Bearded irises grow from thick, fleshy roots called rhizomes that rest on the soil surface.
So, loosen the soil around the clump with a garden fork or a spade, and lift the clump out of the soil.
Dividing the Rhizomes
Once you have the clump out of the ground, you can see the individual rhizomes.
Separate each rhizome by hand, making sure that each piece has a fan of leaves and a healthy portion of the rhizome.
If you notice any rhizomes that are soft or diseased, discard them.
Replanting
Now, replant each rhizome in its own pot or a new location in your garden.
Remember our earlier planting guide – rhizomes should be partially exposed, and the fan of leaves should face towards the sun.
Dividing your bearded irises will rejuvenate older clumps, prevent overcrowding, and reward you with more plants.
It’s a win-win situation! So, when late summer rolls around, grab your garden tools and let’s divide and conquer.
Bearded Irises in Pots FAQ

Let’s face it, as much as we love tending to our bearded irises, we all have those burning questions that crop up every now and then.
No need to wonder in silence, we’ve got your back! In this section, we’ll tackle some of the most frequently asked questions about bearded irises in pots.
Whether you’re puzzled about pot selection, curious about post-flowering care, or simply pondering if irises are the right fit for your garden, we’ve got the answers you need.
So let’s dive into these FAQs and quench your curiosity!
Q: Can Bearded Iris be grown in pots?
A: Absolutely! Bearded irises adapt quite well to container culture. It’s an excellent option if you’re short on garden space, or if you simply want to add some vertical interest to your patio or balcony.
Q: Do irises grow well in pots?
A: Yes, irises can thrive in pots, provided they have good drainage and receive plenty of sunlight. Just remember, they like their rhizomes to be on the soil surface, even in pots.
Q: What are the best irises for pots?
A: While most irises can adapt to pot culture, dwarf iris varieties and bearded irises tend to do especially well in pots. They have beautiful blooms and are easier to manage size-wise.
Q: What to do with irises in pots after flowering?
A: After your iris has finished blooming, it’s a good idea to deadhead spent flowers.
Once the foliage starts to yellow in late summer or fall, you can cut it back to about six inches. Remember to periodically check the rhizomes to make sure they’re not buried too deeply in the soil.
Q: Do bearded iris need to be cut back?
A: Yes, bearded irises should be cut back in the late summer or early fall. Trim the leaves to about six inches. This helps prepare the plant for winter and reduces the risk of pests and diseases.
Q: Should I deadhead bearded irises?
A: Deadheading, or removing spent flowers, is a good practice. It encourages the iris to focus its energy on growing stronger and producing more blooms next season, rather than on seed production.
Conclusion

Well, folks, we’ve come a long way on this bearded iris journey, haven’t we?
From learning about the anatomy and perfect growing conditions for these vibrant flowers to understanding their care needs and tackling some common questions, we’ve covered quite a bit of ground.
But as we all know, in the garden, there’s always room to grow.
So, as we wrap up this colorful journey into the world of bearded irises in pots, let’s take a moment to recap the highlights and set our sights on a blooming future.
So sit back, enjoy that cup of tea, and let’s reflect on our iris adventure together.
Let’s jog down memory lane:
We kicked off our journey with an introduction to bearded irises, those vibrant and tall bearded irises that are a delight in any garden.
We spoke about their unique characteristics and the variety of colors they offer.
We learned why growing them in pots is beneficial, offering flexibility in placement, easier pest control, and a great option for limited space.
Then, we dived into the nitty-gritty of how to plant these beauties.
We discussed the importance of choosing the right pot with good drainage, the ideal soil mix of coco coir and perlite, and a step-by-step guide on planting the irises in pots.
Next, we delved into the essential care requirements of watering, fertilizing, and ensuring the right amount of sun exposure to keep our irises blooming bright.
We moved on to some advanced care tips and common issues such as dividing and repotting, pruning, deadheading, and how to deal with common pests and diseases.
We even covered a special section on growing these beauties from seeds and propagating them by division.
Lastly, we addressed some frequently asked questions to clear up any remaining doubts.
How To Grow Bearded Irises in pots quick recap
- To grow Bearded Irises in pots, choose a container at least 12 inches in diameter and fill it with well-drained soil.
- Plant rhizomes near the soil surface, spacing them 8 to 12 inches apart.
- Place the pot in a sunny location and water moderately, allowing the soil to dry slightly between waterings.
- Fertilize sparingly for optimal blooms.
Give growing Bearded Iris a try
So, there you have it, a comprehensive guide to growing bearded irises in pots.
It might seem a bit daunting at first, but remember, every beautiful iris started as a humble seed or a bare root plant.
And with your love and care, they too will grow into beautiful flowers, adding colors to your garden and joy to your day.
Now, it’s time to roll up your sleeves, get your hands a little dirty, and begin your journey as a bearded iris grower.
Remember, gardening is not just about the destination, but also the journey.
So take your time, enjoy the process, and watch your garden come alive with the vibrant hues of bearded irises. Happy gardening!
Ready to upgrade your backyard? These expert guides will help you grow beauty, food, and function right outside your door.
🌼 Backyard Gardening Guides
- 🏡 Backyard Gardening Ideas (Pillar Guide)
- 🌳 Red Tip Photinia Privacy Hedge
- 🌸 Planting Dahlia Seeds
- 🪴 Best Soil for Dahlias in Pots
- 🫐 Growing Blueberries in Pots
- 🌿 Cold Hardy Tea Plant
- 🧄 Growing Goji Berries in Pots
- 🌱 How to Grow Creeping Thyme
- 🌺 Growing Balloon Flowers from Seed
- 🌼 Growing Penstemon in Pots
- 🐝 Growing Echinacea in Pots
- 🪻 Plant Creeping Phlox
- 🌞 Care for Verbena in Pots
- 🌾 Growing Poppies in Pots
- 🌷 Dahlia Care in Pots
- See all articles in our Backyard Gardening category

 Steve S. is the creator of