
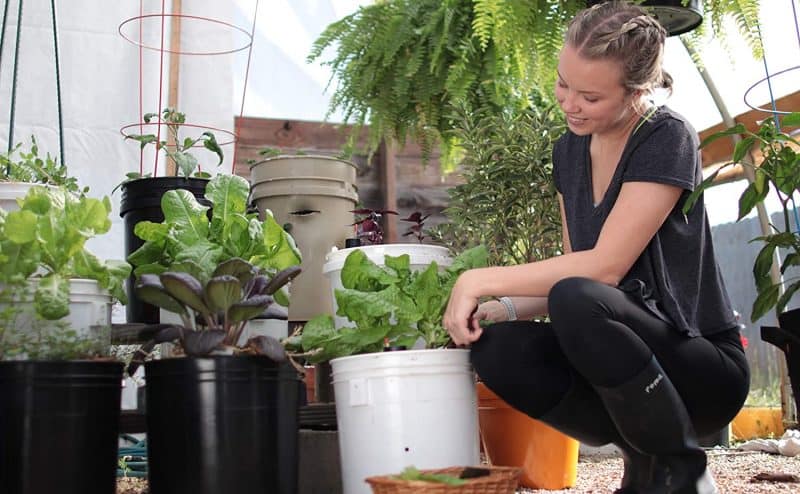
Looking for an easier way to grow healthy plants? The GroBucket Garden Kit lets you turn a simple 5-gallon bucket into a self-watering garden that practically takes care of itself.
Explore the ease and efficiency of the GroBucket Garden Kit! Transform any 5-gallon bucket into a thriving garden space, perfect for any home gardener.
GroBucket Garden Kit Key Takeaways:
- The GroBucket Garden Kit transforms a regular 5-gallon bucket into a self-watering planter.
- It utilizes a wicking system for efficient water delivery, ensuring plants receive the right amount of moisture.
- Perfect for various plants, it’s an ideal solution for space-saving and water-efficient gardening.
Are you ready to revolutionize your gardening experience? The GroBucket Garden Kit offers an innovative solution, turning any standard 5-gallon bucket into a self-watering planter.
Ideal for urban gardeners, busy plant enthusiasts, or anyone looking to simplify their green routine, the GroBucket is your ticket to a hassle-free, lush garden.
GroBucket Self Watering Planter
Discover the simplicity and efficiency of the GroBucket Garden Kit, a revolutionary solution for transforming ordinary 5-gallon buckets into self-watering planters
The GroBucket garden kit from GroTech garden products allows you to use the GroBucket insert to quickly and easily convert a 5-gallon bucket into a self-watering planter.
You can use it as a container garden for indoor plants or use it outdoors. It can be used as a portable garden to move plants from the sun to shade or indoors when the weather turns cold to extend your growing season.
This self-watering container makes it easy to take care of your plants.
With its water reservoir with a water-level indicator, you will always know when it’s time to water plants.
The GroBucket self-watering plant kit eliminates frequent watering. It works by capillary movement from bottom to top in all weather conditions and for any type of plant.
I just set out my new GroBucket garden kit. Here is my GroBucket unboxing and setup article.
So this will be a GroBucket review with live plants in it.
So the self-watering insert for a 5-gallon bucket is easy to install. Besides placing it in the bucket you will need to drill a small overflow hole and that’s it.
In 5 minutes or less, your old school grow bucket will be transformed into a highly efficient self-watering planter. Just follow the simple GroBucket instructions.
It has many positive reviews so you might want to buy a grobucket garden kit for yourself and ditch those old outdated outdoor plant pots.
Get this great grobucket system delivered to you in the comfort of your own home and start growing beautiful garden plants.
")
My Honest GroBucket Review
I actually own the GroBucket inserts and have been using them to grow tomatoes and peppers. I can truthfully say they work.
I am going to talk about the best growing medium for your GroBucket self and how to fertilize your self-watering bucket.
Self-watering planters are also called SIPs or sub-irrigated planters and I think it is a bit more accurate because these planters are only self-watering until the reservoir runs out.
But if you are tired of guessing when to water or having to water every day you need to buy a GroBucket garden kit. They come with 3 or 10 inserts and you provide the buckets yourself.
") GroBucket Fertilizer
GroBucket Fertilizer
")
And now we’re going to feed our grow buckets and we’re going to talk a little bit about watering your self-watering bucket insert and GroBucket fertilizer.
The pepper plant in the middle doesn’t look that happy the way the leaves are rolled but I think it will settle in in a few days.
It says in the GroBucket instructions to water from the top the first few times.
I think the main reason for doing that would be to make sure your soil is well moistened and has settled so that the mixture in the reservoir can wick up properly.
Also, the roots are still pretty shallow right now.
If the soil is not moist it will not be able to wick up moisture effectively.
So don’t fill your self-watering bucket with dry soil. Moisten it first.
Feeding Time For The GroBucket Garden Kit
So ordinarily I probably would wait to feed and water because these plants were just absolutely soaked at the nursery.
I mean they were way overwatered, literally hosed and that’s probably what’s causing the leaf rolling on that pepper plant.
I brought out a bucket of nutrients and I have three gallons of nutrient solution here. I’m going to put a gallon through each bucket.
I measured this with my TDS meter and my pH pen and right now these nutrients are about 450 parts per million and the pH is 6.2.
So it’s not a real heavy feeding. But it’s enough to get some nutrients into the coco and I’ll talk about that a little bit more as we go along.
I figure because my transplants were really wet the best thing to do is water it all around the edge and not soak the middle.
But the coco coir I am using is moist and precharged which I will talk about a bit later on in this article.
So each plant will get about a gallon of water and most of that should perk down and fill the reservoir.
This will help settle the coco down and get things off to a good start.
What Is A GroBucket Kit?
The GroBucket kit is used to turn a 5-gallon bucket into a sub-irrigated planter also called a self-watering planter. The kit contains the insert, a feed tube, and a water level indicator.
")
You will need to provide the buckets. Other than that you will need to drill one drain hole in each bucket.
GroBucket kits come in 3 and 10 bucket kits.
GroBucket inserts form a small reservoir under your plant. You will fill in around the insert and then add more soil above it and then your plant or plants.
Wicking action pulls the liquid up through the soil where the plant roots are watered.
The result is happy plants that are never over or under-watered.
In my other video, I talked about why you want to use coco coir instead of potting soil but you can use anything you want.
I mean it will all work, just some work better than others and not everybody gets the same results even from the same things.
But do not use garden soil!
")
How To Use a Grow Bucket Garden Kit the Right Way
The GroBucket garden kit is a self-watering planter that takes advantage of wicking. It was designed to be fed and filled through the feed tube. You do add water from the top to settle your new plants in.
From that point on use the feed tube. Do not be tempted to just pour water into the top of the bucket. This would totally defeat the whole purpose of a self-wicking planter.
No, it won’t likely kill your plants but they will be overwatered by the time you fill the reservoir and get some runoff.
When you fill your GroBucket as it was designed to work make sure you add water until some runs out of the drain hole.
This will help leach out any excess salts and refresh the water in the reservoir.
Also here is an article about it Growing Vegetables In Coco Coir Get Amazing Results

So anyhow while these were getting watered in I am not seeing the water level indicators rise up very much. But I can add more water later and they won’t be drying out any time soon.
When you transplant it’s a good idea to keep things a bit on the dry side. It forces the plant to spread its roots and search for water.
GroBucket Soil Or Coco Which Is Best?
")
I want to talk to you about a couple of things. First up I did talk earlier about why I think coco is a better growing media but it’s your choice. You can use coco or you can use peat-based media and either one will work.
But coco has much better wicking properties than peat-based soil mixes. Since the GroBucket is a wicking planter it is the obvious choice.
How To Use Coco Coir In A GroBucket
Coco really is not like soil and should be treated differently for the best results.
Technically coco coir is a hydroponic grow media. It is basically inert and provides very little nutrition on its own so it needs to be fed.
It also needs to always remain moist for the best results. That makes it a perfect choice for a GroBucket kit or any other self watering planter system.
My GroBucket Garden Kit Uses Coco Coir
The thing about coco is it’s kind of a strange animal in that it holds on to certain nutrients more than others and sometimes that’s a good thing and sometimes it’s not.
The main thing you want to do with your coco is to pretreat it before planting anything in it.
Because what you want to do is get some calcium and magnesium in there.
Like I said coco coir is an inert hydroponic media. If you treat it like hydro it will really perform for you but if you treat it like soil you will be missing out on a lot.
Coco needs to be primed before you use it. I use CaliMagic from General Hydro. There are other brands but I found that one to be the best. I use that to prime my coco and I add about 300 parts per million of that when I’m soaking my coco.
I use Canna coco bricks. I don’t like to buy big loose bags instead I buy coco bricks. The bags are moist and can become a home for bugs.
Bricks are bone dry and of no interest to bugs and also much easier to carry and store.
You just throw them in a bucket with water and CalMag and they swell up.
A brick makes about 5 gallons of coco and soaks up about 3 gallons of water.
You will want to add CalMag to this water to prime your coco coir for growing.
I really recommend if you’re going to use coco use Canna it’s the best out there.
If you buy cheap coco it could have a lot of salt in it and you’d have to leach all that out or it would ruin your plants.
• Important! Always add some nutrients every time you water.
• Coco should always be kept moist.
• This is not like soil where you alternate feedings or wait for it to dry out.
How To Feed Your Coco – Hint Add CalMag When You Feed
So if you’re going to use coco please use Canna Coco to get off to a good start. Then you’ll want to pretreat it with a little bit of CalMag.
If you can, use CaliMagic from General Hydroponics. It’s pretty cheap and you can get it on Amazon. One ml per gallon works out to about 100 ppms.
But during the time the plants are actually growing you will still probably need to add magnesium and the cheapest way to do that is to get Epsom salts from your grocery store or drugstore.
Half a teaspoon will raise a gallon of water 300 parts per million that is the most you would ever want to put in one of these buckets at a time.
Your plants probably will need it every time you feed. The problem is it won’t add calcium.
Some water has enough calcium and magnesium naturally but my water measures 30 ppm total so it is very soft meaning there are no minerals in it.
Reverse osmosis water measures 0 ppm. Many water systems in the US measure 150 ppms or more but I need to add minerals.
The thing is magnesium is in the center of the chlorophyll molecule and when your plants get short on it they get yellow leaves kind of like what this pepper has.
It may be that, I really don’t know. Like I said they came from the nursery so I didn’t raise them and I don’t know what they fed them.
I don’t know how well they took care of them but I know they watered the crap out of them so they were sitting soaking wet in the shade and that’s not really a good thing.
So what I do is I add CaliMagic when I’m making up my coco and then I use some during the growing season.
But once I move into flowering and fruiting time I go over to the magnesium sulfate because the plants don’t need the added nitrogen that’s in there.
The calmag formula has some nitrate nitrogen, it has calcium that has magnesium, and a little bit of iron in it.
All in all, it’s good but when plants are fruiting you want less nitrogen and so that’s what I’m going to talk about right now.
I am using this Jacks classic bloom booster 10 30 20 in flower. It almost has everything in it but doesn’t really have calcium in it.
It does have magnesium and this is a product that commercial greenhouses use.

You can use Miracle Grow but honestly, it’s garbage they use really cheap ingredients.
They use a lot of urea nitrogen which is harder for plants to take up. Basically, it’s cow piss.
You want something like the 10 30 20 that has a profile like that because these are fruiting plants so they want more phosphorus and potassium and less nitrogen.
A Bit About Fertilizer
I don’t want to insult anybody’s intelligence here but I don’t know how much any of you know about growing.
Some of you are probably advanced gardeners and some of you are just starting out.
But for the sake of the gardening newbies here we go:
So the three numbers you see here are N, P, and K or nitrogen, phosphorus, and potassium. When you’re flowering stuff that fruits like peppers or tomatoes you want a low nitrogen number.
Now it doesn’t have to be exactly like 10 30 20. It could be 10 20 20 or something similar. But you get the idea, you cut back on the nitrogen in flower.
So Jack’s Fertilizer is readily available on Amazon and it’s not real expensive plus a little goes a long way.
You want to use something like this for tomatoes, peppers, squash, and stuff like that that makes fruit.

The next thing I want to talk about is what kind of nutrients to use. These are synthetic nutrients.
Now if you are organic I’m going to tell you right from the get-go don’t use organic nutrients here.
I am NOT against organic growing I was growing organic vegetables back in the 70’s when we were considered a lunatic fringe so I’m not down on organic gardening.
But to everything, there is a season and these plants are sitting in a bucket.
There’s a gallon of water in the bottom and it’s going to get warm out.
If you’re putting organics in there it’s going to get warm and it’s going to grow bacteria.
More often than not it will grow bad bacteria along with some good but you run the risk of getting Pythium or Phytophthora root rot.
Fortunately, coco is fairly resistant to these diseases. It is inoculated with a good mold called Trichoderma that eats bad molds like Pythium. But at higher temperatures the risk increases.
Your GroBucket garden kit is probably sitting out in the sun and it has standing water in it. Water molds love to grow in warm water that’s not moving.
You are risking getting root disease because these plants will eventually get through the insert and they will put roots down into the water.
If you’re running a mineral-based nutrient there’s nothing for the bacteria to feed on really so you eliminate a lot of your problems.
Here is something I recommend to prevent this. I would really recommend using 3% hydrogen peroxide as a preventive no matter what kind of nutrients you’re using.
Use it at a teaspoon of 3% hydrogen peroxide per gallon every 2 or 3 days.
That’s the stuff you get at the grocery store it’s 3%. It does come in other strengths so read the label.
Use a teaspoon per gallon and put that down your feed tube every two or three days.
What this will do is kill any bad bacteria in there and it also gives off oxygen so it will aerate your roots which plants really like.
You might even see a growth spurt after you use it.
That’s a preventative, it’s cheap, it’s easy to do and you can probably get a bottle of it for a dollar at the local dollar store.
It will probably take you through the whole gardening season.
GroBucket Fertilizer How Much To Use?
You’re just going to feed the GroBucket garden kit normally down the fill tube after the first week or so.
These are constantly being fed. Water is wicking up to the roots all the time.
Because your plants are eating constantly they need less food than a plant fed intermittently.
If you invest in a TDS meter and a pH pen you can measure what you are feeding your plants.
I recommend 300 ppms for seedlings once they have their true leaves. 600 ppms for medium plants like transplants.
Once your plants are established and starting to flower I would raise it to 800-1000 ppms.
For those who don’t have this or don’t want to test I would say no matter what brand of nutrients you’re using I would probably start at half the recommended amount.
Look at your plants and see how they’re doing and adjust accordingly.
If they are really dark green they are probably being overfed and light green plants are probably being underfed.
GroBucket FAQs
Embarking on a gardening journey with the GroBucket Garden Kit opens up a world of convenience and effectiveness in growing a variety of plants.
Whether you’re a seasoned gardener or a beginner, understanding how to make the most of this innovative gardening solution is key to achieving a thriving garden.
To help you navigate the nuances of using the GroBucket Garden Kit, here’s a compilation of frequently asked questions and answers.
These insights are gathered from various sources and are designed to provide you with practical advice, tips, and ideas for optimizing your gardening experience with the GroBucket
Q: What is the GroBucket Garden Kit?
A: The GroBucket Garden Kit is a system that converts any standard 5-gallon bucket into a self-watering, sub-irrigated planter.
It’s designed to water plants efficiently from the bottom up, ensuring they receive the right amount of water without the risk of over or underwatering.
Q: How should I use the GroBucket Garden Kit correctly?
A: Initially, water your plants from the top until their roots extend deeper into the bucket.
After this period, switch to using the feed tube for watering. This approach maintains the water level, prevents overwatering, and promotes healthy root development.
Q: Can I use coco coir with the GroBucket?
A: Yes, coco coir is an excellent growing medium for the GroBucket. It has good wicking properties but requires pre-treatment with nutrients like calcium and magnesium since it’s nutrient-poor.
Keeping the coco coir consistently moist is crucial for success in a GroBucket.
Q: What are the advantages of using a GroBucket over a regular 5-gallon bucket?
A: The GroBucket offers a more controlled watering system through its reservoir, reducing guesswork and the risk of over or underwatering.
It also promotes bottom watering, which reduces the chance of fungal diseases on plant leaves.
Q: Is the GroBucket suitable for indoor use?
A: Absolutely. GroBuckets can be used indoors when placed in a plant tray to catch excess water.
They are great for growing sensitive plants that need to be moved indoors during colder weather.
Ensure adequate lighting for the plants, depending on their specific needs.
Q: What types of plants can I grow in a GroBucket?
A: The GroBucket is versatile and can support a wide variety of plants, including herbs, vegetables, small fruiting shrubs, and trees.
Its efficient self-watering system makes it suitable for both indoor and outdoor gardening.
Why Not Give the GroBucket Garden Kit a Try
The GroBucket garden kit makes a great way to garden. You don’t need a green thumb to get great results with them either. They work indoors or out.
They are so simple and easy to use with no moving parts and they don’t need electricity either.
They can make your growing easy because you will always know when to water and if you grow in coco you will see amazing results.
Check out the GroBucket on Amazon
💧 Indoor Hydroponic Gardens
Want fresh veggies year-round in small spaces? Explore beginner-friendly hydro systems, closet grow setups, self-watering hacks, and gear reviews that make indoor gardening simple.
-
- 🚪 How to Grow Vegetables in a Closet
- 🧰 How to Turn a Closet into a Grow Room
- 🏕️ Using a Grow Tent for Vegetables
- 🎪 Are Grow Tents Worth It for Vegetables?
- 🏢 Apartment Kitchen Garden: Smart Space Ideas
- 🏙️ Hydroponic Apartment Garden: How to Start
- 🥔 Growing Sweet Potatoes Indoors
- 🧱 Small Closet Grow Room Setup
- See all articles in our Indoor Hydroponic Gardens category

 Steve S. is the creator of