This post contains affiliate links. If you buy something from one of our links we may earn a commission. Thanks
Discover the joys of growing plumeria in pots indoors with our comprehensive guide! Get tips on lighting, watering, and pruning, to keep your plumeria thriving
To grow Plumeria in pots indoors, choose a well-draining pot and soil mix, and place the plant in a bright location with at least 6 hours of indirect sunlight daily. Water only when the top inch of soil feels dry. Fertilize with a high-phosphorus fertilizer every 4-6 weeks during the growing season for optimal bloom.
Imagine bringing the vibrant colors and intoxicating fragrance of the tropics right into your living space!
Growing plumeria in pots indoors allows you to do just that, no matter where you live.
In this comprehensive guide, we’ll share everything you need to know to cultivate these beautiful, fragrant plumeria flowers inside your home.
Get ready to transform your space into a tropical oasis with your very own thriving plumeria!
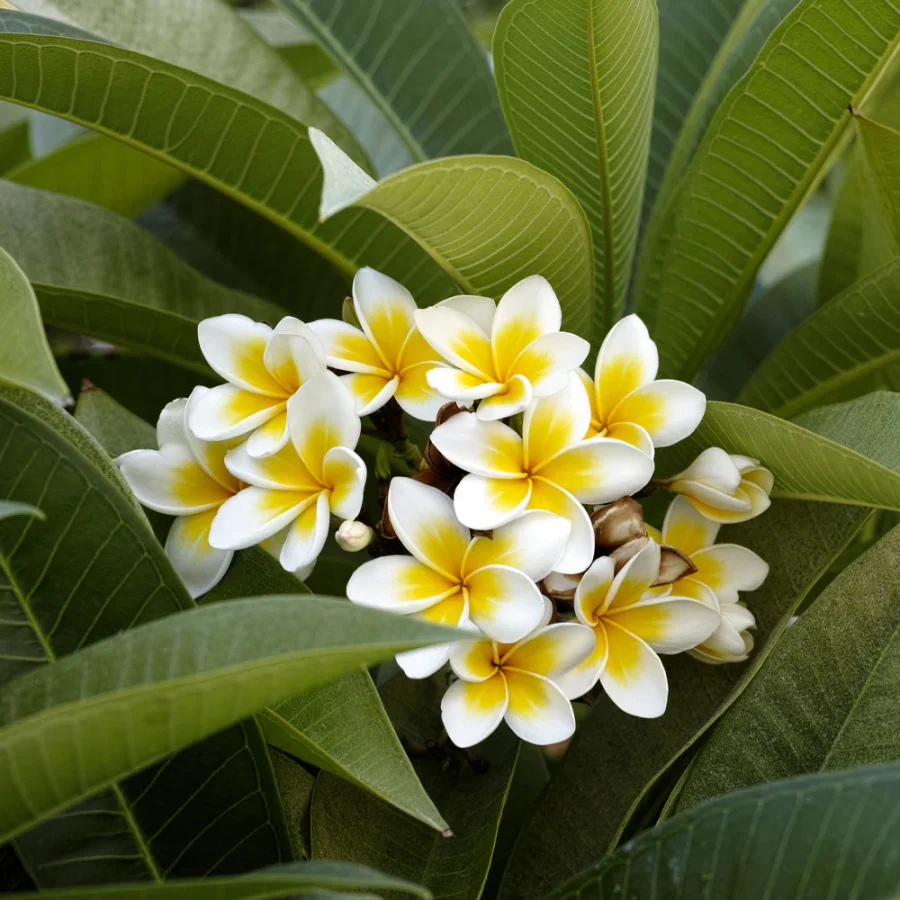
Growing Plumeria in Pots Indoors
Welcome, fellow gardening enthusiasts! We’ve got an exciting journey ahead as we delve into the world of growing plumeria in pots indoors.
This guide is packed with valuable information, tips, and tricks to help you successfully cultivate these stunning, fragrant flowers right in the comfort of your home.
We’ll cover essential topics such as lighting, watering, soil selection, pruning, and dealing with pests and diseases.
By the end of this post, you’ll be well-equipped with the knowledge and confidence needed to bring the tropical charm of plumeria into your living space.
So, let’s get started!
An Introduction to Plumeria Plants
Plumeria, also known as frangipani, is a genus of tropical flowering plants famous for their dazzling, vibrant blooms and enchanting fragrance.
These plants are native to Central America, Mexico, the Caribbean, and South America, but they have also found their way into the hearts of gardeners around the world.
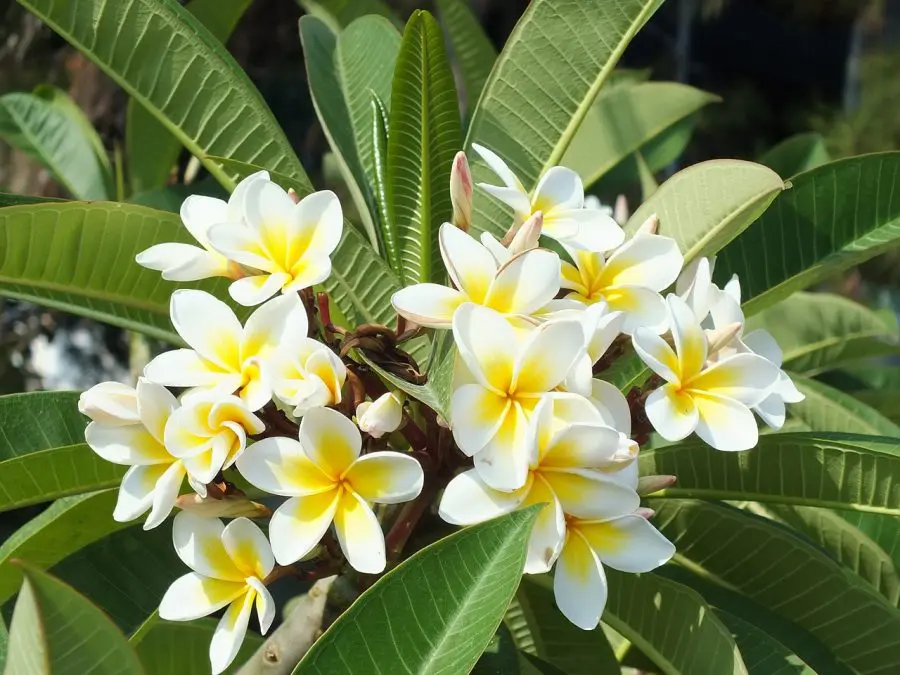
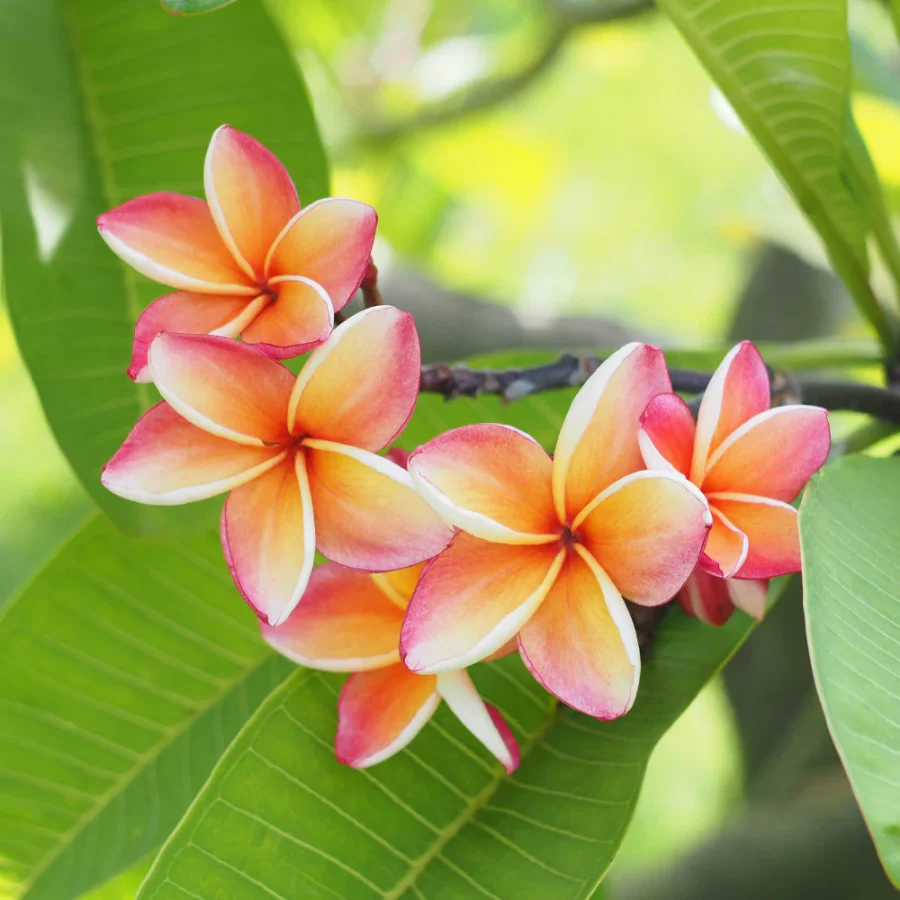
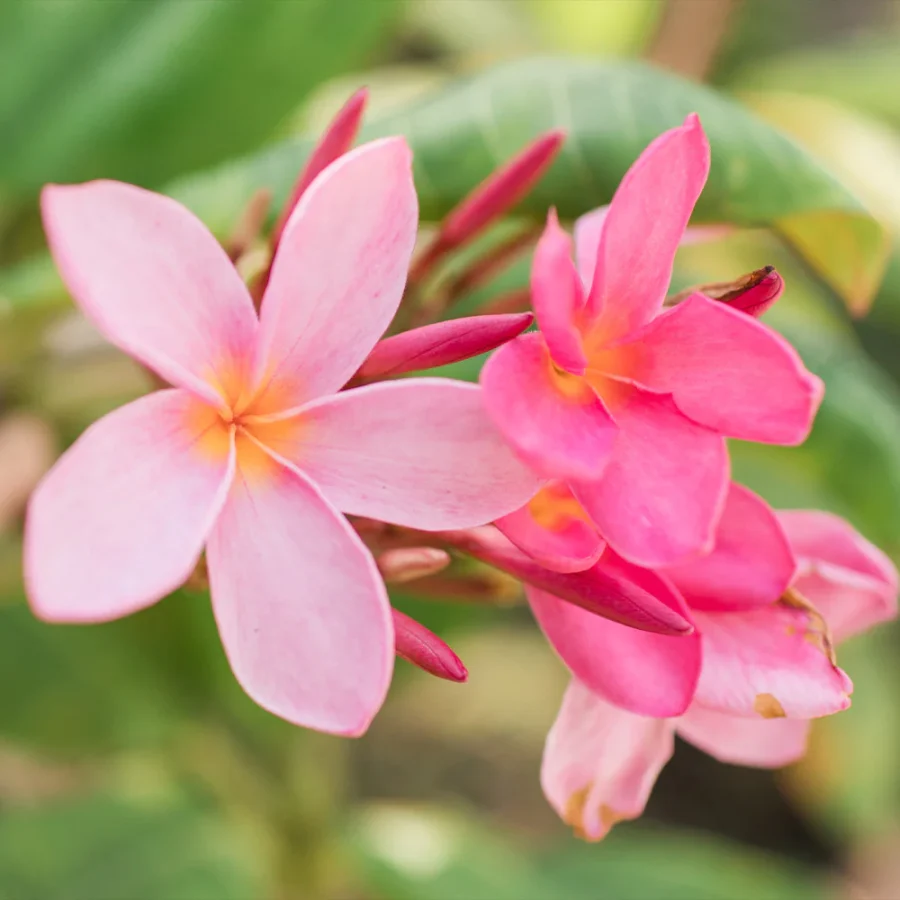
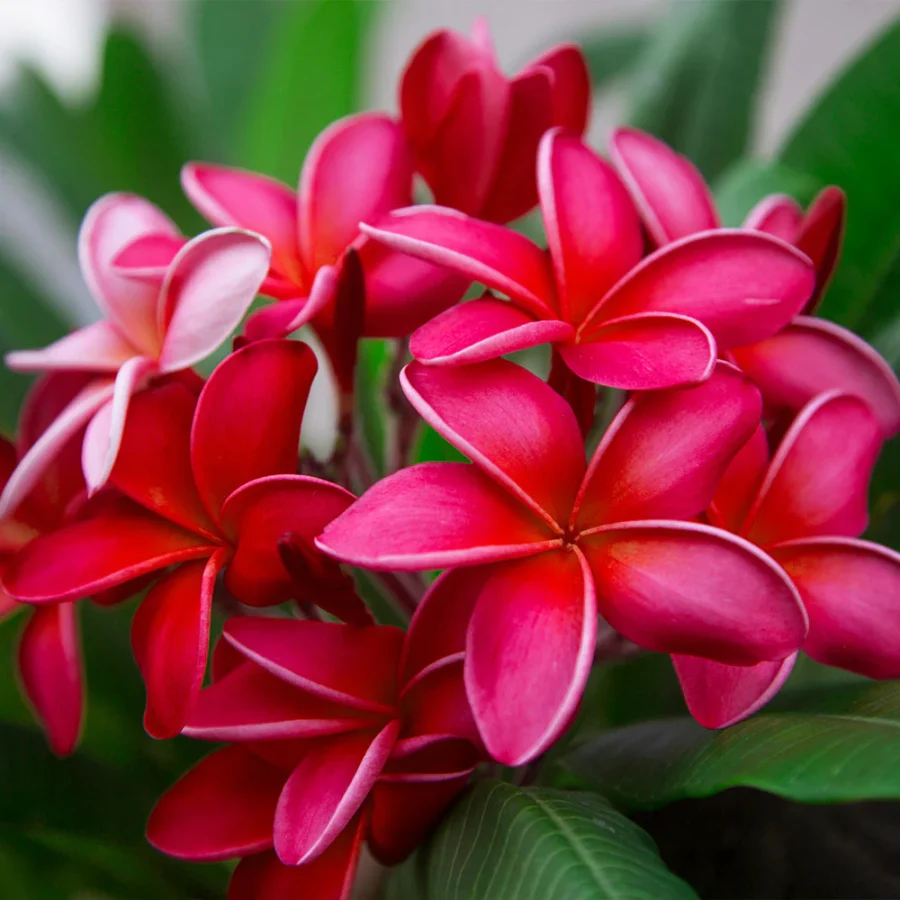
They produce stunning flowers in various colors, including white, yellow, pink, and red, which can turn any space into a tropical paradise.
You won’t be growing a soft-stemmed pansy flower either. Plumeria trees are tough tropical plants and can reach a mature height of 5-10 ft. and a width of 3-5 ft.
Plumeria is a genus of eleven species of shrubs and small trees in the dogbane family (Apocynaceae) native to tropical America from Brazil to Mexico and the Caribbean. https://hort.extension.wisc.edu/articles/plumeria/
Plumeria Plants For Sale
What Makes Plumeria Plants Special? Well for one thing most nurseries online only sell cuttings that may or may not grow.
But I found a company that sells live Plumeria plants.
Here is why you want one:
From April to November, plumerias captivate the senses with their clusters of broad, five-petaled blossoms.
The vibrant colors of the blooms create a striking contrast against the plant’s lush, dark green foliage, turning your garden into a tropical haven.
Known as Frangipani or the ‘lei flower,’ plumerias hail from tropical regions like Hawaii.
But you don’t have to reside in a tropical climate to enjoy these stunning plants.
If you’re not in a warm region like southern Florida, simply grow your plumeria in a container and move it indoors during the colder months.
Plumerias are resilient, boasting impressive drought and heat resistance, as well as a high tolerance for salt.
This makes them a perfect choice for various settings, from apartment balconies to suburban patios.
| Mature Height: | 5-10 ft. |
| Mature Width: | 3-5 ft. |
| Sunlight: | Full-Partial |
| Growth Rate: | Fast |
| Botanical Name: | Plumeria |
| Does Not Ship To: | AZ |
| Grows Well In Zones: | 4-9 patio / 10-11 outdoors |
When you order a plumeria, you’ll receive a mixed-color variety.
Although the exact color of your plumeria will be a surprise, you can expect it to bring vibrancy and versatility to your space, whether you plant it along your driveway or in a container on your deck.
And with its delightful gardenia-like fragrance, plumeria is perfect for areas with frequent foot traffic.
You can buy your Plumeria here.
The Benefits of Growing Plumeria in Pots Indoors
Growing plumeria in pots indoors brings several advantages to both you and your beloved plants.
For starters, cultivating them indoors allows you to enjoy their beauty and fragrance all year round, regardless of the climate in your region.
Plumeria plants thrive in warm, sunny environments, so growing them indoors provides a controlled environment where they can flourish even in areas with cooler temperatures or harsh winters.
Additionally, growing plumeria in pots offers flexibility in terms of plant placement and mobility.
You can easily move your potted plumeria to different locations within your home to find the perfect spot with the right amount of light, or even take it outdoors during the warmer months.
This adaptability also makes it easier to manage potential pest and disease issues, as you can isolate affected plants and treat them accordingly.
In short, growing plumeria in pots indoors allows you to maximize their potential while enjoying their captivating beauty up close.
Can Plumeria Grow Indoors?
")
Are you wondering if plumeria can really thrive indoors? Well, you’re in for a pleasant surprise!
With the right care and attention, it’s entirely possible to grow plumeria indoors and enjoy their delightful blooms and fragrance.
In this section, we’ll explore the factors that make plumeria suitable for indoor growth and discuss some of the challenges you might face along the way.
So, let’s dive in and uncover the secrets of successfully growing plumeria within the cozy confines of your home!
What Makes Plumeria Suitable for Indoor Growth
There are several factors that make plumeria well-suited for indoor cultivation:
Size and Growth Habit: Plumeria plants have a relatively compact growth habit, making them an ideal candidate for a potted plant and suitable for container gardening.
With proper pruning, you can easily maintain a manageable size for your indoor plumeria.
Adaptability: Plumeria is adaptable to various light conditions, which is crucial for indoor plants.
They do best with 6-8 hours of full sun but while they love bright sunlight, they can also adjust to lower light levels if provided with supplemental lighting.
Fragrance and Aesthetics: The gorgeous, fragrant blooms of plumeria add a tropical ambiance to your indoor space, making them a popular choice for indoor gardens.
Navigating the Challenges of Indoor Plumeria Cultivation
Growing plumeria indoors isn’t without its challenges, but with the right approach, you can overcome them.
Here are some considerations to keep in mind:
• Lighting: Ensuring your plumeria gets enough light is crucial for its growth and blooming.
• You may need to invest in supplemental lighting, such as grow lights, to provide the required light intensity.
• Humidity: Plumeria plants are native to tropical climates and prefer higher humidity levels, which can be challenging to maintain indoors.
You might need to employ methods like misting, using a humidifier, or placing a tray of water near the plant to increase humidity levels.
• Temperature: Plumeria thrives in warm temperatures, so make sure your indoor space doesn’t get too cold, especially during winter months.
A consistent temperature of around 65-80°F (18-27°C) is ideal for their growth. Nighttime temperatures can be a few degrees cooler.
• Pests and Diseases: Like any indoor plant, plumeria can be susceptible to pests and diseases.
• Regularly inspect your plant for any signs of infestation and address them promptly to prevent issues from escalating.
By addressing these challenges and providing your plumeria with the right conditions, you can enjoy the satisfaction of growing a healthy, vibrant plant right inside your home.
Plumeria Indoor Lighting
")
Now that we know plumeria can grow indoors, let’s talk about one of the most critical factors for their success, lighting!
In this section, we’ll discuss the importance of proper lighting for your indoor plumeria and explore various light sources that can help your plant thrive.
So, let’s shed some light on this topic and make sure your plumeria has the ideal environment to flourish and bloom!
The Role of Lighting in Plumeria Growth
Proper lighting plays a crucial role in the overall health and well-being of your indoor plumeria.
It affects various aspects of the plant’s growth, such as leaf development, branching, and blooming.
Inadequate light can lead to weak, leggy growth and fewer or no blooms.
On the other hand, providing your plumeria with the right amount and intensity of light will result in a robust, healthy plant with vibrant flowers.
Light Sources for Indoor Plumeria

Natural Sunlight: Plumeria plants love bright sunlight. If you have a sunny window or a well-lit room, placing your plumeria near the window can provide it with the natural light it needs to thrive.
East, west, or south-facing windows are ideal, as they offer the most sunlight throughout the day.
Artificial Grow Lights: If your home doesn’t receive enough natural sunlight, you can use artificial grow lights to supplement the light your plumeria needs.
There are various types of grow lights available, such as LED and fluorescent.
Each has its advantages and drawbacks, so choose the one that best suits your plant’s needs and your budget.
But I think LED lights are the best way to go because they produce more light while using less electricity.
Ensuring Optimal Lighting Conditions
To provide your indoor plumeria with the best possible lighting conditions, follow these tips:
• Monitor the Light: Observe how much light your plumeria receives throughout the day.
Adjust its position or add supplemental lighting as needed to ensure it gets the right amount of light.
• Rotate the Plant: Regularly rotate your plumeria to ensure all sides receive equal light exposure.
This promotes even growth and prevents the plant from leaning toward the light source.
• Adjust the Distance: If using artificial grow lights, place them at the appropriate distance from your plumeria to avoid scorching the leaves or causing weak growth.
Consult the manufacturer’s guidelines for the recommended distance.
By paying close attention to your plumeria’s lighting needs, you can create an environment in which your plant can thrive and reward you with stunning blooms.
How Often to Water Indoor Plumeria

Regular watering is a key aspect of plumeria care, and finding the right balance is essential for your plant’s health.
In this section, we’ll dive into the world of indoor plumeria watering, helping you understand their unique requirements and offering guidance on how often you should water them.
With the right watering techniques, your plumeria will be well on its way to becoming a lush, flourishing plant that brightens up your indoor space!
Plumeria’s Water Requirements
Plumeria plants have specific water requirements that differ from many other indoor plants.
They prefer a good soak followed by a period of drying out, rather than consistently moist soil.
This means you’ll need to let the top few inches of soil dry out between waterings.
Providing the right amount of water is essential for your plumeria’s health, as overwatering and underwatering can both lead to problems.
Factors Affecting Watering Frequency
Several factors influence how often you should water your indoor plumeria, including:
• Pot Size: Larger pots hold more moisture, which means you may need to water less frequently than you would with a smaller pot.
• Soil Type: Well-draining soil dries out faster than soil that retains moisture, affecting the frequency of watering.
• Season: Plumeria plants typically need more water during their active growing season (spring and summer) and less water during their dormant period (fall and winter).
• Indoor Environment: The temperature and humidity levels inside your home can also impact how quickly the soil dries out.
Recognizing Overwatering and Underwatering
It’s essential to recognize the signs of overwatering and underwatering your plumeria:
Overwatering: Symptoms include yellowing leaves, wilting despite wet soil, and root rot. Overwatered plants are also more susceptible to pests and diseases.
Underwatering: Signs include dry, brown leaf tips, leaf drop, and slow growth. Prolonged underwatering can lead to severe stress and potential plant death.
Proper Watering Techniques for Plumeria
To ensure your plumeria gets the right amount of water, follow these tips:
• Check the Soil: Before watering, stick your finger into the soil about 2 inches deep.
If it feels dry, it’s time to water your plumeria. If it’s still moist, wait a few days and check again.
• Water Deeply: When watering, ensure you provide enough water to reach the root zone.
This encourages deep root growth, which is crucial for a healthy plumeria.
• Drainage: Always use a pot with drainage holes to prevent standing water at the bottom, which can lead to root rot.
• Adjust as Needed: Monitor your plumeria’s condition and adjust your watering schedule accordingly.
Factors like season, temperature, and humidity can change the plant’s water needs.
By understanding and addressing your plumeria’s water requirements, you’ll be better equipped to keep your plant healthy and vibrant.
Soil, Pot Size, and Repotting

The foundation of a thriving indoor plumeria lies in choosing the right soil, pot size, and knowing when it’s time to repot.
In this section, we’ll delve into these essential aspects of plumeria care, providing you with valuable insights and practical tips to ensure your plant has a strong, healthy foundation.
With the right setup, your plumeria will have everything it needs to grow and flourish in its indoor environment!
Choosing the Right Soil for Plumeria
 Plant Cuttings....From a PEST-FREE certified Hawaiian nursery with the proper U.S. Department of Agriculture stamp.")
Plumeria grows in tropical regions and requires good drainage and doesn’t like wet feet.
So you want to make sure any pot you use has adequate drainage holes.
We recommend a coco coir and perlite mix. If you plan to use a heavier potting mix lighten it up with extra perlite to promote good drainage
Benefits of Using Coco Coir:
Coco coir, made from the fibrous husks of coconuts, is an excellent soil option for plumeria plants.
It’s well-draining, lightweight, and retains moisture without becoming waterlogged.
Coco coir also provides good aeration, allowing oxygen to reach your plumeria’s roots, and promoting healthy growth.
Other Suitable Soil Options:
Besides coco coir, you can use a well-draining, high-quality potting mix such as a cactus mix.
You can also create your own blend by mixing equal parts of potting soil, perlite, and coarse sand or fine bark.
Selecting the Appropriate Pot Size
Choosing the right pot size for your plumeria is essential for proper root development and overall plant health.
As a general rule, select a pot that’s about 1-2 inches larger in diameter than the current root ball.
This allows enough room for growth without causing the plant to become root-bound.
Make sure the pot has drainage holes to prevent water from pooling at the bottom.
Signs That It’s Time to Repot Your Plumeria
 Plant Cuttings....From a PEST-FREE certified Hawaiian nursery with the proper U.S. Department of Agriculture stamp.")
Here are some indications that your plumeria needs a new pot:
• Root-bound: If you notice roots growing out of the drainage holes or circling the root ball, it’s time to give your plant more space.
• Slowed Growth: If your plumeria’s growth seems to have stalled despite proper care, it may be time for a larger pot.
• Deteriorating Soil: Over time, potting soil can break down and become compacted, reducing aeration and drainage. Repotting refreshes the soil and improves growing conditions.
Step-by-Step Guide to Repotting Plumeria
Follow these steps to successfully repot your plumeria:
• Choose a new pot that’s 1-2 inches larger in diameter than the current one and has drainage holes.
• Prepare a well-draining soil mix, such as coco coir or a blend of potting soil, perlite, and coarse sand or fine bark.
• Carefully remove the plumeria from its current pot, taking care not to damage the roots.
• Inspect the root ball and trim away any dead or damaged roots.
• Place a layer of fresh soil mix at the bottom of the new pot, and position the plumeria in the center.
• Fill the pot with the soil mix, ensuring the plant is at the same depth as it was in the previous pot.
• Gently firm the soil around the plant and water thoroughly to settle the soil.
By following these guidelines, you’ll create a supportive environment that allows your indoor plumeria to thrive and prosper.
How to Grow Plumeria in a Pot
Growing plumeria in a pot can be a rewarding experience, allowing you to bring a touch of the tropics right into your home.
In this section, we’ll guide you through the process of potting your plumeria and provide essential tips for ensuring its success.
From selecting the right pot and soil to establishing a proper care routine, we’ll cover everything you need to help your potted plumeria flourish.
So let’s embark on this exciting journey together and create a thriving indoor oasis with your beautiful plumeria plant!
Planting and Potting Techniques
 Plant Cuttings....From a PEST-FREE certified Hawaiian nursery with the proper U.S. Department of Agriculture stamp.")
To give your plumeria the best start in a pot, follow these planting and potting guidelines:
• Choose a pot with drainage holes that are 1-2 inches larger in diameter than the root ball.
• Fill the bottom of the pot with a layer of well-draining soil mix, such as coco coir.
• Position the plumeria in the center of the pot and gently spread out its roots.
• Fill the pot with the soil mix, ensuring the plant is at the same depth as it was in its previous container.
• Firm the soil around the plant and water thoroughly to settle the soil.
Proper Drainage and Aeration
 Plant Cuttings....From a PEST-FREE certified Hawaiian nursery with the proper U.S. Department of Agriculture stamp.")
Ensuring your potted plumeria has proper drainage and aeration is crucial for its health:
Drainage: Always use a pot with drainage holes and a well-draining soil mix to prevent water from pooling at the bottom, which can lead to root rot.
Aeration: A well-aerated soil mix, such as coco coir or a blend containing perlite, allows oxygen to reach the roots, promoting healthy growth.
Avoid using heavy or compacted soil, which can restrict airflow and water movement.
Tips for Maintaining A Healthy Potted Plumeria
To keep your potted plumeria thriving, follow these tips:
• Watering: Allow the top few inches of soil to dry out between waterings, and then water deeply.
Adjust your watering schedule based on factors such as season, temperature, and humidity, and don’t give them too much water.
• Lighting: Provide your plumeria with bright, indirect sunlight or supplement with artificial grow lights if natural light is insufficient.
• Fertilizing: Plumeria are heavy feeders that benefit from regular fertilization.
Feed your plumeria with a balanced, water-soluble fertilizer every 4-6 weeks during the growing season.
Reduce feeding frequency during the dormant period. Too much nitrogen can reduce flowering and stimulate excess leaf growth.
• Pruning: Regularly prune your plumeria to maintain its shape and encourage branching. Remove any dead or damaged branches as needed.
• Pest and Disease Control: Inspect your plant for signs of pests or diseases and treat them promptly with appropriate measures, such as insecticidal soap, neem oil, or fungicides.
By following these guidelines and providing consistent care, your potted plumeria will grow into a stunning, healthy plant that adds a touch of tropical charm to your indoor space.
Growing Plumeria from Cuttings
 Plant Cuttings....From a PEST-FREE certified Hawaiian nursery with the proper U.S. Department of Agriculture stamp.")
Starting your own plumeria plant from a cutting can be a truly rewarding experience, as you watch it grow and transform into a beautiful, fragrant addition to your home.
In this section, we’ll share the secrets to successfully growing plumeria from cuttings, guiding you through the process step by step.
From selecting a healthy cutting to rooting and potting, we’ll be with you every step of the way as you embark on this exciting gardening adventure.
Let’s get started on your journey to growing a stunning plumeria plant from just a simple cutting!
Benefits of Propagating Plumeria from Cuttings
Growing plumeria from cuttings is the preferred method of propagation and offers several advantages:
Faster Growth: Cuttings typically establish and grow faster than seedlings, helping you achieve a mature plant more quickly.
Cloning: Cuttings taken from a healthy, desirable plant will produce a new plant with the same characteristics, ensuring you know exactly what to expect in terms of appearance and growth habits.
Cost-Effective: Propagating from cuttings is an affordable way to expand your plant collection or share your favorite plumeria with friends and family.
Step-by-Step Guide to Growing Plumeria from Cuttings
To successfully propagate plumeria from cuttings, follow these steps:
• Select a healthy, disease-free branch that’s at least 12 inches long and has a diameter of 0.5-1 inch.
• Use clean, sharp pruning shears to make a diagonal cut just below a leaf node (the point where a leaf attaches to the stem).
• Remove all leaves from the cutting, leaving only the top 2-3 leaves intact. Some people recommend allowing the cutting to dry and callous over for 3-7 days in a cool, shaded area but I disagree.
Just take your cutting and dip the cut end in a rooting hormone powder, tapping off any excess.
• Then fill a pot with a well-draining soil mix, such as coco coir, and plant it.
• Insert the cut end of the cutting about 2-3 inches deep into the soil mix.
• Water the soil thoroughly and place the pot in a warm, bright location with indirect sunlight.
• Keep the soil slightly moist but not soggy, and avoid overwatering to prevent rot.
After 4-6 weeks, check for root development by gently tugging on the cutting. If it resists, roots have likely formed.
Tips for Successful Propagation and Growth
 Plant Cuttings....From a PEST-FREE certified Hawaiian nursery with the proper U.S. Department of Agriculture stamp.")
To increase your chances of successful plumeria propagation, follow these tips:
Timing: The best time to take cuttings is in the spring or early summer when the plant is actively growing.
Cutting Selection: Choose a healthy, mature branch with no signs of disease or pest infestations.
Rooting Hormone: Using a rooting hormone can help increase the likelihood of successful root formation.
Patience: Be patient, as plumeria cuttings can take several weeks to root. Avoid disturbing the cutting during this time.
Care: Once your cutting has rooted, provide proper care, including adequate light, watering, and fertilizing, to support healthy growth.
By following these guidelines, you’ll be well on your way to successfully growing a beautiful plumeria plant from a cutting, adding a stunning tropical touch to your indoor space.
Plumeria Indoors Winter Care
 Plant Cuttings....From a PEST-FREE certified Hawaiian nursery with the proper U.S. Department of Agriculture stamp.")
As the winter months approach, it’s important to ensure your indoor plumeria continues to receive the care it needs to stay healthy and vibrant.
In this section, we’ll provide helpful tips and tricks for caring for your plumeria during the cooler months, addressing changes in lighting, temperature, watering, and more.
With a little extra attention and care, your plumeria will not only survive the winter but continue to thrive, bringing you joy and tropical beauty even on the coldest days.
So let’s explore how to keep your plumeria happy and healthy throughout the winter season!
Preparing Plumeria for Winter Conditions
To help your plumeria transition smoothly into the winter months, take these steps to prepare your plant for cooler conditions:
Gradual Adjustment: Slowly acclimate your plumeria to lower light levels and temperatures by moving it to a cooler, less brightly lit area for a few hours each day before relocating it permanently.
Pruning: Prune your plumeria in late fall or early winter, removing any dead or damaged branches to encourage healthy growth in the spring.
Check for Pests: Inspect your plant for any pests and treat them promptly before they become a bigger issue during the winter months.
Adjusting Care Routines During Winter Months
 Plant Cuttings....From a PEST-FREE certified Hawaiian nursery with the proper U.S. Department of Agriculture stamp.")
To keep your plumeria healthy during the winter, make these adjustments to its care routine:
• Lighting: Since natural sunlight is often limited during winter, consider supplementing with artificial grow lights to maintain proper light levels for your plumeria.
• Temperature: Plumeria prefers temperatures between 60-70°F (16-21°C) during the winter months.
Keep your plant away from drafts, cold windows, or heat sources to maintain consistent temperatures.
• Watering: Reduce your watering frequency, as plumeria requires less water during its dormant period.
Allow the top few inches of soil to dry out before watering deeply.
• Fertilizing: Hold off on fertilizing your plumeria during the winter months, as it enters a dormant period and requires fewer nutrients.
Tips for Preventing Common Winter Issues
To prevent common winter-related issues with your plumeria, follow these tips:
Maintain Humidity: Indoor heating can lead to dry air, which can cause issues for your plumeria.
Use a humidifier or place a tray of water near your plant to maintain adequate humidity levels.
Watch for Pests: Keep an eye out for pests that may take advantage of your plumeria’s weakened state during the winter, such as spider mites, mealybugs, and scale insects.
Treat any infestations promptly with insecticidal soap or other appropriate measures.
Monitor Plant Health: Regularly inspect your plumeria for signs of stress, such as yellowing leaves, wilting, or dropping leaves, and adjust your care routine accordingly to help your plant recover.
By following these guidelines and giving your plumeria some extra attention during the winter months, you’ll ensure that it remains healthy, vibrant, and ready to flourish when spring arrives.
Maintenance, Pruning, and Pests and Diseases

Proper maintenance, pruning, and vigilance against pests and diseases are essential for keeping your indoor plumeria plant healthy and thriving.
In this section, we’ll discuss the best practices for maintaining your plumeria, including how and when to prune, as well as how to identify and manage common pests and diseases that can affect your tropical beauty.
With a bit of knowledge and dedication, you can ensure your plumeria remains a stunning and fragrant addition to your indoor garden.
So let’s dive in and learn how to keep your plumeria in tip-top shape!
Maintenance and Pruning
Importance of Regular Maintenance for Healthy Plumeria Growth:
Keeping your plumeria well-maintained encourages healthy growth, increases flowering, and reduces the risk of pests and diseases.
When to Prune Plumeria: The best time to prune plumeria is in late winter or early spring, before the plant begins its active growth phase.
You can also prune after the blooming season to shape the plant or remove damaged branches.
Pruning Techniques to Encourage Branching and Flowering: To promote branching and flowering, remove branches growing inward, crossing other branches, or competing with the main leader.
Make clean, diagonal cuts just above a leaf node or branch junction, and avoid removing more than one-third of the plant’s foliage at once.
Tips for Preventing and Treating Common Pruning Issues:

Use clean, sharp tools to reduce the risk of disease transmission, and sanitize them between cuts.
If you accidentally remove too much foliage, provide extra care and attention to your plumeria to help it recover.
Pests and Diseases
Common Pests Affecting Indoor Plumeria:
• Spider Mites: These tiny pests feed on plant sap, causing leaves to yellow and drop off.
Use a magnifying glass to inspect the undersides of leaves for mites and their webs.
• Mealybugs: These small, white, cottony insects feed on plant sap, leading to yellowing and wilting.
They often hide in leaf axils and other protected areas.
• Scale Insects: These small, oval-shaped insects can cause leaf yellowing and curling.
They attach themselves to plant stems and leaves, forming a protective covering.
Common Diseases Affecting Indoor Plumeria:
• Root Rot: Overwatering or poor drainage can lead to root rot, causing leaves to yellow, wilt, and drop off.
Ensure proper drainage and avoid overwatering to prevent this issue.
• Powdery Mildew: This fungal disease appears as a white, powdery substance on leaves and stems, and can cause leaf distortion and premature leaf drop.
Improve air circulation and reduce humidity to prevent powdery mildew.
• Black Tip Fungus: This fungal disease causes blackened tips on new growth, eventually leading to leaf drop.
Maintain proper temperature and humidity levels, and avoid overhead watering to prevent this issue.
Prevention Strategies for Pests and Diseases:

• Proper Hygiene and Sanitation Practices: Keep your plumeria and its surrounding area clean and free from debris, and sanitize your tools regularly.
• Routine Plant Inspection and Monitoring: Regularly inspect your plumeria for signs of pests or diseases, and address issues promptly.
• Using Pest-Resistant Potting Mix and Containers: Choose well-draining potting mixes and containers with drainage holes to reduce the risk of pests and diseases.
Treatment Options for Pests and Diseases:
• Biological Control Methods: Introduce beneficial insects, such as ladybugs and lacewings, to control pest populations.
• Chemical Control Methods: Use insecticidal soap, neem oil, or other appropriate pesticides to treat infestations. Always follow label instructions and precautions.
• Cultural Control Methods: Adjust your care routine to create less favorable conditions for pests and diseases, such as improving air circulation, reducing humidity, and avoiding overwatering.
Plumeria FAQs
Growing Plumeria indoors can offer a tropical touch to your home. These fragrant, flowering plants are often associated with warm, tropical climates, but they can be grown in pots indoors with some specialized care.
Whether you’re a seasoned gardener or new to indoor plants, you may have questions about how to best care for a potted Plumeria, especially during the winter months.
In this FAQ section, we’ll explore these and other questions you may have about indoor Plumeria care.
Q: Can a plumeria be grown indoors?
A: Yes, Plumeria can be grown indoors, although it requires a bright location with at least 6 hours of indirect sunlight each day for optimal growth and flowering.
Q: Do Plumerias do well in pots?
A: Plumerias can thrive in pots if they are given the right care, including a well-draining soil mix, ample sunlight, and appropriate watering and fertilization.
Q: Can you keep plumeria indoors for winter?
A: Yes, Plumeria can be kept indoors during the winter months. It’s important to reduce watering and withhold fertilization during this dormant period. Make sure it still receives some bright, indirect light.
Q: How often should I water my indoor plumeria?
A: Water your indoor Plumeria only when the top inch of the soil feels dry. Overwatering can lead to root rot, so it’s important to let the soil dry out a bit between waterings.
Indoor Plumeria care may require some attention to detail, especially when it comes to light and watering needs.
However, with a little know-how, you can enjoy the tropical ambiance that a healthy, flowering Plumeria can bring to your home.
Growing Plumeria In Pots Indoors Final Thoughts

As we wrap up our journey into the world of growing plumeria in pots indoors, we hope you’ve found this guide to be both informative and inspiring.
With the right care, attention, and a bit of patience, you can transform your indoor space into a lush, tropical paradise filled with the beauty and fragrance of plumeria.
So go ahead, give it a try, and experience the joy of nurturing these stunning plants in the comfort of your own home.
We’re confident that with the knowledge and tips shared in this post, you’ll be well on your way to becoming a successful indoor plumeria gardener. Happy growing!
Recap of Key Points for Growing Plumeria in Pots Indoors
• Assessing Indoor Suitability: Determine if your indoor conditions are suitable for plumeria growth, including factors such as temperature, humidity, and lighting.
• Proper Lighting: Ensure your plumeria receives adequate light, either through natural sunlight or supplemental artificial grow lights.
• Watering and Fertilizing: Understand the watering and fertilizing requirements of plumeria to keep them healthy and prevent issues like root rot and nutrient deficiencies.
• Soil, Pot Size, and Repotting: Choose the right soil, pot size, and repotting schedule to accommodate your plumeria’s growth and maintain its overall health.
• Propagation from Cuttings: Learn how to propagate plumeria from cuttings to grow new plants or share with friends and family.
• Winter Care: Adjust your plumeria’s care routine during the winter months to ensure it continues to thrive in cooler conditions.
• Maintenance, Pruning, and Pest Management: Implement regular maintenance practices, including proper pruning techniques and proactive pest management, to keep your plumeria healthy and vibrant.
Try Growing Plumeria In Pots Indoors
As you’ve learned from this guide, growing plumeria in pots indoors is not only achievable but can also be a rewarding and enjoyable experience.
With the right care, attention, and patience, you can cultivate a thriving, beautiful plumeria plant that adds a touch of the tropics to your indoor space.
So, don’t hesitate to give it a try! Embrace the challenge, apply the tips and knowledge shared in this post, and discover the joy of growing your very own indoor plumeria.
You might just find it to be one of the most gratifying and fulfilling aspects of your indoor gardening journey. Happy planting!
You can get your own Plumeria here
Read more about The Benefits Of Keeping Indoor Plants