This post contains affiliate links. If you buy something from one of our links we may earn a commission. Thanks
Discover How to Grow Basil Hydroponically in Your AeroGarden with our easy guide!
Unlock the secrets to fresh, flavorful basil in your own home – no green thumb needed!
Grow Basil Hydroponically in Your AeroGarden by inserting the basil seed pods into the device’s growing slots. Fill the water reservoir and add the recommended nutrients. Set the light cycle for 16 hours on and 8 hours off. The controlled environment ensures optimal growth, allowing you to harvest fresh basil in as little as 4 weeks.
Welcome, fellow gardening enthusiasts! Today, we’re going to dive into the delightful world of how to grow basil hydroponically in your AeroGarden.
Imagine having fresh, aromatic basil at your fingertips, without the fuss of soil or a traditional garden.
Better yet it works even if you live in a small apartment and even if it does not have any windows(but I sure do hope you have some windows!).
With the help of AeroGarden, anyone can enjoy the perks of growing their own basil hydroponically.
So, let’s embark on this flavorful journey together and transform your kitchen into a haven for homegrown herbs!
I have been growing a variety of vegetables in my Aerogarden Harvest for over 2 years now. It still works perfectly and I love it.
I have made a few changes which I will explain further in this article so stick around!
An Introduction To How to Grow Basil Hydroponically in Your AeroGarden
Hey there, plant lovers! In this introduction, we’re going to get acquainted with the amazing herb basil and why growing it hydroponically is such a game-changer.
We’ll also touch on the fantastic AeroGarden system, which makes cultivating your very own basil plants a total breeze.
So, buckle up and prepare to be amazed by the endless possibilities of fresh, homegrown basil right in the comfort of your own space!
Let’s get started, shall we?
All About Basil and Its Many Uses
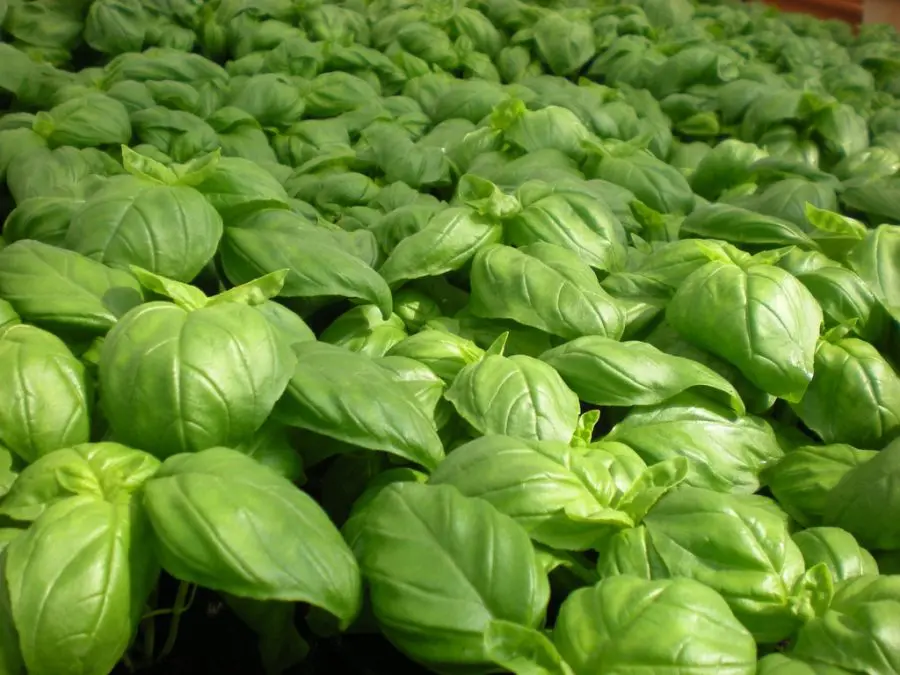
Basil is a versatile and fragrant herb that’s a staple in many cuisines!
Originating from Southeast Asia and Africa, this delightful plant has made its way into hearts and kitchens across the globe.
Its distinct flavor and aroma make it perfect for a variety of dishes, from classic Italian pesto to zesty Thai curries.
Basil is not only a culinary wonder but also packed with nutrients and health benefits.
It’s no surprise that this herb has become a must-have in every food lover’s garden!
The Perks of Hydroponic Basil Growth
Growing basil hydroponically comes with a handful of advantages that make it a truly appealing option for gardeners.
For starters, it’s an efficient method that saves water and space, making it perfect for urban dwellers.
Hydroponic basil grows faster and produces higher yields compared to traditional soil-based cultivation.
Plus, you can kiss most pests and soil-borne diseases goodbye!
Your basil plants will also benefit from the controlled environment, resulting in healthier and more vibrant plants. It’s a win-win for everyone!
AeroGarden: Your Hydroponic Hero
Enter AeroGarden the all-in-one, user-friendly hydroponic system that has revolutionized indoor gardening.
With its sleek design and intuitive features, AeroGarden makes it simple for anyone to grow their own basil (and other plants) hydroponically.
Its built-in LED grow lights, adjustable height, and automated nutrient delivery system ensure that your plants get the optimal care they need.
Whether you’re a seasoned green thumb or a gardening newbie, the AeroGarden system is your trusty companion in your quest for fresh, homegrown basil all year round!
Equipment and Supplies
Alright, now that we’re all hyped about growing basil hydroponically in an AeroGarden, let’s talk about the gear you’ll need to make it all happen!
In this section, we’ll walk you through the essential equipment and supplies that’ll set you up for success in your AeroGarden basil-growing adventure.
So if you want to learn how to grow basil hydroponically in your AeroGarden you’re going to need an AeroGarden if you don’t already have one.
From selecting the right AeroGarden model to gathering all the necessary tools, we’ve got you covered.
So, let’s dive in and get you prepped and ready to grow some lush, aromatic basil!
Picking the Perfect AeroGarden System
Comparing Different Models
When it comes to selecting an AeroGarden system, you’ll find various models to choose from, each with its own set of pros and cons.
Some models, like the AeroGarden Sprout, are perfect for beginners and small spaces due to their compact size. However, they have limited plant capacity.
On the other hand, larger models like the AeroGarden Bounty and Farm offer more room for plants, better lighting, and more advanced features but can be pricier and take up more space.
Top AeroGarden Models for Basil Growth
For growing basil, we recommend the AeroGarden Harvest or Bounty models.
The AeroGarden Harvest offers a balance between affordability, plant capacity, and features, making it ideal for most basil enthusiasts.

The Bounty model is great for those looking for more advanced features, such as a touchscreen control panel and Wi-Fi connectivity, and it can accommodate more plants.

Gathering Essential Supplies
Hydroponic Nutrient Solution
To ensure your basil plants thrive, you’ll need a hydroponic nutrient solution specifically designed for AeroGarden systems.
This liquid mix provides your plants with all the essential nutrients they need to grow strong and healthy.
When you buy an AeroGarden the nutrients are included and refills are readily available online on Amazon.
pH Testing and Adjustment Kit
Maintaining the right pH level is crucial for hydroponic growth. A pH testing and adjustment kit will help you keep the pH in the optimal range for basil (5.5 to 6.5).
The kit typically includes pH testing strips or a digital meter, as well as pH up and down solutions.
To be honest I rarely if ever check pH because usually added fertilizer brings it to the right level.
Seed Pods
AeroGarden seed pods are pre-packaged, soilless containers filled with a sponge-like growing medium.
They’re designed to fit perfectly in your AeroGarden system and provide an ideal environment for germination and plant growth.
You can find seed pods specifically for basil, or you can purchase empty seed pods and add your own basil seeds.
I like to buy my own seeds and don’t use the sponges or baskets that come with the AeroGarden system. Instead, I use Root Riot plugs instead as you will see in my videos.
But when you first start it’s not a bad idea to use their preseeded pods and their baskets and sponges.
Optional Accessories for a Flourishing Garden
While not strictly necessary adding a small airstone can supercharge your grows and lead to healthier root systems.
You will notice 2 small rubber plugs in the lid that can be removed to insert airlines.
Preparing Your AeroGarden
Now that you’ve got your AeroGarden system and all the essential supplies, it’s time to start prepping for your basil-growing journey!
In this section, we’ll walk you through the steps to get your AeroGarden ready for action.
From setting up the system to adding water and nutrients, we’ll guide you through the process with ease.
So, let’s roll up our sleeves and get your AeroGarden all set to nurture some beautiful basil plants!
Assembling Your AeroGarden
First things first – let’s get your AeroGarden system set up! Unbox your AeroGarden and follow the included instructions to assemble the unit.
Typically, this involves attaching the grow light arm to the base, connecting the power adapter, and setting up the water reservoir.
Make sure your AeroGarden is placed in a location with easy access, a power source nearby, and minimal exposure to direct sunlight, as the LED grow lights provide all the light your plants need.
Hydrating and Nourishing Your Plants
Next, fill the water reservoir with clean, room-temperature water up to the indicated fill line.
Add the recommended amount of hydroponic nutrient solution according to the AeroGarden instructions, typically around 2-4 mL per liter of water.
Make sure to give it a good stir to distribute the nutrients evenly.
Keep in mind that you’ll need to periodically top off the water and add more nutrients as your plants grow.
Balancing the pH for Happy Basil
Before planting your seeds, it’s important to check the pH level of the water using the pH testing kit.
Basil thrives in a slightly acidic environment, with a pH range of 5.5 to 6.5.
If your water’s pH is outside this range, use the pH up or down solutions from your kit to adjust it accordingly.
Maintaining the right pH level ensures that your basil plants can efficiently absorb the nutrients they need.
Planting Seeds in Your AeroGarden
Now it’s time to insert the seed pods! If you’re using pre-seeded basil pods, simply place them in the AeroGarden’s pod openings, making sure they’re fully seated.
If you’re using empty seed pods, add 2-3 basil seeds to each pod and cover them lightly with the growing medium.
Place the clear plastic domes over each seed pod to create a mini greenhouse effect and boost germination.
Light It Up and Set the Timer
Last but not least, adjust the grow light height so it’s about 4-6 inches above the seed pods.
This ensures your basil plants receive the optimal light intensity for growth.
Set the AeroGarden’s timer according to the instructions, typically around 14-16 hours of light per day for basil.
The AeroGarden system will automatically turn the lights on and off according to the timer, so your plants get the perfect balance of light and darkness.
Planting and Germinating Basil Seeds
Alright, now that your AeroGarden is all set up and ready to go, it’s time to dive into the exciting world of planting and germinating basil seeds!
In this section, we’ll discuss the different basil varieties you can choose from, how to plant your seeds for optimal growth, and what to expect during the germination and early growth stages.
So, let’s get those green thumbs working and embark on the journey of nurturing your very own hydroponic basil plants!
Picking Your Perfect Basil Variety
With several varieties of basil to choose from, you can find the one that best suits your taste buds and aesthetic preferences.
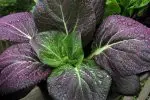
Some popular options include sweet basil (the classic choice for Italian dishes), Thai basil (perfect for Asian cuisine), and purple basil (a visually stunning option with a slightly different flavor).
Consider growing a mix of varieties to spice up your dishes and add visual appeal to your AeroGarden!
Sowing Seeds for Success
To plant your seeds in the AeroGarden seed pods, follow the instructions provided with your empty seed pods or use the pre-seeded basil pods.
If you’re planting your own seeds, place 2-3 seeds in each pod, and gently press them into the growing medium.
Cover the seeds lightly, ensuring they are not exposed to direct light, as this could hinder germination.
Don’t forget to place the clear plastic domes over the pods to create a humid environment that encourages germination.
Giving Your Basil Room to Grow
When planting your basil seeds, pay attention to the spacing recommendations for the specific AeroGarden model you’re using.
Proper spacing ensures that your plants have enough room to grow without competing for light and nutrients.
As a general rule, leave at least one empty pod space between basil plants.
If all your seeds germinate, you may need to thin them out by removing the smallest seedlings, leaving only the strongest one in each pod.
Anticipating Germination and Early Growth
Once your seeds are planted, it’s time to sit back and watch the magic happen! Basil seeds typically germinate within 5-10 days.
You’ll see tiny sprouts emerging from the seed pods, and at this stage, you can remove the plastic domes.
In the early stages of growth, your basil plants will focus on developing roots and leaves.
The LED grow lights in your AeroGarden will provide the right spectrum of light to support this process.
Keep an eye on your plants and adjust the grow light height as needed to ensure they receive the optimal light intensity.
Maintenance and Care
Now that your basil seeds are planted and starting to grow, it’s time to focus on their ongoing maintenance and care.
After all, happy and healthy plants mean a bountiful harvest!
In this section, we’ll guide you through the essential steps to keep your hydroponic basil plants thriving in your AeroGarden.
From monitoring water levels to pruning and harvesting, we’ll share all the tips and tricks you need to enjoy a flourishing basil garden right in your home!
Keeping an Eye on Water and Nutrients
Regularly monitor the water level in your AeroGarden reservoir to ensure your basil plants stay well-hydrated.
Top off the water as needed and add nutrients every two weeks or according to the AeroGarden instructions.
Maintaining proper water and nutrient levels is key to supporting healthy plant growth and preventing nutrient deficiencies.
Balancing pH for Optimal Growth
Remember to periodically check the pH level of the water in your AeroGarden, aiming for a slightly acidic range of 5.5 to 6.5.
Adjust the pH as needed using the pH up or down solutions from your testing kit.
A balanced pH level ensures that your basil plants can efficiently absorb the nutrients they need for strong growth.
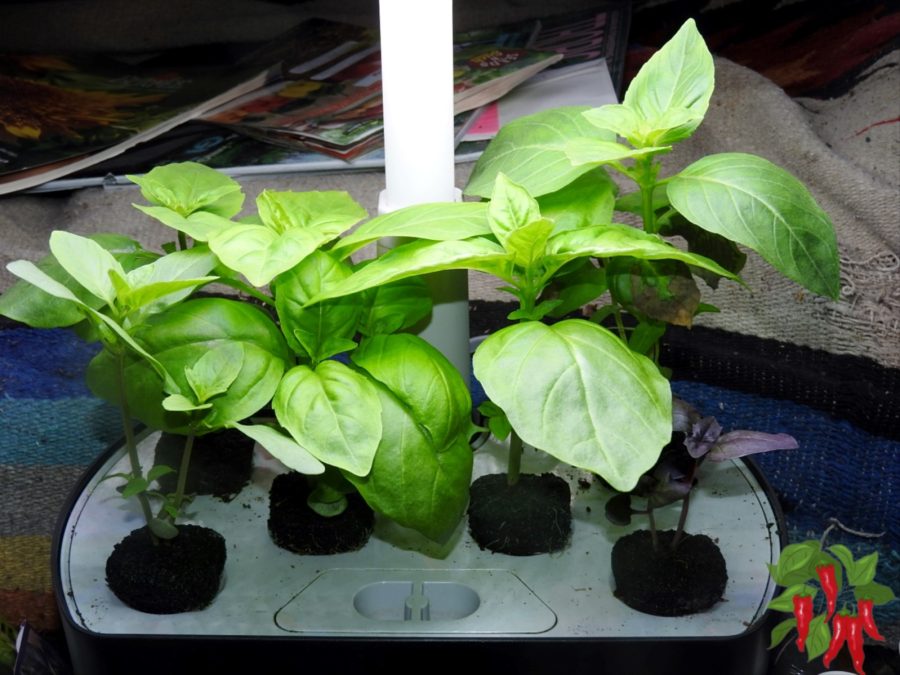
Pruning and Trimming Your Basil Beauties
In this video, I am topping my basil plants. My first harvest is after only 21 days. I also spotted some fungus gnats and sprayed them with neem oil.
Regular pruning and trimming of your basil plants encourage bushy growth and prevent them from becoming too leggy.
Pinch off the growing tips just above a pair of leaves, and remove any yellowing or damaged leaves.
This promotes branching and helps maintain a compact, bushy shape that maximizes light exposure and airflow.
You can dry your basil prunings or use them as clones.
Remove lower leaves so you have a few inches of bare stem and plant them directly into a small pot of coco coir that is kept moist.
In a few weeks, they will have rooted. Wait another week or two before transplanting into a larger pot or in your vegetable garden.
Keeping Pests and Diseases at Bay
Hydroponic basil plants are generally less susceptible to pests and diseases compared to soil-grown plants.
However, it’s still important to keep an eye out for common pests like aphids, whiteflies, or spider mites.
If you spot any unwelcome visitors, treat your plants with a gentle insecticidal soap or neem oil.
Keep your AeroGarden area clean and free of debris to prevent the spread of diseases.
Supporting and Training Your Basil Buddies
As your basil plants grow taller, they might need some extra support to prevent them from drooping.
You can use plant supports or a trellis system to help keep your plants upright and organized.
Training your basil plants to grow in a specific direction can also optimize light exposure and airflow.
Keeping Your AeroGarden Spick and Span
Regularly clean and maintain your AeroGarden system to ensure it functions efficiently and keeps your basil plants in top shape.
Wipe down the grow light and other surfaces with a damp cloth to remove dust and debris.
Periodically clean the water reservoir to prevent algae growth and ensure your plants receive clean water and nutrients.
Follow the AeroGarden instructions for guidance on deep cleaning and maintenance procedures.
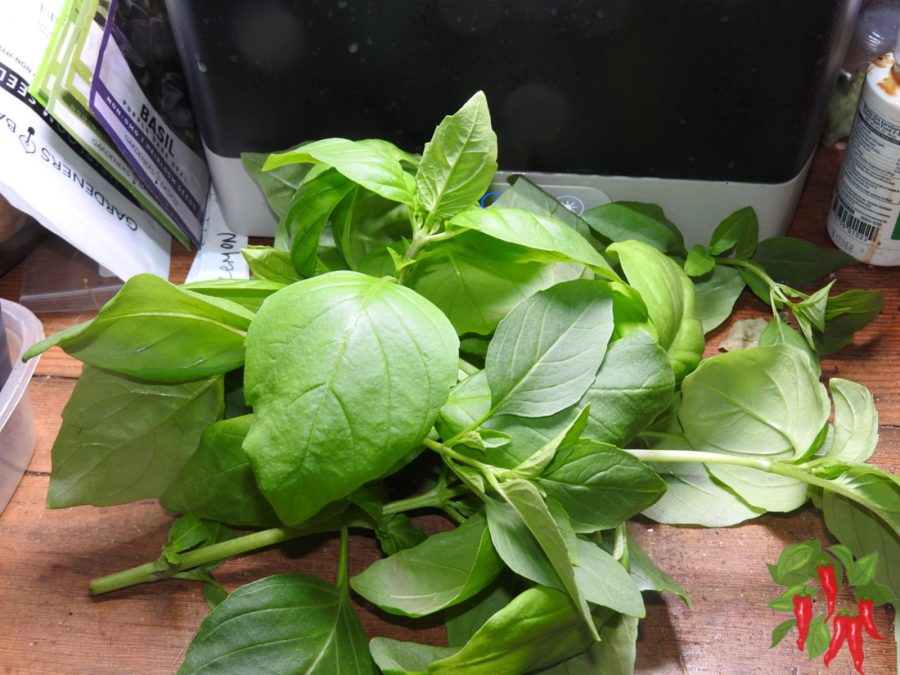
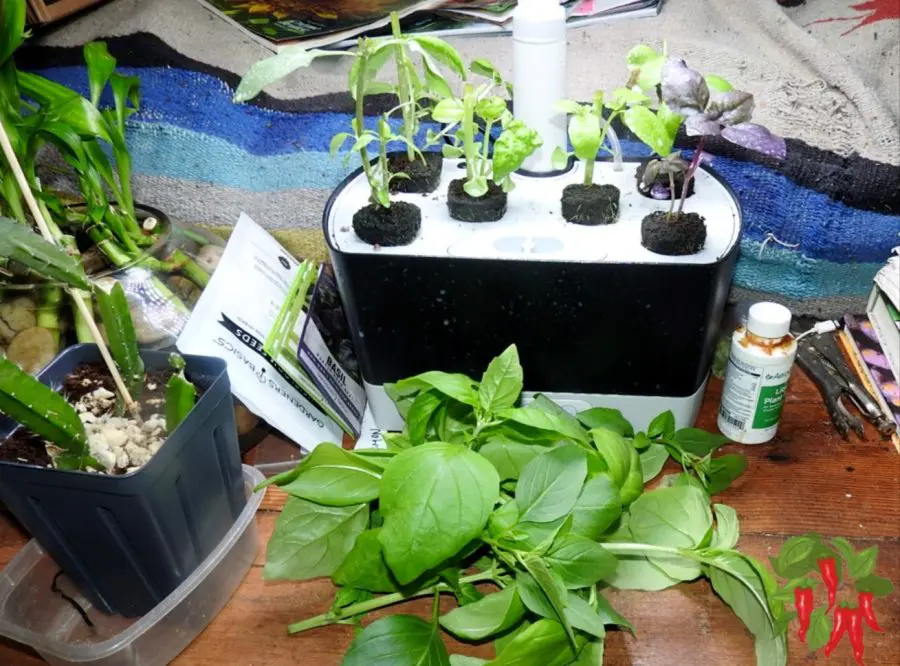
Harvesting Your Basil
You’ve nurtured your basil plants from tiny seeds to thriving green beauties – now it’s time to enjoy the fruits (or rather, leaves) of your labor!
In this section, we’ll share the ins and outs of harvesting your hydroponic basil from your AeroGarden.
You’ll learn the best time and method to harvest, how to store your freshly picked basil, and some delicious ways to incorporate it into your meals.
So, let’s get ready to savor the amazing flavors of your homegrown basil!
Timing Your First Harvest
Basil plants are usually ready for their first harvest when they have at least 3-4 sets of true leaves and are about 6 inches tall.
This typically occurs around 4-6 weeks after germination.
By waiting until your plants have reached this stage, you give them enough time to establish strong root systems and robust foliage.
Mastering the Art of Harvesting
To harvest your basil, use a clean, sharp pair of scissors or pruning shears to snip off the leaves or stems.
Cut just above a set of leaves, leaving at least one-third of the plant intact.
This encourages new growth and ensures your basil plants continue to produce fresh leaves throughout the growing season.
Remember to harvest early in the day when the essential oils in the leaves are at their most potent for the best flavor.
Preserving and Storing Your Fresh Basil
Once you’ve harvested your basil leaves, rinse them gently under cold water and pat them dry.
For short-term storage, place the basil leaves in a damp paper towel and store them in a sealed plastic bag or container in the refrigerator.
They should last for up to a week. For longer-term storage, consider freezing or drying your basil leaves.
You can freeze whole leaves or make a basil puree with a little olive oil and freeze it in ice cube trays for easy portioning.
Encouraging Continuous Growth with Regular Harvests
By regularly harvesting your basil plants, you can prolong their growth and productivity.
Frequent harvesting encourages branching and new leaf production, ensuring a steady supply of fresh basil throughout the growing season.
Aim to harvest no more than one-third of each plant at a time, giving your plants a chance to recover and regrow between harvests.
With proper care and regular harvesting, your AeroGarden basil plants can continue to provide fresh, aromatic leaves for months!
Troubleshooting Common Issues
While growing basil hydroponically in your AeroGarden can be a smooth and rewarding experience, it’s not uncommon to encounter a few hiccups along the way.
Don’t worry, we’ve got your back! In this section, we’ll discuss some common issues you might face while growing your basil plants and provide solutions to help you overcome these challenges.
With a little troubleshooting know-how, you’ll be well-equipped to handle any obstacles and keep your basil garden thriving!
Solving the Mystery of Yellowing Leaves
If you notice your basil leaves turning yellow, it could be due to several factors:
Nutrient deficiency: Make sure you’re providing the right amount of nutrients and maintaining proper pH levels for optimal nutrient absorption.
Overwatering: Ensure your AeroGarden’s water level is maintained according to the instructions, and avoid adding too much water.
Natural aging: Older leaves may yellow and drop off naturally. Prune them away to promote healthy new growth.
Addressing Slow Growth
Slow growth in your basil plants could be caused by:
Insufficient light: Ensure your grow lights are set to the correct height and timer settings for basil plants.
Inadequate nutrients: Regularly add the recommended amount of nutrients to the water reservoir.
Suboptimal pH levels: Maintain a pH range of 5.5 to 6.5 to support healthy basil growth.
Battling Root Rot
Root rot is a common issue in hydroponic systems caused by pathogens, oxygen deficiency, or overwatering. To prevent and treat root rot:
Keep your AeroGarden’s water reservoir clean and free of debris.
Maintain proper water and nutrient levels.
Remove any affected plants to prevent the spread of root rot.
Dealing with Pest Infestations
Although hydroponic basil plants are less susceptible to pests, it’s important to be vigilant. If you encounter pests:
Use a gentle insecticidal soap or neem oil to treat your plants.
Keep your AeroGarden area clean and free of debris.
Monitor your plants regularly for early signs of infestation.
Resolving Seed Germination Issues
If you’re having trouble with seed germination, consider the following:
Seed quality: Use fresh, high-quality seeds for better germination rates.
Temperature: Ensure your AeroGarden is located in an area with stable room temperature (65-75°F or 18-24°C).
Light exposure: Cover your seeds with the growing medium and use the clear plastic domes to create a humid environment that promotes germination.
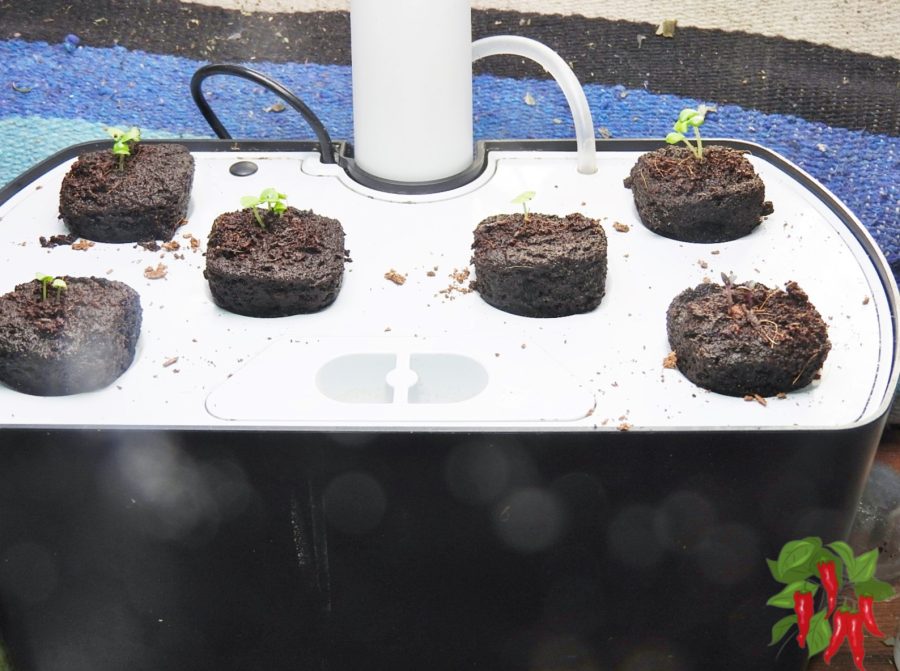
Hydroponic Basil Day 7
These plants took a week to germinate and now they have been up for a week. Here is a day 7 video.
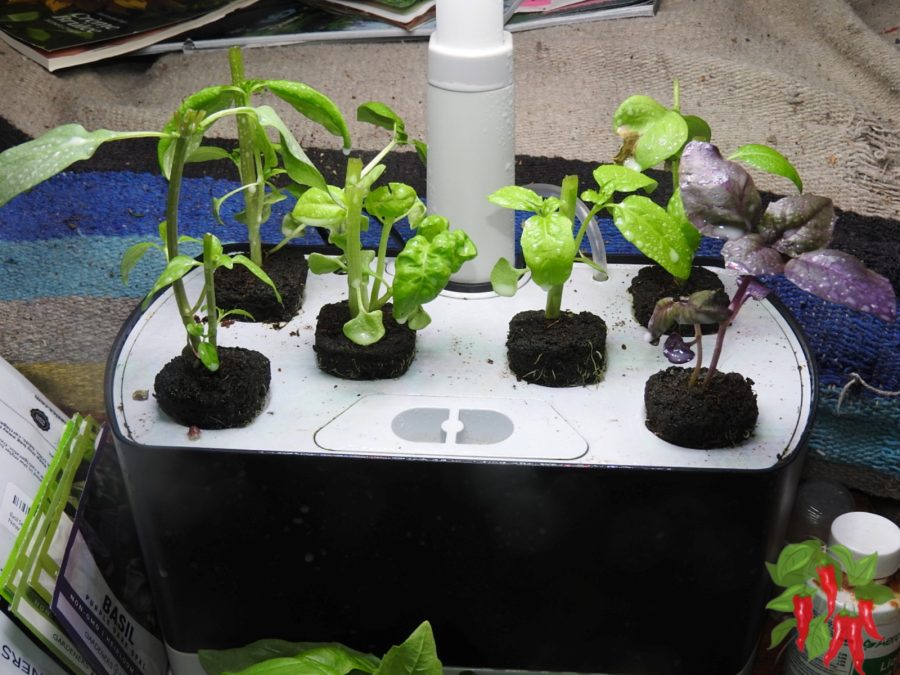
Hydroponic Basil Day 14 In My AeroGarden Harvest
These basil plants are growing well except for the purple basil. It looks healthy but it is much smaller than the other plants.
I raised the light up and the plants are taking off. It looked like they were getting too much light with it all the way down. It looked like the leaf edges were turning away from the light if that makes any sense.
These plants are drinking well and I have been topping up the reservoir about every 2-3 days. I have been adding a capful of the AeroGarden nutrients every second refill.
I will let these plants grow another week or so and then top them so they get bushier. At that point, I may need to remove some plants but we’ll see.
Here is a video of the basil plants on day 14
Hydroponic Basil FAQs
Growing basil hydroponically in an AeroGarden presents a convenient and efficient way to cultivate this popular herb right in your home.
The AeroGarden takes most of the guesswork out of the equation, ensuring that your basil grows in a controlled environment with consistent light, water, and nutrients.
But while the AeroGarden does a lot, you may still have questions about maximizing your basil’s growth, its care, or even about the system itself.
Q: How often should I add nutrients to my hydroponic basil in the AeroGarden?
A: Usually, you should add nutrients every two weeks. When you need more a light will flash. Always follow the manufacturer’s recommendations for best results.
Q: Can I grow other herbs alongside basil in my AeroGarden?
A: Absolutely. You can grow multiple herbs like thyme, oregano, and parsley alongside basil. Just be mindful of the space as basil can become quite bushy.
Q: How long does it take for basil to be ready for harvest in an AeroGarden?
A: Basil grown in an AeroGarden is typically ready for its first harvest within 4-6 weeks.
Q: Can I use tap water in my AeroGarden?
A: While tap water can be used, it’s better to use distilled or filtered water to prevent mineral buildup and ensure optimal plant health.
How to Grow Basil Hydroponically in Your AeroGarden Final Thoughts
As we wrap up our comprehensive guide on how to grow basil hydroponically in your AeroGarden, we hope you’re feeling inspired and well-equipped to embark on this rewarding gardening journey.
With the right equipment, proper care, and a little troubleshooting savvy, you can enjoy a lush, aromatic basil garden right in the comfort of your home.
So, go ahead and give it a try – your taste buds and culinary creations will thank you for it! Happy gardening!
Reaping the Benefits of Hydroponic Basil Growth
In summary, growing basil hydroponically in your AeroGarden offers numerous benefits, such as faster growth, higher yields, and fewer pest and disease problems.
Plus, you get the added convenience of growing fresh basil year-round, right in your own home – perfect for enhancing your culinary creations!
Fostering Success in Your AeroGarden Journey
As you continue your AeroGarden gardening adventure, remember to be patient and attentive to your plants’ needs.
With regular care, maintenance, and a willingness to troubleshoot any challenges that arise, you’ll be well on your way to a thriving hydroponic basil garden.
And, who knows? You might just discover a newfound passion for indoor gardening!
Exploring the World of Hydroponic Plant Options
Once you’ve mastered the art of growing basil in your AeroGarden, don’t hesitate to branch out and explore other hydroponic plant options.
Your AeroGarden is versatile and can support a wide variety of herbs, vegetables, and even flowers.
Consider trying your hand at growing parsley, cilantro, lettuce, or even chili peppers or cherry tomatoes!
The sky’s the limit when it comes to cultivating a diverse and bountiful hydroponic garden.
Read my article What AeroGarden Should I Buy? [How To Choose The Best AeroGarden]