This post contains affiliate links. If you buy something from one of our links we may earn a commission. Thanks
Discover the joys of Polka Dot Plant indoor care with our easy-to-follow tips and tricks. Let’s grow vibrant, healthy Hypoestes phyllostachya houseplants together!
Polka Dot Plant Indoor Care involves placing the plant in bright, indirect light and maintaining a consistent watering schedule. Allow the top inch of soil to dry before watering again. A well-draining potting mix is essential, and occasional misting helps maintain humidity. Fertilize monthly during the growing season for optimal health.
Are you looking for indoor plants to add a pop of color and personality to your indoor garden?
Look no further, because we’re here to help you dive into the wonderful world of Polka Dot Plant indoor care.
With their whimsical, vibrant foliage, these delightful houseplants are sure to brighten up your space and bring a smile to your face.
Stick around, and we’ll share all the insider tips to help your Polka Dot Plant flourish!
Introduction To Hypoestes phyllostachya The Polka Dot Plant

Today, we’re going to talk about the charming Hypoestes phyllostachya, also known as the Polka Dot Plant.
Another common name is the Freckle Face Plant. These eye-catching beauties are a fantastic addition to any indoor garden, with their uniquely speckled leaves and easygoing nature.
In this post, we’ll cover everything you need to know about their origin, Polka Dot Plant indoor care requirements, and even some fun facts.
So, let’s get started on this plant-filled adventure and learn how to make your Hypoestes phyllostachya truly shine!
Getting to Know Hypoestes phyllostachya (Polka Dot Plant)
Let’s start with a quick introduction to our colorful friend, the Hypoestes phyllostachya.
This attractive plant, commonly known as the Polka Dot Plant, hails from Madagascar and South Africa and has captivated plant lovers with its delightful polka-dotted foliage.
Available in a variety of vibrant shades such as pink, red, and white, these plants bring a splash of color and cheer to any indoor space.
While they can be a little fussy at times, with the right care, they’ll reward you with their unique charm and beauty.
Polka Dot Plant Size

Polka Dot Plants (Hypoestes phyllostachya) typically grow to a size of 8 to 12 inches (20 to 30 cm) in height, with a similar spread.
However, if given the right conditions and Polka Dot Plant indoor care, they can sometimes grow even taller, up to 24 inches (60 cm).
Their compact and bushy growth habit makes them perfect for indoor gardens, containers, or as a decorative accent in mixed plantings.
Keep in mind that regular pruning can help maintain the desired size and shape, as well as encourage a fuller, bushier appearance.
The Key to Thriving Indoors: Proper Care
Now that we’re acquainted with the Polka Dot Plant, let’s talk about the importance of proper care for indoor growth.
Like any houseplant, Hypoestes phyllostachya has specific needs to thrive indoors.
Ensuring that these needs are met will result in a happy, healthy plant that graces your space with its lively presence.
In the sections to come, we’ll dive into the various aspects of Polka Dot Plant care, including lighting, watering, humidity, and more.
With a little love and attention, you’ll soon have a flourishing Polka Dot Plant that’s the envy of all your plant-loving friends!
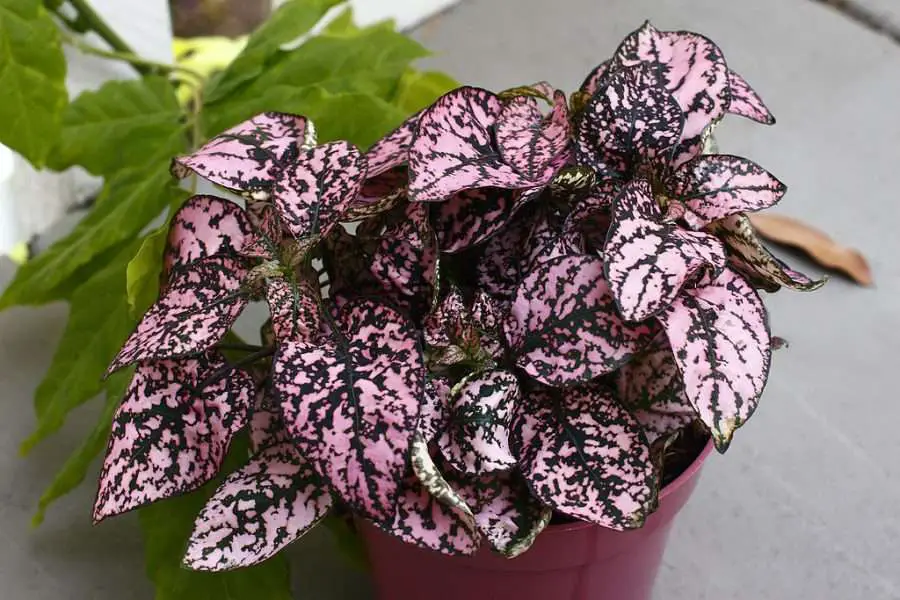
Varieties: Pink Polka Dot Plant

In this section, we’re going to chat about one of the most popular varieties of Hypoestes phyllostachya: the fabulous Pink Polka Dot Plant.
With its gorgeous splashes of pink against a lush green background, this variety is a true showstopper and a favorite among houseplant collectors.
So, let’s dive in and explore the fascinating world of the Pink Polka Dot Plant, learn what sets it apart, and find out how to care for it to make your indoor garden a true spectacle of color and joy!
Other Varieties
While the Pink Polka Dot Plant is certainly popular, there are several other beautiful varieties of Hypoestes phyllostachya that can add a touch of color and flair to your indoor garden. Here are a few other varieties to consider:
Red Polka Dot Plant: This variety showcases stunning red polka dots on a green backdrop, creating a bold and striking visual effect.
White Polka Dot Plant: Featuring delicate white speckles on its green leaves, the White Polka Dot Plant offers a more subtle, yet elegant, appearance.
Purple Polka Dot Plant: With deep purple spots on green leaves, the Purple Polka Dot Plant adds a touch of regal beauty to any indoor space.
Confetti Series: This is a collection of Polka Dot Plants with a mix of vibrant colors like pink, red, and white on their leaves, creating a festive and colorful display.
Each variety of Hypoestes phyllostachya has its own unique charm and appeal, so you may want to try growing a few different ones to see which you prefer or even create a dazzling mix in your indoor garden!
Hypoestes phyllostachya Lighting

In this section, we’ll shine a light on an essential aspect of Hypoestes phyllostachya care: lighting.
As with all plants, the right amount and type of light are crucial to ensure your Polka Dot Plant stays happy and healthy.
Too much light is just as bad as too much low light.
But don’t worry, we’ve got you covered with all the tips and tricks you’ll need to provide the perfect lighting conditions for your vibrant, speckled friend.
So, let’s brighten things up and learn how to make your Polka Dot Plant thrive in your home’s unique lighting environment!
The Sweet Spot: Ideal Lighting Conditions for Indoor Growth
Let’s talk about the perfect lighting recipe for your Hypoestes phyllostachya. These lively plants prefer indirect bright light to maintain their vibrant foliage colors.
The ideal spot would be near a window with filtered sunlight or in a well-lit room where they can bask in the sun without being directly exposed to harsh rays.
Too little light may result in dull, faded leaves, while the direct intense full sun can scorch their delicate foliage.
Light Up Your Plant’s Life: Tips to Ensure Proper Light Exposure
Now that we know what kind of light our Polka Dot Plant craves, let’s explore some helpful tips to make sure it gets just the right amount of illumination:
Rotate your plant: To ensure even light exposure, make a habit of rotating your plant every few weeks.
This prevents the plant from growing lopsided as it reaches for the light source.
Use a sheer curtain: If your plant is near a window that gets direct sunlight, consider using a sheer curtain to filter the light and protect your Polka Dot Plant from to much sun and sunburn.
Artificial lighting: If your home doesn’t receive enough natural light, you can always supplement it with artificial lighting.
A simple LED grow light or even a regular household LED bulb can make a significant difference in your plant’s health.
Observe and adjust: Keep an eye on your Polka Dot Plant’s appearance and growth.
If you notice the leaves losing their vibrant colors or the plant becoming leggy, it might be a sign that it’s not receiving enough light.
In such cases, try moving it to a brighter spot or adjusting the artificial lighting accordingly.
By following these tips and providing your Hypoestes phyllostachya with the right lighting conditions, you’ll be well on your way to raising a dazzling, radiant Polka Dot Plant!
Polka Dot Plant Indoor Care-Temperature and Humidity

When it comes to caring for your Polka Dot Plant, temperature and humidity play a significant role in ensuring its health and vibrancy.
Just like any other living organism, this eye-catching plant thrives in an environment that closely mimics its natural habitat.
In this section, we’ll delve into the ideal temperature and humidity levels to create ideal conditions for Polka Dot Plants and share some practical tips for maintaining a comfortable and consistent atmosphere.
Let’s create the perfect environment to help your polka-dotted beauty flourish!
Feeling Just Right: Ideal Temperature for Polka Dot Plants
Polka Dot Plants are native to Madagascar, which means they’re accustomed to warm temperatures and tropical conditions.
To keep your plant happy and healthy, try to maintain the following temperature range:
Ideal temperature range: Polka Dot Plants prefer temperatures between 65°F and 75°F (18°C to 24°C) during the day.
At night, temperatures can drop slightly but should stay above 60°F (15°C) to avoid causing stress to the plant.
Avoid temperature extremes: Be mindful of sudden temperature fluctuations or drafts from windows, doors, or air conditioning vents, as these can cause stress and harm your plant.
A Breath of Fresh Air: Ideal Humidity for Polka Dot Plants

In addition to temperature, humidity is a crucial factor in creating the perfect environment for your Polka Dot Plant.
Here’s what you need to know:
Ideal humidity levels: Polka Dot Plants thrive in a relatively high humidity environment, ideally between 50% and 70%.
They may tolerate lower humidity levels, but their growth may be slower, and their leaves may become less vibrant.
Increasing humidity: To raise humidity levels around your plant, consider the following methods:
Humidity tray: Place a tray filled with water and pebbles beneath your plant’s pot, ensuring the bottom of the pot doesn’t touch the water. As the water evaporates, it will raise the humidity around your plant.
Group plants: Place your Polka Dot Plant close to other humidity-loving plants, as they’ll create a microclimate with higher humidity levels.
Use a humidifier: If your home’s air is particularly dry, consider using a humidifier near your plant to maintain the desired humidity.
Monitor humidity: Use a hygrometer to monitor humidity levels near your plant and make adjustments as needed.
By carefully managing temperature and humidity levels, you’ll create a comfortable and nurturing environment that closely resembles your Polka Dot Plant’s native habitat.
This attention to detail will help ensure your plant’s health, vitality, and continued growth, showcasing its striking, polka-dotted beauty for all to enjoy!
Polka Dot Plant Soil Mix Recipe: Coco Coir and Perlite

In this segment, we’ll be diving into the wonderful world of Polka Dot Plant soil mixes, specifically focusing on a fantastic recipe that combines coco coir and perlite.
These plants prefer moist soil that is well-drained. This dynamic duo creates the perfect balance of moisture retention and good drainage, ensuring your beloved Polka Dot Plant has the right environment to thrive.
So, grab your gardening gloves, and let’s mix things up as we learn how to create the ultimate soil blend for your Hypoestes phyllostachya!
The Dynamic Duo: Benefits of Using Coco Coir and Perlite
Coco coir and perlite make an excellent team when it comes to creating the ideal soil mix for your Polka Dot Plant.
Let’s explore the benefits this combination brings to the table:
Moisture retention: Coco coir, derived from coconut husks, has an impressive ability to hold onto water.
This helps maintain consistent moisture levels, which is essential for your Polka Dot Plant’s well-being.
Drainage and aeration: Perlite, a type of volcanic glass, is well-known for its excellent drainage properties.
It prevents the soil from becoming waterlogged, reducing the risk of root rot.
Additionally, it improves aeration, ensuring the roots have access to the oxygen they need.
Sustainability: Coco coir is an eco-friendly, renewable resource, making it a responsible choice for environmentally conscious gardeners.
Mixing Magic: Steps to Create the Perfect Soil Mix
Now we know the benefits of using coco coir and perlite.
Here are the steps to create the ultimate Polka Dot Plant soil mix:
• Gather your ingredients: You’ll need equal parts of coco coir and perlite for this recipe. Be sure to purchase high-quality, horticultural-grade products to ensure the best results.
• Prepare the coco coir: If your coco coir comes in a compressed brick, follow the manufacturer’s instructions to rehydrate and expand it before mixing.
• Measure and mix: Combine equal parts of coco coir and perlite in a large container. Mix thoroughly, ensuring the two components are evenly distributed.
• Test the mix: Before potting your Polka Dot Plant, test the soil mix by lightly watering it. It should retain moisture but drain well, without becoming soggy.
• Pot your plant: Fill your chosen pot with the prepared soil mix and gently transplant your Polka Dot Plant, taking care not to damage the roots.
By following these steps, you’ll create a nurturing environment for your Hypoestes phyllostachya, setting the stage for a thriving, vibrant Polka Dot Plant!
Potting and Repotting

Ready to give your Polka Dot Plant a cozy new home?
In this section, we’ll be discussing the ins and outs of potting and repotting your Hypoestes phyllostachya.
Whether you’re a proud new plant owner or simply helping your leafy buddy settle into a bigger space, we’ve got the tips and advice you need for a smooth transition.
So let’s roll up our sleeves and get ready to dive into the world of pots, roots, and happy plants!
Time for a Change: When and Why to Repot a Polka Dot Plant
Knowing when and why to repot your Polka Dot Plant is crucial for its long-term health and happiness.
Let’s explore the reasons and signs that indicate it’s time for a move:
Rootbound: If you notice roots growing out of the drainage holes or wrapping around the top of the soil, your plant may be rootbound and in need of a larger pot.
Stunted growth: A Polka Dot Plant that seems to stop growing or struggles to produce new leaves might be constrained by its current pot.
Soil degradation: Over time, potting soil loses its structure and nutrient content. Repotting with fresh soil mix rejuvenates your plant, providing essential nutrients for growth.
Annual refresh: Generally, it’s a good idea to repot your Polka Dot Plant every 1-2 years to encourage healthy growth and maintain optimal conditions.
New Beginnings: Step-by-Step Repotting Guide
Now that we know when it’s time to repot, let’s go through the process step by step:
• Choose a pot: Select a new pot that’s 1-2 inches larger in diameter than the current one. Ensure it has drainage holes to prevent waterlogging.
• Prepare the pot: Place a piece of mesh or coffee filter over the drainage holes to prevent soil loss.
Optionally, add a layer of small stones or gravel at the bottom for extra drainage.
• Remove the plant: Gently remove the Polka Dot Plant from its current pot by carefully tipping it over and supporting the plant as it slides out.
• Inspect and trim roots: Examine the root system for any signs of rot or damage. Use clean, sharp scissors to trim away any unhealthy roots.
• Add soil to the new pot: Fill the bottom of the new pot with your prepared soil mix, creating a small mound in the center to support the plant.
• Position the plant: Place the Polka Dot Plant on the mound of soil, spreading the roots out evenly.
Adjust the plant’s position so it’s sitting at the same depth as in its previous pot.
• Fill in with soil: Add soil mix around the plant, gently pressing it down to eliminate air pockets.
Be careful not to bury the base of the stem, as this can lead to rot.
• Water and care: Water your newly repotted Polka Dot Plant thoroughly and place it in a spot with suitable lighting conditions.
Monitor the plant’s progress and adjust care as needed.
By following this repotting guide, you’ll help your Polka Dot Plant settle into its new home with minimal stress and maximum success!
Polka Dot Plant Watering

Gather ’round, fellow plant lovers, as we dive into the refreshing world of Polka Dot Plant watering!
Just like us, our leafy friends need the right amount of hydration to stay happy and healthy.
In this section, we’ll share all the essential tips and tricks to quench your Polka Dot Plant’s thirst and keep those vibrant, dotted leaves looking their best.
So, let’s get those watering cans ready and explore the art of watering your Hypoestes phyllostachya!
The Perfect Quench: Proper Watering Techniques
To keep your Polka Dot Plant happy and hydrated, it’s important to employ the right watering techniques.
Let’s take a look at some tips to ensure your plant gets just the right amount of moisture:
Check the soil: Before watering, check the top inch of soil by sticking your finger in it. If it feels dry, it’s time to water; if it’s still moist, wait a day or two and check again.
Water thoroughly: When watering, saturate the soil until water flows out of the drainage holes. This ensures that the moisture reaches the root system evenly.
Allow for drainage: After watering, let excess water drain out of the pot to prevent the soil from becoming waterlogged. A saucer or tray under the pot can help catch any runoff.
Adjust for conditions: Be mindful of environmental factors like temperature, humidity, and lighting, which can affect how often your plant needs water. In warmer, brighter conditions, you may need to water more frequently.
Staying Alert: Signs of Over- or Under-Watering
Recognizing the signs of over- or under-watering can help you adjust your care routine and keep your Polka Dot Plant in tip-top shape.
Here’s what to look out for:
Under-watering: Symptoms of under-watering include wilting leaves, dry soil, and a drooping appearance.
If you notice these signs, increase the frequency or amount of water you’re providing.
Over-watering: Signs of over-watering include yellowing leaves, soggy soil, and root rot.
If you suspect your plant is getting too much water, reduce the watering frequency and ensure proper drainage.
By following these watering guidelines and staying alert to your Polka Dot Plant’s needs, you’ll be able to maintain the perfect moisture balance, ensuring a happy, healthy, and vibrant plant!
How to Prune Polka Dot Plant

Snip, snip, hooray! In this chapter, we’ll explore the art of pruning your Polka Dot Plant.
Pruning is an essential part of plant care that promotes healthy growth, maintains a pleasing shape, and encourages a lush, bushy appearance.
Don’t worry, even if you’re new to the world of plant grooming, we’ll guide you through the process with helpful tips and tricks to ensure your Polka Dot Plant stays looking its best.
So, let’s grab those pruning shears and get ready to give your Hypoestes phyllostachya a little trim!
Snip to Shape: Reasons for Pruning
Pruning your Polka Dot Plant isn’t just about aesthetics; it’s also an essential part of promoting overall plant health. Let’s take a closer look at the reasons for pruning:
Encourage bushiness: Regular pruning encourages your Polka Dot Plant to grow fuller and bushier, preventing it from becoming too leggy or sparse.
Maintain shape: Pruning helps you control the shape and size of your plant, keeping it looking neat and tidy.
Remove dead or damaged foliage: Trimming away dead or damaged leaves and stems ensures that your plant focuses its energy on new, healthy growth.
Stimulate growth: Pruning stimulates new growth, helping your Polka Dot Plant stay vibrant and lush.
A Cut Above: Pruning Techniques and Tips
Now that we know the benefits of pruning, let’s explore some techniques and tips to help you prune like a pro:
Use sharp, clean tools: Make sure your pruning shears or scissors are clean and sharp to prevent damage or the spread of disease.
Prune above a leaf node: When trimming, make your cuts just above a leaf node (where a leaf attaches to the stem). This encourages new growth in that area.
Trim back leggy growth: If your Polka Dot Plant is looking a bit stretched out, trim back the long stems to encourage bushier growth.
Remove dead or damaged foliage: Be sure to snip away any yellowing, damaged, or dead leaves and stems to keep your plant looking fresh and healthy.
Prune regularly: Keep an eye on your plant’s growth and prune as needed to maintain its desired shape and size.
By following these pruning guidelines, you’ll not only keep your Polka Dot Plant looking its best but also ensure it remains healthy and vibrant for years to come!
Polka Dot Plant Propagation

Are you ready to share the Polka Dot Plant love? In this section, we’ll delve into the exciting world of Polka Dot Plant propagation.
With just a few simple steps, you can turn a single plant into a thriving little family, ready to brighten up your space or share with friends.
Don’t worry if you’re new to propagation; we’re here to guide you through the process, step by step.
So, let’s gather our tools and embark on this delightful journey of creating new Polka Dot Plant babies!
Propagation Playground: Methods of Propagation
When it comes to Polka Dot Plant propagation, there are two primary methods you can choose from, each with its own set of advantages. Let’s explore your options:
Stem cuttings: This popular method involves taking a stem cutting from the parent plant and encouraging it to root, either in water or soil.
Division: This technique involves dividing the parent plant into smaller sections, each with its own root system, and repotting them separately.
Growing New Life: Detailed Steps for Successful Propagation
Now that we’ve outlined the available methods, let’s dive into the detailed steps for successful Polka Dot Plant propagation:
Stem cuttings:
• Choose a healthy stem: Select a strong, healthy stem from the parent plant with at least 3-4 leaves.
• Make the cut: Using clean, sharp scissors or pruning shears, cut the stem at a 45-degree angle, just below a leaf node.
• Prepare the cutting: Remove the leaves from the bottom half of the cutting to prevent rot and encourage rooting.
• Root in water or soil: Place the cutting in a jar of water, making sure no leaves are submerged, or plant it directly in moist, well-draining soil.
• Monitor progress: Keep an eye on your cutting, changing the water regularly or keeping the soil moist. In a few weeks, roots should begin to form.
• Transplant: Once the roots are well-developed, transplant your new Polka Dot Plant into a pot with appropriate soil mix and care for it as usual.
Division:
• Remove the parent plant: Carefully remove the Polka Dot Plant from its pot, taking care not to damage the root system.
• Divide the plant: Gently separate the plant into smaller sections, ensuring each has a healthy portion of roots and foliage.
• Repot the divisions: Plant each division into a new pot filled with the appropriate soil mix, ensuring the roots are adequately covered.
• Care for the new plants: Water the newly potted divisions thoroughly and provide them with proper lighting and care, just as you would for the parent plant.
By following these propagation guidelines, you’ll be well on your way to growing new Polka Dot Plant babies, ready to share or brighten up even more of your living space!
Polka Dot Plant Problems

Even the most attentive plant parents might encounter a few bumps in the road when it comes to Polka Dot Plant care.
In this section, we’ll tackle some common problems you might face with your Hypoestes phyllostachya and provide helpful solutions to get your plant back on track.
From pesky pests to worrisome wilt, we’re here to help you troubleshoot and ensure your Polka Dot Plant remains happy, healthy, and vibrant.
So, let’s put on our plant detective hats and dive into solving these botanical mysteries!
Plant Puzzles: Common Issues and Their Causes
Even the most well-cared-for Polka Dot Plants might encounter a few challenges. Let’s examine some common issues and their potential causes:
Yellowing leaves: Over-watering, under-watering, or a lack of nutrients can cause leaves to yellow.
Leggy growth: Insufficient light may result in long, spindly stems with sparse leaves.
Wilting: Under-watering, over-watering, or exposure to extreme temperatures can cause wilting.
Brown leaf tips: Dry indoor air or inconsistent watering can lead to brown leaf tips.
Pests: Common pests that may trouble your Polka Dot Plant include aphids, spider mites, and mealybugs.
Plant Solutions: Solutions and Preventative Measures
Now that we’ve identified the potential causes of these common issues, let’s explore some solutions and preventative measures:
Yellowing leaves:
• Check your watering routine: Ensure you’re providing the right amount of water and adjust as needed.
• Feed your plant: If the issue is nutrient-related, provide your Polka Dot Plant with a balanced fertilizer during the growing season.
Leggy growth:
• Move your plant: Relocate your plant to a spot with brighter, indirect light to promote bushier growth.
• Prune: Trim back leggy stems to encourage fuller, more compact growth.
Wilting:
• Adjust watering: Assess your watering routine and make adjustments to prevent both under and over-watering.
• Regulate temperature: Keep your Polka Dot Plant away from drafts, air vents, and direct sunlight to maintain a stable temperature.
Brown leaf tips:
Maintain consistent watering: Be mindful of your plant’s water needs and maintain a consistent schedule.
• Increase humidity: Use a humidifier, pebble tray, or mist your plant to raise the humidity around it.
Pests:
• Inspect regularly: Check your plant regularly for signs of pests and take action at the first sign of infestation.
• Treat with insecticidal soap: Use a gentle insecticidal soap or neem oil to treat affected plants and prevent future infestations.
By addressing these common issues and taking preventative measures, you’ll be well on your way to ensuring your Polka Dot Plant stays healthy, happy, and vibrant!
Pests and Diseases

Even the most beautiful Polka Dot Plants may sometimes face a few uninvited guests or pesky problems.
In this section, we’ll discuss common pests and diseases that might affect your Hypoestes phyllostachya, and provide helpful tips to identify, treat, and prevent these unwelcome visitors.
Together, we’ll ensure your plant stays healthy, vibrant, and pest-free, so you can continue to enjoy its stunning polka-dotted foliage.
So, let’s arm ourselves with knowledge and protect our beloved plants from harm!
Garden Guardians: Identifying Common Pests and Diseases
Keep an eye out for these common pests and diseases that might target your Polka Dot Plant:
Aphids: Tiny, pear-shaped insects that come in various colors and feed on plant sap, causing leaves to curl, yellow, or wilt.
Spider mites: Microscopic, spider-like creatures that create fine webbing and cause yellowing or speckling on leaves.
Mealybugs: Small, white, cottony insects that cluster on leaves and stems, sucking plant sap and causing stunted growth or leaf drop.
Root rot: A fungal disease that affects the roots of over-watered plants, causing them to become soft, mushy, and discolored.
Powdery mildew: A fungal infection that appears as a white, powdery substance on the surface of leaves, leading to distortion or stunted growth.
Plant Protectors: Treatment and Prevention Tips
Now that we can identify common pests and diseases, let’s learn how to treat and prevent them:
Aphids:
Treatment: Spray the plant with a strong stream of water to dislodge the aphids or treat with insecticidal soap or neem oil.
Prevention: Keep plants well-spaced for good air circulation and regularly inspect for signs of infestation.
Spider mites:
Treatment: Wash the plant thoroughly with water, then treat with insecticidal soap or neem oil.
Prevention: Maintain proper humidity levels and inspect plants regularly for signs of infestation.
Mealybugs:
Treatment: Manually remove visible bugs with a cotton swab dipped in rubbing alcohol or treat with insecticidal soap or neem oil.
Prevention: Keep plants clean and dust-free, and regularly inspect for signs of mealybugs.
Root rot:
Treatment: Remove affected plants from their pots, trim away damaged roots, and repot in fresh, well-draining soil.
Prevention: Avoid over-watering and ensure your plants have proper drainage.
Powdery mildew:
Treatment: Prune away affected leaves and treat the plant with a fungicide or homemade solution of water and baking soda.
Prevention: Maintain good air circulation and avoid overhead watering.
By following these treatment and prevention tips, you’ll help keep your Polka Dot Plant healthy, happy, and free from pests and diseases!
Polka Dot Plant Indoor or Outdoor

When it comes to Polka Dot Plant care, one question that often arises is whether these stunning plants are better suited for indoor or outdoor living.
In this section, we’ll explore the pros and cons of keeping Hypoestes phyllostachya both indoors and outdoors, as well as the factors you’ll need to consider in order to provide the best environment for your plant to thrive.
Together, we’ll help you decide on the perfect home for your Polka Dot Plant, ensuring its vibrant, spotted leaves continue to dazzle, no matter where it’s placed!
Since it is in USDA hardiness zone 10 try moving outdoors in the summer and indoors in the fall
For those living in hardiness zone 10, where temperatures are generally mild, you can certainly take advantage of both indoor and outdoor growth for your Polka Dot Plant.
During the summer months, when temperatures are warm and humidity levels are higher, you can place your plant outdoors in a spot with bright, indirect light.
This will allow your plant to enjoy the benefits of natural sunlight and fresh air.
As fall approaches and temperatures start to drop, it’s a good idea to bring your Polka Dot Plant back indoors to protect it from cooler weather.
Find a suitable spot near a bright window that provides the necessary indirect light for your plant.
Remember to also maintain consistent watering and humidity levels to ensure your plant continues to thrive indoors.
By moving your Polka Dot Plant between indoor and outdoor environments seasonally, you’ll be able to provide it with the best possible growing conditions throughout the year.
Just be sure to monitor its needs and adjust its care accordingly, and you’ll enjoy a happy, healthy plant with vibrant, polka-dotted foliage!
Polka Dot Plant Life Span

Polka Dot Plants are truly captivating with their vibrant, polka-dotted foliage, but how long can you expect these beauties to grace your home or garden?
In this section, we’ll explore the typical lifespan of Hypoestes phyllostachya and discuss how factors such as proper care and environmental conditions can impact the longevity of your plant.
So, let’s delve into the world of Polka Dot Plants to learn how to keep them flourishing for as long as possible and get the most out of their stunning presence!
Timeless Beauty: Average Life Span of Polka Dot Plants
Polka Dot Plants are generally considered to be short-lived perennials or, in some cases, annuals.
Their average life span typically ranges from 2 to 5 years, depending on various factors such as care, environment, and overall health.
Long Live the Polka Dot: Factors Affecting Plant Longevity
There are several factors that can impact the life span of your Polka Dot Plant. Let’s explore a few key elements:
Care: Providing your plant with proper care – including the right balance of light, water, and nutrients can significantly influence its longevity.
By meeting its specific needs, you’ll help ensure a longer, healthier life.
Environment: Whether grown indoors or outdoors, the environment plays a crucial role in your plant’s life span.
Factors such as temperature, humidity, and light exposure can all impact how long your plant thrives.
Pests and diseases: Keeping your Polka Dot Plant free from pests and diseases can help extend its life.
Regularly inspect your plant for any signs of infestation or infection, and address issues promptly to prevent long-term damage.
Pruning and maintenance: Regularly pruning your plant and removing dead or damaged foliage can promote new growth and improve overall health, contributing to a longer life span.
By understanding these factors and providing your Polka Dot Plant with the care and attention it needs, you’ll maximize its chances of living a long, vibrant life.
Enjoy the stunning display of polka-dotted foliage for years to come!
Extending its life by propagating new plants
One fantastic way to extend the life of your Polka Dot Plant and enjoy its beauty for even longer is through propagation.
By creating new plants from your existing one, you’ll essentially carry on its legacy and continue to enjoy its vibrant, polka-dotted foliage for many more years.
We cover this in a previous section on propagation.
By propagating your Polka Dot Plant, you’ll ensure that its beauty lives on in the form of new plants, extending its presence in your home or garden for years to come!
Polka Dot Plant Leggy

Growing a Polka Dot Plant is a delight, but sometimes you may notice that it starts to look a bit leggy, with long, spindly stems and sparse foliage.
Don’t worry, it happens to the best of us! In this section, we’ll discuss the reasons behind legginess in Polka Dot Plants and offer tips on how to address this issue.
Together, we’ll help you transform your leggy plant back into the full, bushy specimen it was meant to be, so you can continue to enjoy its mesmerizing, polka-dotted charm!
Stretching Out: Causes of Leggy Growth
Understanding the causes of leggy growth in Polka Dot Plants is crucial to effectively address the issue.
Here are some common factors that contribute to legginess:
Insufficient light: When your plant doesn’t receive enough light, it will stretch towards the light source in search of more, resulting in long, spindly stems.
Over-watering: Providing too much water can lead to weak, leggy growth as the plant’s roots aren’t encouraged to grow strong and deep.
Lack of pruning: Failing to prune your plant regularly can cause it to become tall and lanky as it continues to grow without being shaped.
Standing Tall: Tips to Prevent and Address Leggy Plants
To prevent leggy growth in your Polka Dot Plant, follow these tips:
Increase light exposure: Ensure your plant receives bright, indirect light to discourage leggy growth. You may need to move it to a sunnier spot or supplement it with artificial light if necessary.
Adjust watering: Be mindful of your plant’s water needs and avoid over-watering. Allow the top inch of soil to dry out between waterings to encourage stronger root development.
Regular pruning: Prune your plant regularly to promote bushy growth and maintain its shape. Pinch back the tips of the stems and remove any overly long or weak growth.
Fertilize moderately: Provide your plant with a balanced, diluted fertilizer during its active growing season, but avoid over-fertilizing, which can lead to leggy growth.
Rotate the plant: Rotate your Polka Dot Plant every week or so to ensure all sides receive equal exposure to light, preventing it from leaning towards the light source.
By addressing the causes of leggy growth and implementing these preventative and corrective tips, you can help your Polka Dot Plant maintain a full, bushy appearance and showcase its stunning, polka-dotted foliage!
Polka Dot Plant FAQs
Taking care of a Polka Dot Plant indoors can be a delightful experience, but it’s natural to have some questions about its proper care.
From ideal lighting conditions to watering frequency, it’s important to know how to keep your colorful plant vibrant and healthy.
Whether you’re a seasoned gardener or a novice, this FAQ section aims to provide clarity on some of the most commonly asked questions about Polka Dot Plant indoor care.
Q: How much light does a Polka Dot Plant need?
A: The Polka Dot Plant thrives in bright, indirect light. Too much direct sunlight can fade the vibrant colors of its leaves.
Q: How often should I water my Polka Dot Plant?
A: Water your Polka Dot Plant when the top inch of the soil feels dry to the touch. Overwatering can lead to root rot.
Q: Do Polka Dot Plants need high humidity?
A: While they prefer higher humidity, Polka Dot Plants are fairly tolerant of average indoor humidity levels. You can mist the leaves occasionally to increase humidity.
Q: Can I propagate a Polka Dot Plant?
A: Yes, Polka Dot Plants are easy to propagate. Simply snip off a healthy stem and plant it in moist soil. Roots should form in a few weeks.
Polka Dot Plant Indoor Care Final Thoughts

As we wrap up our comprehensive guide on Polka Dot Plant indoor care, we hope you’ve found valuable insights and tips to help your plant thrive.
From lighting to soil, and from pruning to propagation, we’ve covered all the essential aspects of nurturing this unique and captivating plant.
So, armed with this newfound knowledge, it’s time to embark on your own Polka Dot Plant journey!
Embrace the joy of growing these vibrant, polka-dotted beauties, and watch as they add a touch of whimsy and color to your home or garden.
Happy planting, and may your Polka Dot Plants flourish!
In a Nutshell: Summary of Indoor Care Tips
Recapping the essential indoor care tips for your Polka Dot Plant:
• Lighting: Provide bright, indirect light for optimal growth.
• Soil: Use a well-draining soil mix, such as a blend of coco coir and perlite.
• Watering: Water thoroughly, allowing the top inch of soil to dry out between waterings.
• Potting and repotting: Choose a well-draining pot and repot when needed to prevent rootbound issues.
• Pruning: Regularly prune your plant to maintain its shape and encourage bushy growth.
• Propagation: Multiply your plant by propagating stem cuttings in water or soil.
• Pest and disease management: Regularly inspect your plant and address any issues promptly.
Plant with Confidence: Encouragement for Successful Polka Dot Plant Cultivation
Now that you’re well-equipped with the knowledge and tips needed for successful Polka Dot Plant indoor care, it’s time to embark on your own plant journey!
Remember that patience and attentiveness are key to cultivating healthy, vibrant plants.
As you gain experience, you’ll develop a deeper understanding of your plant’s needs and become a confident, skillful plant caretaker.
So, go forth and nurture your Polka Dot Plant with love and care.
Embrace the joy of watching it flourish, and enjoy the stunning, polka-dotted display it brings to your home.
You’ve got Polka Dot Plant indoor care down now, and your plant will thank you for it!
Consider trying a closely related houseplant the Purple Waffle Plant.
Read about: 20 Benefits Of Keeping Indoor Plants For Improved Lifestyle