
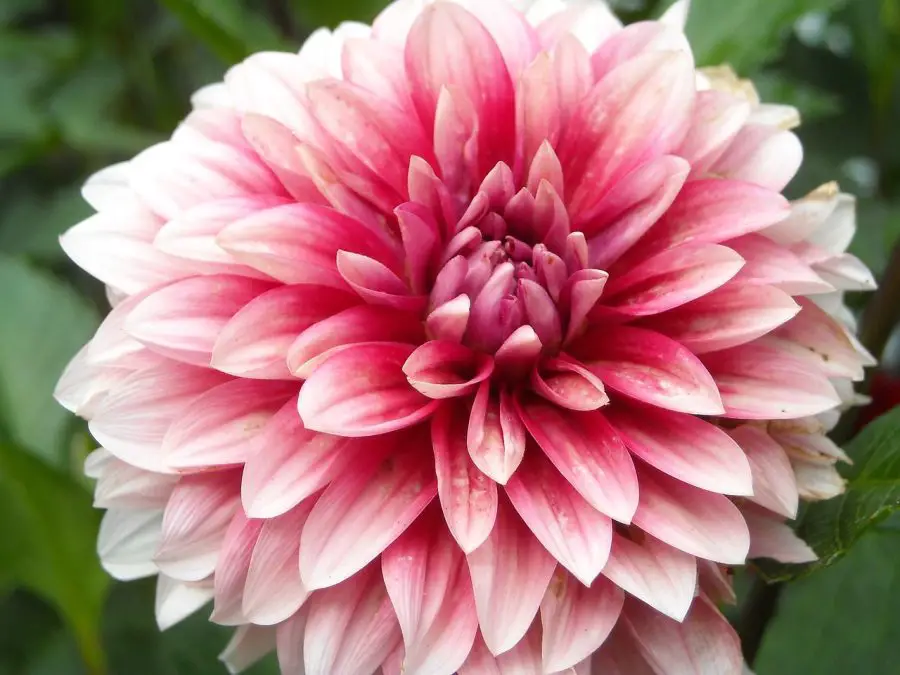
If you’re dreaming of vibrant blooms that turn heads, mastering Dahlia Care is your ticket to success.
Whether you’re growing in pots or a garden bed, Dahlias reward your attention with dazzling colors and endless charm.
With just a little know-how, you can keep these showstoppers blooming strong all season long.
If you love the look of Dahlias but don’t have garden space these show-stopping blooms can feel intimidating to grow, especially in containers.
But here’s the good news: with the right setup and a few easy tricks, Dahlias thrive in pots just as beautifully as they do in garden beds.
Whether you’ve got a sunny balcony or a cozy patio, this guide will walk you through everything you need to know to grow bold, brilliant Dahlias in containers, from choosing the best varieties to mastering watering and pruning.
Let’s dig in and bring those pots to life with dazzling color!
Dahlia Care in Pots
- To care for Dahlias in pots, use well-draining soil like coco coir and perlite.
- Provide at least 6 hours of sunlight daily, and water consistently when the top inch of soil is dry.
- Fertilize every 4–6 weeks.
- Deadhead spent flowers, and overwinter tubers indoors if needed.
Dahlia care in pots is an exciting adventure that allows you to bring the dazzling beauty of these magnificent flowers to your patio, balcony, or any outdoor space with limited garden beds.
With their stunning variety of colors, shapes, and sizes, Dahlias are a versatile and delightful addition to your container garden.
So, let’s dive into the world of Dahlias and uncover the secrets to growing healthy, vibrant blooms that will make your neighbors envious!
Introduction To Dahlia Care In Pots
")
Did you know you can buy Dhalia tubers on Amazon?
Welcome to the wonderful world of Dahlia care in pots, where we’ll guide you through the process of nurturing these showstopping flowers in containers.
Whether you’re a seasoned gardener or a budding enthusiast, this comprehensive guide will cover everything you need to know—from choosing the right pot and soil mix to mastering the art of watering and pruning.
So, let’s embark on this colorful journey together and learn how to transform your outdoor space with dazzling Dahlias that thrive in pots!
The Importance of Proper Dahlia Care in Pots
Taking the time to learn about proper Dahlia care in pots is crucial if you want to enjoy the full potential of these stunning blooms.
When grown in containers, Dahlias may require a bit more attention compared to planting them directly in garden beds.
However, by understanding their specific needs and ensuring they’re met, you’ll be rewarded with an impressive display of vibrant, long-lasting flowers.
From selecting the right container and providing well-draining soil to mastering the right watering technique, every aspect of Dahlia care plays a significant role in the overall health and success of your potted plants.
Dahlia Plant Care Reference Guide
| Characteristic | Details |
|---|---|
| Common Name | Dahlia |
| Botanical Name | Dahlia pinnata |
| Native Habitat | Mexico and Central America |
| Plant Type | Tender perennial (grown as annual in cold climates) |
| Growth Pattern | Upright, bushy |
| Mature Size | 1 to 6 feet tall depending on variety |
| Watering | Keep evenly moist; avoid soggy soil |
| Light/Sun Exposure | Full sun (6–8 hours daily) |
| Soil Type | Well-draining; coco coir & perlite mix ideal in pots |
| Soil pH | Slightly acidic to neutral (6.5–7.0) |
| Temperature | 65–75°F (18–24°C); avoid frost |
| Humidity | Moderate; ensure good air circulation |
| Bloom Time & Flower Color | Summer to frost; wide range of colors and sizes |
| Potential Problems | Powdery mildew, aphids, spider mites, rot in wet soil |
| Repotting | Repot in spring if root-bound or refreshing soil |
| Hardiness Zones (USDA) | 8–11 (dig and store tubers in colder zones) |
Advantages of Growing Dahlias in Pots
")
There are several benefits to growing Dahlias in pots that make them an attractive choice for many gardeners.
Firstly, growing Dahlias in containers allows you to have greater control over the growing conditions, such as soil type, moisture levels, and exposure to sunlight.
This can be especially helpful if you have challenging garden soil or limited space.
Secondly, potted Dahlias can be easily moved to provide optimal sunlight or to protect them from harsh weather conditions like heavy rain or strong winds.
This flexibility is a significant advantage, especially if you live in an area with unpredictable weather patterns.
Lastly, growing Dahlias in pots makes it easier to overwinter the tubers in cold climates.
Since Dahlias are tender perennials, they need to be protected from freezing temperatures.
By growing them in containers, you can effortlessly move the pots indoors or to a sheltered location during the winter months, ensuring their survival for the next growing season.
Best Dahlias for Pots (Dwarf Varieties)
")
If you’re considering growing Dahlias in pots, you’re in for a treat!
With so many beautiful varieties to choose from, it might be a bit overwhelming to decide which ones are best suited for container gardening.
In this section, we’ll explore the world of dwarf Dahlias, which are the perfect choice for pots due to their compact size and stunning display.
These petite beauties offer all the charm and vibrant colors of their larger counterparts but with the added benefit of being perfectly suited to thrive in containers.
So, get ready to dive into the captivating realm of dwarf Dahlias and discover your new favorite addition to your container garden.
Top Dwarf Dahlia Varieties Suitable for Pots
")
When it comes to choosing the best dwarf Dahlia varieties for your container garden, there’s no shortage of stunning options.
Here are a few of our favorites to get you started:
Gallery Series: This collection of compact Dahlias offers a wide range of colors and flower shapes, making them an excellent choice for pots.
They typically grow 16-20 inches tall and are known for their impressive, long-lasting blooms.
Melody Series: These striking Dahlias are known for their vivid colors and unique foliage.
Reaching heights of 12-16 inches, they make a perfect addition to pots and provide a continuous display of blooms throughout the growing season.
Happy Series: Cheerful and colorful, the Happy Series Dahlias are true to their name.
These compact plants grow 10-12 inches tall and produce a profusion of blooms in various colors, making them ideal for container gardens.
Unwin Hybrids: Unwin Hybrids are another excellent choice for growing Dahlias in pots.
These dwarf Dahlias come in a wide range of colors, from soft pastels to bold, vibrant hues.
Their striking, semi-double flowers can make a stunning impact in your container garden.
Typically reaching heights of 12-18 inches, Unwin Hybrids are well-suited for pots and small spaces.
Tips For Growing Dahlias in Pots Indoors
")
If you’re limited on outdoor space or want to enjoy your Dahlias year-round, growing them in pots indoors can be a great option.
Here’s how to make the most of your indoor Dahlia garden:
• Choose the Right Pot: Select a container with good drainage and enough depth to accommodate the Dahlia’s root system.
A pot that is at least 12 inches deep and 12-18 inches wide is ideal.
• Use Quality Potting Mix: Opt for a well-draining, nutrient-rich potting mix such as a coco coir and perlite mix to provide your Dahlias with the best possible growing conditions.
• Provide Ample Light: Dahlias thrive in full sun, so place your pots near a south-facing window or supplement with grow lights to ensure they receive at least 6-8 hours of direct sunlight per day.
• Monitor Watering: Indoor Dahlias may require more frequent watering than their outdoor counterparts.
Check the soil regularly and water when the top inch feels dry to the touch.
• Maintain Good Air Circulation: To prevent issues like powdery mildew, ensure your indoor Dahlias have good air circulation.
A small fan can help keep the air moving and reduce the risk of fungal diseases.
Dahlia Plant Size

Are you curious about how to accommodate the different sizes of Dahlia plants in your container garden?
In this section, we’ll dive into the fascinating world of Dahlia plant sizes, from compact dwarf varieties to show-stopping dinner plate Dahlias.
Understanding the various sizes and growth habits of Dahlias will help you choose the perfect plant for your pot, ensuring a stunning floral display that fits your space just right.
So, let’s explore the diverse universe of Dahlia plant sizes and find the perfect match for your garden!
Dahlia Size Spectrum: From Miniature to Giant Blooms
Dahlias come in a wide range of sizes, making them suitable for various garden spaces and pot sizes.
In this section, we’ll explore the size spectrum of Dahlias, from petite and charming miniature blooms 18-24 inches tall to the awe-inspiring giant varieties that can reach over 4 feet in height.
We’ll discuss the different sizes in terms of plant height, flower diameter, and the impact of size on pot selection and Dahlia care requirements, ensuring you choose the perfect Dahlia for your space.
You can grow any size in pots as long as you use the right pot size but I recommend starting with dwarf dahlias in pots.
Dinner Plate Dahlia Care: Tips for Giant Blooms

Proper Staking: Due to their large blooms and tall stems, dinner plate Dahlias require sturdy stakes or supports to prevent them from toppling over.
Install stakes at the time of planting and secure the stems to the stakes as they grow.
Optimal Watering: Dinner plate Dahlias need consistent moisture to support their large blooms.
Water the plants regularly, keeping the soil evenly moist but not waterlogged.
Be sure to use a well-draining potting mix to avoid root rot.
Essential Nutrients: To encourage impressive growth and large blooms, dinner plate Dahlias require a balanced fertilizer with a higher phosphorus content.
Apply a slow-release fertilizer at planting time, and supplement with a water-soluble fertilizer every 3-4 weeks during the growing season.
Pruning and Pinching: Encourage bushier growth and more blooms by pinching back the tips of young plants when they reach 12-18 inches tall.
Remove any side buds to direct the plant’s energy into producing a few large blooms rather than numerous smaller ones.
Deadheading: Remove spent blooms regularly to encourage continuous flowering throughout the season.
This will also help maintain the plant’s overall appearance and health.
Dinner Plate Dahlias Need Staking

The height of the stakes required for dinner plate Dahlias depends on the specific variety and its mature height.
Dinner plate Dahlias can grow anywhere from 3 to 6 feet tall, so it’s essential to choose stakes that are appropriate for the height of your specific Dahlia variety.
Generally, stakes should be about 75% of the mature height of the plant.
For example, if you have a dinner plate Dahlia that will grow to be 4 feet tall, the stakes should be around 3 feet in height.
This will provide adequate support to the plant without being too tall or too short.
Keep in mind that it’s best to install the stakes at the time of planting to avoid damaging the developing root system later on.
As the Dahlias grow, secure their stems to the stakes with soft ties or strips of fabric, allowing some room for growth and movement.
This will help prevent the stems from breaking under the weight of the large blooms.
Dahlia Growth Stages

As a gardener, it’s important to be familiar with the different growth stages of your Dahlia plants.
By understanding how they develop, you can anticipate their needs and provide the proper Dahlia care to help them thrive.
In this section, we’ll explore the different stages of Dahlia growth, from the initial sprouting to the emergence of colorful blooms.
We’ll provide tips and tricks for supporting your Dahlias through each phase, including advice on watering, fertilizing, and pruning.
By the end of this section, you’ll be able to confidently care for your Dahlia plants at every stage of their growth.
Care needed for each Dahlia growth stage :
• Sprouting: During this stage, the Dahlia tubers will begin to sprout and send up new shoots.
It’s important to keep the soil consistently moist but not overly wet to encourage healthy growth.
Make sure to also protect the sprouts from any late frosts or cold temperatures.
• Vegetative growth: During this stage, the Dahlia plants will focus on developing foliage and stems.
Continue to provide consistent moisture and fertilize every few weeks with a balanced fertilizer to support healthy growth.
Also, consider staking or tying the plants to prevent them from toppling over.
• Budding: As the plants prepare to bloom, they will start producing buds.
At this stage, it’s important to reduce nitrogen fertilization and switch to a fertilizer higher in phosphorus to encourage blooming.
Provide consistent moisture and protect the buds from pests and diseases.
• Flowering: This is the most exciting stage, as your Dahlias will produce stunning blooms in a variety of colors and sizes.
Continue to fertilize and water regularly, and remove spent flowers to encourage more blooming.
Keep an eye out for any pest or disease issues and address them promptly.
By providing proper care and attention at each growth stage, you can ensure that your Dahlias will produce abundant blooms and thrive in your pots.
Best Soil for Dahlias in Pots
")
Are you looking to give your Dahlias the best possible start in life?
In this section, we’ll delve into the world of potting mixes, focusing on the magic combination of coco coir and perlite.
Learn why this dynamic duo is a match made in heaven for your Dahlias in pots, offering excellent drainage, aeration, and a healthy growing environment.
Stick with us as we share tips on how to create the perfect soil mix that will have your Dahlias thriving and rewarding you with stunning blooms all season long.
Ideal Soil Composition for Dahlias in Pots
When it comes to the ideal soil composition for Dahlias in pots, the combination of coco coir and perlite reigns supreme.
Coco coir, a byproduct of the coconut industry, is an excellent soil amendment that retains water while still providing ample aeration.
It’s also eco-friendly and a sustainable alternative to peat moss.
Perlite, a volcanic glass, is lightweight and improves drainage, preventing root rot and other water-related issues.
By mixing these two components in the right proportions, you’ll create a well-draining, aerated, and nutrient-rich soil mix that your Dahlias will absolutely love.
You can use a 50/50 mix of coco coir and perlite and get excellent results.
But for a moister mix that requires less frequent watering, you can decrease the amount of perlite to 25 to 33% of the mix.
Experiment to find the ideal ratio for your plants.
Planting Dahlia Tubers in Pots: Depth Matters
")
When planting Dahlia tubers in pots, it’s crucial to plant them at the appropriate depth to promote healthy growth.
In this section, we’ll guide you on how deep to plant the tubers, taking into consideration factors such as pot size, Dahlia variety, and the importance of good drainage for a thriving plant.
Planting Depth For Dahlias In Pots
")
Planting depth is a crucial factor in the successful growth and development of dahlia plants in pots.
When planting dahlia tubers, it’s essential to consider factors such as the pot size and the specific variety of dahlia being planted.
As a general rule, larger pots are recommended for larger dahlia varieties, as they allow for more root development and support for the plant.
When it comes to planting depth, a good rule of thumb is to bury the tuber about 4-6 inches deep in the potting mix.
However, this can vary depending on the size of the tuber and the specific dahlia variety being planted.
It’s important to ensure that the potting mix is well-draining, as dahlia tubers are susceptible to rot if they are planted in waterlogged soil.
By understanding the proper planting depth and ensuring good drainage, you can give your dahlia plants the best chance at thriving in their pots.
Planting Dahlia Tubers in the Ground
")
If you prefer to plant your Dahlia tubers directly in the ground instead of pots, proper soil preparation is still crucial.
Start by selecting a well-draining location that receives full sun for at least 6-8 hours a day.
Amend the soil by incorporating plenty of organic matter, such as compost or well-rotted manure, to improve its fertility and structure.
Dig a hole that’s about 6-8 inches deep, and place the tuber horizontally with the eye facing up.
Cover the tuber with 2-4 inches of soil, and then water thoroughly to settle the soil around the tuber.
As new growth emerges, gradually fill in the planting hole with more soil until it’s level with the surrounding area.
Timing Is Key: When to Plant Dahlias in Pots
Planting your Dahlias at the right time can make all the difference in their growth and blooming success.
In this part, we’ll discuss the best time to plant Dahlias in pots, factoring in your region’s climate, the last frost date, and how giving your Dahlias a head start indoors can lead to a more robust and beautiful plant
Timing For Planting Dahlias In Pots

The best time to plant depends on various factors, including your region’s climate, the last frost date, and your desired bloom time.
Dahlias thrive in warm soil and air temperatures, so it’s important to avoid planting too early in the season when temperatures are still cool.
For those in colder climates, starting dahlias indoors in pots a few weeks before the last frost date can give them a head start and help ensure they have enough time to develop strong roots and shoots before being transplanted outdoors.
This method can lead to a more robust and beautiful plant, especially for gardeners with a short growing season.
In warmer regions, dahlias can be planted directly in pots outdoors after the last frost date.
However, it’s still essential to pay attention to the temperature and avoid planting when the soil is still too cool.
Overall, the best time to plant dahlias in pots is when the soil has warmed up to at least 60°F and there is no longer a risk of frost in your area.
By considering your region’s climate and the last frost date, you can give your dahlias the best chance for a successful growing season.
Dahlia Container Size

Are you ready to dive into the world of Dahlia container gardening?
One of the key factors to consider is choosing the right container size for your Dahlias.
In this section, we’ll explore how the size of your pot can significantly impact the health and growth of your Dahlia plants.
We’ll also provide helpful tips on selecting the perfect container for your Dahlias, ensuring that they have ample space to thrive and bloom beautifully throughout the season.
So, let’s get started on your journey to mastering Dahlia container size and creating a stunning potted Dahlia display!
Choosing the Right Container Size for Dahlias
The right container size is crucial for the healthy growth of your Dahlia plants. Dahlias need enough room to develop their root systems and support their growth.
The general rule of thumb is to choose a container with a diameter at least twice the size of the Dahlia tuber.
For dwarf varieties, a pot with a diameter of 12-14 inches should suffice, while larger Dahlias may require pots up to 18-24 inches in diameter.
Remember to also consider the pot’s depth to accommodate the tuberous roots.
Transplanting Dahlias from Pots

Transplanting Dahlias from smaller pots to larger ones is an essential step in ensuring their continued growth and health.
When your Dahlia outgrows its current pot or shows signs of stress, it’s time to transplant.
Gently remove the plant from its original pot, taking care not to damage the roots.
Prepare the new, larger container with a well-draining potting mix and carefully place the Dahlia inside, ensuring that the tuber is at the same depth as in the previous pot.
Fill the surrounding area with potting mix, water thoroughly, and place the container in a spot with adequate sunlight.
Dahlia Light Requirements

Dahlias are sun-loving plants that thrive when they receive plenty of light.
In this section, we’ll delve into the light requirements for these beautiful blooms and provide tips on how to ensure your potted Dahlias get the right amount of sunshine.
From positioning your pots to considering Dahlia varieties with varying light needs, we’ve got you covered on all things related to Dahlia light requirements.
So, let’s learn how to keep these bright and colorful flowers basking in the sun and flourishing in your container garden!
Optimal Sunlight Exposure for Dahlias

Dahlias require at least 6-8 hours of direct sunlight per day to produce their best blooms.
When you’re growing Dahlias in pots, it’s essential to place them in a sunny spot, such as a south-facing balcony or patio.
Keep an eye on the amount of sun your Dahlias receive throughout the day, and adjust their position if needed to ensure they get the necessary sunlight for healthy growth and stunning flowers.
Planting Dahlia Bulbs Outdoors
If you decide to plant your Dahlia bulbs outdoors, there are a few key steps to follow for successful growth.
First, choose a well-draining location with full sun exposure.
Prepare the soil by loosening it and adding organic matter, such as compost or well-rotted manure.
Plant the tubers about 6-8 inches deep, with the eye (growth point) facing upwards.
Space the tubers about 12-24 inches apart, depending on the size of the Dahlia variety.
After planting, water the soil thoroughly, and continue to water regularly during the growing season, keeping the soil evenly moist but not waterlogged.
How Often to Water Dahlias in Pots
In this section, we’ll explore the vital topic of watering Dahlias in pots.
Ensuring your Dahlias receive the right amount of water is crucial for their health and the production of those gorgeous blooms we all love.
Learn how to strike the perfect balance between too much and too little water, and discover the best practices for keeping your potted Dahlias happy and thriving throughout the growing season.
Let’s dive into the details of watering Dahlias in pots!
Watering Frequency and Technique for Dahlias in Pots
When it comes to watering Dahlias in pots, consistency, and technique are key.
Dahlias need evenly moist soil, so it’s important to establish a regular watering schedule.
Learn about factors that affect the frequency of watering, such as the size of the pot, the type of soil, and weather conditions.
We’ll also discuss proper watering techniques, like watering at the base of the plant and avoiding wetting the foliage, which can help prevent diseases like powdery mildew.
Assessing your Dahlias’ water needs:

The size of the pot, type of soil, and weather conditions all play a role in determining how often you should water your Dahlias.
Smaller pots dry out more quickly than larger ones, so they may require more frequent watering.
Soil that drains well, such as a mix of coco coir and perlite, also dries out faster and needs to be watered more often.
Finally, hot or windy weather can cause the soil to lose moisture more quickly, necessitating more frequent watering.
Establishing a watering routine:
To ensure your Dahlias receive adequate water, check the soil regularly by inserting your finger about an inch or two into the pot.
If the soil feels dry at this depth, it’s time to water.
In general, it’s a good idea to water your potted Dahlias at least once or twice a week during the growing season, adjusting the frequency as needed based on the factors mentioned above.
Proper watering technique:
 Large Clump of Tubers")
When watering your Dahlias, it’s important to use the right technique to prevent disease and promote healthy growth.
Water your plants slowly and deeply, ensuring the water reaches the root system.
Aim to water at the base of the plant, avoiding wetting the foliage, as this can contribute to the development of diseases like powdery mildew.
If possible, water your Dahlias in the morning to give the foliage time to dry during the day.
Monitoring and adjusting:
Keep an eye on your Dahlias’ growth and overall health to determine if your watering routine is working.
If you notice wilted leaves, yellowing foliage, or weak stems, these can be signs of over- or under-watering.
Adjust your watering schedule and technique accordingly to ensure your Dahlias receive the proper amount of moisture for optimal growth.
By maintaining a consistent watering schedule and using the right techniques, you’ll help your potted Dahlias thrive and produce beautiful, long-lasting blooms throughout the growing season.
Bottom Watering for Dahlias in Pots
 Large Clump of Tubers")
Bottom watering is an alternative watering technique that can be especially beneficial for potted Dahlias.
This method involves providing water to the plants through the drainage holes at the bottom of the pot, allowing the roots to absorb moisture from the bottom up.
Here’s a closer look at how bottom watering works and the advantages it offers:
How to bottom water Dahlias:
To bottom water your potted Dahlias, place the pot in a container filled with water, ensuring the water level is below the pot’s rim.
The water will be absorbed through the drainage holes, gradually moistening the soil.
Keep the pot in the water until the soil’s surface feels damp. This may take anywhere from a few minutes to an hour, depending on the size of the pot and the soil composition.
Once the soil is moist, remove the pot from the water and let it drain before placing it back in its usual location.
Benefits of bottom watering:
• Encourages healthy root growth: Bottom watering promotes deeper root growth, as the roots naturally reach downward in search of moisture.
This leads to a stronger root system, which supports healthier plants and more abundant blooms.
• Reduces the risk of disease: By watering from the bottom, you avoid getting the foliage wet, which can help prevent diseases like powdery mildew and fungal infections.
• Conserves water: Bottom watering is an efficient way to provide water to your plants, as it minimizes evaporation and water waste.
This method ensures that water goes directly to the roots, where it’s needed most.
• Prevents over-watering: By observing the moisture level at the soil surface, you can avoid over-watering your Dahlias.
When the soil surface feels damp, you know the plant has absorbed enough water, reducing the risk of waterlogged soil and root rot.
While bottom watering offers numerous benefits, it’s essential to monitor your Dahlias’ health and adjust your watering routine as needed.
Pay attention to signs of over or underwatering, such as yellowing leaves or wilting, and adapt your watering schedule accordingly to ensure your potted Dahlias receive the proper amount of moisture for optimal growth and beautiful blooms.
Preparing Potted Dahlias for Winter Dormancy and Tuber Care

As the colder months approach, it’s essential to prepare your potted Dahlias for winter dormancy.
Properly tending to your Dahlia tubers during this period can ensure they remain healthy and ready to produce stunning blooms next growing season.
Follow these steps to prepare your Dahlias for winter dormancy and care for the tubers:
Cutting Back Foliage and Digging Up Tubers
Wait for the first frost: Allow your Dahlia plants to be exposed to the first frost of the season, which will cause the foliage to turn black.
This signals that the plant is entering dormancy and is ready to be stored for the winter.
Cut back the foliage: About a week after the first frost cut the Dahlia stems back to about 4-6 inches above the soil surface.
This will make it easier to handle the tubers during the winter storage process.
Allowing Tubers to Dry Out – Overwintering Dahlias in Pots

Dahlias are tender perennials that need protection from freezing temperatures.
If you live in an area with harsh winters, it’s crucial to know how to overwinter your Dahlias in pots.
In this section, we’ll cover the steps to prepare your potted Dahlias for winter dormancy, such as cutting back the foliage, allowing the tubers to dry out, and storing them in a cool, dark place.
We’ll also discuss how to properly care for your Dahlia tubers during the winter months to ensure they’re ready to flourish again next spring.
Remove the tubers from the pot:
Carefully lift the tubers out of the pot, taking care not to damage them.
Gently shake off any excess soil, but don’t wash the tubers, as this can promote rot during storage.
Dry the tubers
Lay the tubers out in a well-ventilated area, away from direct sunlight, for about a week to allow them to dry out. This process helps prevent mold and rot during storage.
Storing Tubers in a Cool, Dark Place
Prepare a storage container:
Use a container with a lid, such as a plastic storage box or a large paper bag.
Fill the container with a slightly moistened storage medium, such as peat moss, vermiculite, or coco coir.
Place the tubers in the container: Nestle the tubers into the storage medium, ensuring they don’t touch one another to minimize the risk of disease spreading between tubers.
Store the container: Place the container in a cool, dark location, such as a basement or garage, with a consistent temperature of about 40-50°F (4-10°C).
Check on the tubers periodically throughout the winter months to ensure they remain healthy.
Winter Tuber Care
Monitor for rot and mold: Inspect your stored tubers every few weeks for any signs of rot or mold.
If you discover any affected tubers, remove and discard them immediately to prevent the spread of disease to the healthy tubers.
Maintain proper moisture levels: Ensure the storage medium remains slightly damp throughout the winter months.
If it appears to be drying out, lightly mist it with water to maintain the appropriate moisture level. Avoid over-watering, as this can lead to rot.
By following these steps to properly prepare your potted Dahlias for winter dormancy and caring for the tubers during the colder months, you’ll be well on your way to enjoying another season of beautiful blooms when spring returns.
Can You Leave Tubers In Pots Until The Next Growing Season?

It is possible to leave the tubers in the pots until the next growing season, especially if you live in a milder climate with no risk of the soil freezing during winter.
However, there are some essential steps to take to ensure your Dahlia tubers survive the winter and thrive in the next growing season.
• Cut back the foliage: After the first frost, cut the Dahlia stems back to about 4-6 inches above the soil surface.
This will help the plant focus on conserving energy during dormancy.
• Move the pots: Relocate the pots to a sheltered location, such as a garage, shed, or unheated greenhouse, where the temperature remains above freezing but below 50°F (10°C).
This will protect the tubers from extreme cold and frost damage.
• Insulate the pots: To further protect the tubers from cold temperatures, insulate the pots by wrapping them in bubble wrap, burlap, or old blankets.
You can also pile straw or mulch around and on top of the pots to provide extra insulation.
• Water sparingly: Reduce watering significantly during the winter months, as the tubers require less moisture during dormancy.
Water the pots only when the soil becomes dry to the touch, taking care not to over-water, as this can lead to rot.
• Check on the tubers: Periodically inspect the tubers for signs of rot or mold.
If you notice any issues, remove and discard the affected tubers to prevent the spread of disease.
By following these steps, you can successfully overwinter your Dahlia tubers in their pots and ensure a healthy start to the next growing season.
However, it’s important to note that lifting and storing tubers as described in the previous answer is a more reliable method to protect tubers from rot and disease, especially in colder climates.
Can Dahlias Grow Indoors All Year Round In Pots?

Dahlias are tender perennials and do not require a dormant season.
They are usually dug up in colder climates to protect the tubers from freezing.
It occurred to me that Dahlias can be grown indoors all year round in pots, but there are certain factors to consider in order to provide the best environment for them to thrive.
Very little is written about growing Dahlias in pots indoors all year round.
I will be trying this and creating an article about it but in the meantime, I believe it can be done, and here’s what is required if you want to try it:
• Light: Dahlias need plenty of light to grow well.
Make sure to place them near a sunny window that receives at least 6-8 hours of direct sunlight per day.
If natural light is insufficient, you can supplement it with grow lights.
• Temperature: Dahlias prefer moderate temperatures, between 65-75°F (18-24°C) during the day and slightly cooler at night.
Ensure that the indoor temperature remains within this range to promote healthy growth.
• Pot size: Choose a pot that is large enough to accommodate the Dahlia’s root system and provide good drainage.
Depending on the size of the Dahlia variety, you may need a pot that is at least 12-18 inches in diameter.
• Soil: Use a well-draining, high-quality potting mix to ensure the roots have access to the necessary nutrients and oxygen.
Coco coir and perlite drain better than potting soil and don’t compact.
• Watering: Water your indoor Dahlias consistently, keeping the soil evenly moist but not soggy.
Be careful not to over-water, as this can lead to root rot.
• Fertilization: Provide a balanced, slow-release fertilizer according to the product’s instructions to encourage healthy growth and abundant blooms.
• Pruning: Pinch back the tips of the main stem and side shoots to encourage bushier growth and more blooms.
Remove any dead or yellowing leaves to maintain the plant’s health.
By providing these optimal conditions, it is possible to grow Dahlias indoors in pots all year round.
However, keep in mind that Dahlias are naturally accustomed to a period of dormancy in the winter, so their growth and blooming may slow down during this time.
Best Fertilizer for Dahlia

Are you looking for the secret to vibrant, flourishing Dahlias with stunning blooms?
In this section, we’ll discuss the best fertilizers for Dahlias and how proper nutrition can make all the difference in their growth and flowering.
We’ll cover the ideal nutrient balance, organic and synthetic options, and the right application schedule to ensure your Dahlias are the envy of the neighborhood.
Let’s unlock the full potential of these beautiful plants together!
Recommended Fertilizer Types for Dahlias
When it comes to fertilizing your Dahlias, it’s essential to choose the right type to ensure their optimal growth and flowering.
We’ll explore both organic and synthetic options, such as compost, slow-release granular fertilizers, and water-soluble options.
We’ll also discuss the ideal nutrient balance for Dahlias, focusing on the key macronutrients: nitrogen, phosphorus, and potassium.
Dahlia Plant Care: Tips for Success

Taking care of your Dahlia plants involves more than just providing them with fertilizer. They need the right fertilizer at the right time.
In this section, we’ll cover essential aspects of Dahlia care, such as the proper fertilizer, proper watering techniques, pest management, and pruning practices.
We’ll also discuss how to encourage a longer blooming period, so you can enjoy your Dahlias’ beautiful flowers for an extended time.
By following these guidelines, your Dahlias will reward you with stunning blossoms and healthy growth.
Types Of Fertilizer
In order to provide your Dahlias with the nutrients they need to thrive, it’s important to consider both organic and synthetic fertilizer options.
Each type of fertilizer has its advantages and can contribute to the overall health and growth of your Dahlias.
Organic fertilizers, such as compost and worm castings are an excellent option for providing nutrients in a more natural and environmentally friendly manner.
Compost, which is made from decomposed organic matter, can improve soil structure, promote drainage, and supply essential nutrients to your Dahlias.
Using compost or worm castings as fertilizer also supports beneficial microorganisms in the soil, contributing to the overall health of your plants.
Synthetic fertilizers are available in a variety of forms, including slow-release granular fertilizers and water-soluble options.
Slow-release granular fertilizers gradually release nutrients into the soil over an extended period, ensuring a consistent supply of essential elements.
Water-soluble fertilizers, on the other hand, dissolve easily in water and provide an immediate nutrient boost to your plants.
Regardless of the type of fertilizer you choose, it’s important to maintain a balanced nutrient profile for your Dahlias.
What The Numbers Mean
The key macronutrients required by these plants are nitrogen (N), phosphorus (P), and potassium (K).
They are listed as amounts of N-P-K and in that order on every fertilizer package.
Nitrogen promotes healthy foliage growth, while phosphorus encourages strong root development and improved flowering.
Potassium contributes to overall plant health and disease resistance.
A balanced fertilizer with an N-P-K ratio of 10-20-20 or 15-30-15 is ideal for Dahlias.
A fertilizer with a high middle number (phosphorus) and lower first number (nitrogen) helps promote blooming and should be used during flowering time.
Be sure to follow the manufacturer’s instructions for the application rates and frequencies to ensure the best results.
By providing your Dahlias with the right nutrients, you’ll enjoy vibrant blooms and robust plant growth.
Dahlia Maintenance in Pots

Dahlia maintenance in pots is an essential aspect of ensuring your lovely blooms continue to brighten up your home or garden all season long.
In this section, we’ll delve into the key aspects of Dahlia care, from proper pruning techniques to pest control and everything in between.
With the right attention and care, your potted Dahlias will reward you with an abundance of stunning flowers that are sure to be the envy of your neighbors and friends.
Let’s dive into the world of Dahlia maintenance and discover how to keep your plants healthy and happy in their containers!
Dahlia Plant Care: Maintenance Essentials
Dahlia plants, regardless of their size or variety, require consistent care and attention to thrive.
In this section, we’ll go over the essential maintenance tasks for Dahlia plants, such as deadheading, pinching back, and managing pests and diseases.
By following these recommendations, you’ll be well on your way to enjoying a flourishing Dahlia display in your pots.
How to Deadhead Dahlias in Pots

Caring for your Dahlias in pots involves more than just watering and fertilizing; it’s also essential to keep those blooms looking fresh and vibrant.
In this section, we’ll discuss the art of deadheading Dahlias, an easy yet important practice that encourages continuous flowering and keeps your potted Dahlias looking their best throughout the growing season.
So, grab your gardening gloves, and let’s dive into the simple steps for deadheading your Dahlias, keeping them blooming and beautiful!
Proper Deadheading Technique: Step-by-Step Guide
Deadheading Dahlias in pots is a simple process that can make a big difference in your plant’s appearance and overall health.
In this section, we’ll walk you through the proper deadheading technique, including when to deadhead, how to identify spent blooms, and the best way to remove the faded flowers without damaging the plant.
Follow this step-by-step guide to keep your Dahlias looking their best throughout the season.
How To Deadhead Dahlias Step By Step
Deadheading is the practice of removing dead or faded flowers from a plant.
In this section, we’ll guide you on how to deadhead dahlias step by step.
Deadheading Steps:
1. Start by examining your dahlia plant and identifying the faded flowers that need to be removed.
Look for blooms that have lost their color or are starting to wilt.
2. Locate the stem just below the faded flower and follow it down to where it meets the main stem. This is the spot where you will make your cut.
3. Using a pair of sharp, clean pruning shears, make a clean cut at a 45-degree angle just above the first set of healthy leaves below the spent flower.
Be careful not to cut too close to the stem or damage any new buds or leaves that may be growing nearby.
4. Continue deadheading your dahlia plant regularly throughout the growing season, focusing on removing the spent blooms and any damaged or diseased foliage.
This will encourage the plant to produce more flowers and keep it looking neat and tidy.
After you have finished deadheading your dahlia plant, it’s a good idea to give it a light feeding of fertilizer to help support new growth and encourage more blooms.
Deadheading your dahlias is a simple but essential task that can make a big difference in the appearance and health of your plant.
By following these simple steps, you can help your dahlias to continue producing beautiful, healthy blooms all season long.
Benefits of Deadheading: Why It’s Worth the Effort
While deadheading might seem like an extra chore, it comes with a host of benefits that make it well worth the effort.
In this part, we’ll explore the advantages of deadheading your Dahlias in pots, such as promoting more blooms, extending the flowering period, improving the plant’s overall appearance, and even preventing disease.
Understanding these benefits will help you appreciate the value of this simple yet effective gardening practice.
Pruning Dahlias in Pots

Dive into the world of pruning Dahlias in pots and learn how to give your plants the care they need to flourish!
In this section, we’ll discuss the importance of proper pruning and share essential tips to help your Dahlias look their best and produce an abundance of stunning blooms.
From understanding the right time to prune to mastering the techniques, we’ve got you covered with everything you need to know about pruning Dahlias in pots.
Let’s get started on this exciting gardening journey together!
When and How to Prune Dahlias in Pots
Discover the key factors for the successful pruning of Dahlias in pots.
Learn how to use proper pruning techniques to promote healthy growth, prevent disease, and encourage more blooms throughout the season.
Master the art of proper pruning techniques to help your Dahlias flourish.
In this section, we’ll guide you through the process of pruning Dahlias to promote healthy growth, prevent disease, and encourage more blooms throughout the season.
Learn how to:
• Identify the right time to prune: The ideal time for pruning Dahlias is during the growing season when the plant has developed several sets of leaves.
This encourages bushier growth and prevents the plant from becoming too leggy.
• Pinch back the main stem: When your Dahlia has at least three sets of leaves, pinch back the main stem just above the third set.
This will encourage the plant to produce side shoots, resulting in a bushier plant with more blooms.
• Remove dead or diseased foliage: Regularly inspect your Dahlias for any signs of disease or dead leaves.
Promptly remove any affected areas to prevent the spread of disease and maintain the overall health of the plant.
• Trim back side shoots: As your Dahlia grows, it will produce side shoots.
To encourage more blooms, trim back the side shoots to just above a leaf node or bud.
This will direct the plant’s energy toward producing flowers rather than additional foliage.
• Prune after flowering: Once your Dahlias have finished blooming, you can remove spent flowers to encourage more blooms.
Cut the flower stem back to a leaf node or bud, which will stimulate the plant to produce new blooms.
By following these proper pruning techniques, you’ll help your Dahlias maintain healthy growth, reduce the risk of disease, and enjoy a more abundant blooming season.
Planting Dahlia Bulbs: Depth Matters

Get the scoop on the ideal planting depth for Dahlia bulbs to ensure strong, healthy growth.
In this section, we’ll discuss the importance of planting depth for root development and stability, and provide guidelines for how deep to plant your Dahlia bulbs based on their size and variety.
From dwarf Dahlias to dinner plate varieties, we’ll help you create the perfect foundation for your Dahlia plants to thrive.
Planting depth is a crucial factor in ensuring the proper root development and stability of your Dahlia plants.
By planting your Dahlia bulbs at the appropriate depth, you provide the tubers with the necessary support and growing conditions to thrive.
In this section, we’ll discuss the importance of planting depth and provide guidelines for how deep to plant your Dahlia bulbs based on their size and variety.
Importance of planting depth: Planting depth affects root development, anchoring the plant and ensuring it can access the necessary nutrients and water.
Proper planting depth also protects the tubers from temperature fluctuations and allows for adequate airflow around the base of the plant, reducing the risk of rot and disease.
Planting depth guidelines: As a general rule, Dahlia bulbs should be planted at a depth of 4 to 6 inches.
However, the exact depth may vary depending on the size and variety of your Dahlias:
Dwarf Dahlias: For smaller, dwarf varieties, plant the tubers 2 to 4 inches deep.
This depth provides adequate support for these compact plants, while ensuring they remain close enough to the soil surface for proper root development.
Medium-sized Dahlias: For medium-sized varieties, aim for a planting depth of 4 to 6 inches.
This depth offers the necessary support and allows for optimal root growth and nutrient uptake.
Dinner Plate Dahlias: For large, dinner plate varieties, plant the tubers 6 to 8 inches deep.
Due to their larger size and heavy blooms, these Dahlias need a deeper planting depth to ensure they remain stable and have sufficient access to water and nutrients.
By following these guidelines, you’ll ensure your Dahlia bulbs are planted at the appropriate depth for their size and variety, creating a strong foundation for your plants to flourish throughout the growing season.
Repotting Dahlias
")
Dahlias are versatile and resilient, making them the perfect candidates for repotting as they grow and develop.
In this section, we’ll dive into the ins and outs of repotting Dahlias, discussing when and why it’s necessary, and providing step-by-step guidance on how to successfully transplant your Dahlias into a new home.
Whether you’re upgrading to a larger container or refreshing your potting mix, we’ve got you covered with all the tips and tricks you need for a thriving Dahlia garden.
When and How to Repot Dahlias
Timing is crucial when it comes to repotting Dahlias.
We’ll discuss the key signs that your Dahlias are ready for a bigger container, such as root-bound growth, as well as the best time of year to make the move.
Additionally, we’ll provide a detailed, step-by-step guide on how to repot your Dahlias safely and efficiently to minimize stress on the plants and ensure a successful transition.
Step 1: Choose the Right Time
The best time to repot Dahlias is in early spring, just before they start to produce new growth.
This will give the plants enough time to establish themselves in their new container before the growing season begins.
Step 2: Prepare the New Pot
Choose a pot that is at least 2 inches larger in diameter than the current pot.
Make sure it has drainage holes at the bottom to prevent waterlogging.
Fill the new pot with a high-quality, well-draining potting mix, such as a blend of coco coir, perlite, and compost.
Step 3: Water the Dahlia Plant
Water your Dahlia plant thoroughly before repotting. This will help to reduce stress and make it easier to remove the plant from its current pot.
Step 4: Remove the Dahlia from Its Current Pot
Carefully loosen the soil around the edges of the pot with a trowel or your fingers.
Gently tip the pot on its side, and slide the plant out, being cautious not to damage the root system.
If the plant is root-bound, you may need to give the pot a few gentle taps to loosen it.
Step 5: Inspect and Trim the Roots
Examine the root system for any damaged or dead roots, and trim them off with a clean, sharp pair of pruning shears.
If the plant is severely root-bound, you can also gently tease apart the roots with your fingers to encourage them to grow outward.
Step 6: Place the Dahlia in the New Pot
Create a small mound of potting mix in the center of the new pot, and place the Dahlia plant on top, spreading the roots out evenly.
The crown of the plant, where the stems meet the roots, should be at the same level as the soil surface.
Step 7: Fill in with Soil
Add more potting mix around the plant, filling in any gaps, and firming the soil gently with your fingers.
Make sure the soil is level and the plant is sitting upright.
Step 8: Water and Fertilize
Water your newly repotted Dahlia thoroughly, allowing the water to drain through the drainage holes.
Apply a slow-release granular fertilizer or a balanced liquid fertilizer according to the package instructions to give your plant a nutrient boost.
Step 9: Monitor and Care for Your Repotted Dahlia
Place your repotted Dahlia in a location with the appropriate light requirements, and continue to monitor its growth and health.
Water and fertilize as needed, and prune or deadhead as necessary to promote healthy growth and abundant blooms.
Following these steps will help ensure a successful transition for your Dahlias and set them up for a thriving growing season.
Planting Dahlia Bulbs in Pots

Growing Dahlias in pots can be a game-changer for gardeners with limited space or those wanting to enjoy Dahlias in different parts of their home.
In this section, we’ll cover the essentials of planting Dahlia bulbs in pots, including selecting the right pot size, preparing the potting mix, and proper planting depth.
We’ll also provide tips for ongoing care, ensuring your potted Dahlias grow strong and produce a stunning display of blooms.
Planting Dahlia Bulbs in Pots
Growing Dahlias in pots offers flexibility for gardeners with limited space or those wanting to add a burst of color to various parts of their home.
In this section, we’ll explore the essentials of planting Dahlia bulbs in pots, ensuring a strong foundation for growth and a stunning display of blooms.
Selecting the Right Pot Size
The size of the pot you choose for your Dahlias will depend on the variety you’re planting.
For dwarf varieties, a pot that is at least 12 inches in diameter should suffice.
For larger varieties, opt for a container that is 18 inches or more in diameter.
Make sure the pot has drainage holes to prevent waterlogging.
Preparing the Potting Mix
A high-quality, well-draining potting mix is essential for growing Dahlias in pots.
A blend of coco coir, perlite, and compost or worm castings will provide the necessary nutrients and drainage for healthy growth.
You can also add slow-release granular fertilizer to give your Dahlias a nutrient boost.
Planting Depth and Spacing
The planting depth for Dahlia bulbs in pots will vary depending on the size of the tuber and variety.
Generally, aim to plant the tubers about 4 to 6 inches deep, with the eye facing upward.
If you’re planting multiple tubers in one pot, space them at least 2 to 3 inches apart to allow for adequate root development and airflow.
Generally, unless you are using really large pots it’s best to only plant one tuber per pot.
Watering and Light Requirements
After planting the tubers, water the potting mix thoroughly, ensuring the soil is evenly moist but not waterlogged.
Place the pot in a location that receives at least 6 to 8 hours of direct sunlight per day, as Dahlias thrive in full sun.
As the plants begin to grow, monitor the soil moisture and water as needed, usually when the top inch of soil feels dry to the touch.
Ongoing Care for Potted Dahlias
To keep your potted Dahlias healthy and productive, provide regular care, including proper watering, fertilizing, pruning, and deadheading.
Apply a balanced liquid fertilizer every 4 to 6 weeks during the growing season to support robust growth and abundant blooms.
Prune and deadhead as needed to encourage branching, increase airflow, and promote continuous flowering.
By following these guidelines, you’ll create the perfect environment for your potted Dahlias to thrive, resulting in a showstopping display of vibrant blooms throughout the season.
Propagating Dahlias
 - Made in USA, Ships from Iowa - Stunning Large White Zinnia Blooms, Very Eye Appealing")
Propagation is a great way to expand your collection of beautiful dahlias.
With a little bit of patience and know-how, you can easily propagate these stunning plants from tubers, cuttings, or seeds.
In this section, we’ll explore the two main methods of propagating dahlias, including tips for selecting and planting tubers and step-by-step instructions for growing Dahlias from cuttings and growing dahlias from seeds.
Propagating Dahlias from Tubers
Selecting and Preparing Tubers
To propagate dahlias from tubers, you’ll need to select healthy, disease-free specimens.
Look for firm, plump tubers with no signs of mold or rot.
Once you’ve chosen your tubers, you’ll need to prepare them for planting.
Start by soaking them in water for a few hours, then dust them with a fungicide to prevent any fungal infections.
Planting the Tubers
When it’s time to plant your tubers, choose a spot with well-draining soil and plenty of sunlight.
Dig a hole that’s deep enough to cover the entire tuber, and add a bit of fertilizer to the soil.
Place the tuber in the hole with the pointed end facing up, and cover it with soil. Water the soil lightly to help settle it around the tuber.
Caring for the Plants
As your dahlia plants begin to grow, you’ll need to provide them with regular care to ensure they thrive.
This includes watering the soil regularly, fertilizing every few weeks, and providing support with stakes or cages as the plants get taller.
You’ll also need to monitor the plants for signs of disease or insect infestations and treat any issues promptly to prevent them from spreading.
Propagating Dahlias From Cuttings:
Propagating dahlias from cuttings is a great way to expand your dahlia collection and create new plants that are identical to their parent plant.
In this section, we’ll guide you through the process of taking dahlia cuttings, preparing them for propagation, and caring for them until they’re ready to be planted.
Step-by-Step Guide to Propagating Dahlias from Cuttings:
Choose a healthy dahlia plant:
The first step in propagating dahlias from cuttings is to choose a healthy plant that you want to propagate.
Make sure the plant is free of pests and diseases and is growing vigorously.
Select the cutting:
Look for a stem that is at least 6 inches long and has several sets of leaves.
Use sharp, clean scissors or pruning shears to make a clean cut just below a node, which is where the leaves are attached to the stem.
Remove the lower leaves:
Once you have your cutting, remove the lower leaves from the stem, leaving only the top two or three sets of leaves.
Dip the cutting in rooting hormone:
To increase the chances of the cutting taking root, dip the cut end of the stem in rooting hormone powder or gel.
Plant the cutting:
Plant the cutting in a pot filled with moist, well-draining potting mix.
Make a hole in the soil with a pencil or your finger, and insert the cutting so that at least one set of leaves is above the soil.
Water the cutting:
Water the cutting thoroughly to settle the soil and ensure that it makes good contact with the stem.
Cover the cutting:
Cover the cutting with a clear plastic bag or a plastic dome to create a humid environment that will help the cutting take root.
Place the pot in a warm, bright location, but out of direct sunlight.
Check the cutting regularly:
After a few days, check the cutting to see if it has rooted.
Gently tug on the stem to see if it has resistance, which indicates that roots have formed. If not, give it more time.
Transplant the cutting:
Once the cutting has rooted, usually in 2-4 weeks, remove the plastic covering and transplant it to a larger pot or into your garden.
Be careful not to damage the delicate new roots when transplanting.
By following these simple steps, you can propagate your own dahlia plants from cuttings and enjoy a bigger and more diverse collection of these stunning flowers.
Propagating Dahlias from Seeds
")
Starting Dahlia Seeds Indoors
To grow dahlias from seeds, you’ll need to start them indoors in early spring. Begin by filling seed trays with potting soil and planting the seeds about 1/4 inch deep.
Water the soil lightly, cover the trays with plastic wrap, and place them in a warm, sunny spot. Keep the soil moist and watch for signs of germination, which should occur within a few weeks.
Planting Dahlia Seeds: Seed Starting Tips
Starting Dahlias from seeds can be a fun and rewarding way to expand your Dahlia collection.
In this section, we’ll cover the essential steps for successfully planting Dahlia seeds, from preparing the seed trays and potting mix to providing the right growing conditions for germination and early growth.
Choose Quality Seeds:
Begin by selecting high-quality Dahlia seeds from a reputable source. This will increase your chances of successful germination and healthy plant growth.
Prepare Seed Trays and Potting Mix:
Use a seed tray or small pots filled with a light, well-draining potting mix like coco coir.
Make sure the potting mix is moist but not overly wet, as excessive moisture can cause the seeds to rot.
Sow Seeds:
Sow Dahlia seeds on the surface of the potting mix, spacing them about an inch apart.
Lightly cover the seeds with a thin layer of the mix or vermiculite.
Provide Ideal Growing Conditions:
Place the seed trays or pots in a warm location with bright, indirect light. Maintain a consistent temperature of around 70°F (21°C) for optimal germination.
Keep the potting mix consistently moist but not saturated.
Germination and Early Growth:
Dahlia seeds typically germinate within 7-14 days.
Once seedlings have emerged and developed their first set of true leaves, thin them out to give each plant enough room to grow.
Transplanting Seedlings:
When the Dahlia seedlings have developed a robust root system and are about 3-4 inches tall, they can be transplanted into larger pots or directly into the garden, depending on your preference and growing space.
Transplanting Seedlings Outdoors
Once your seedlings have grown a few sets of leaves, it’s time to transplant them outdoors.
It is a good idea to harden them off for several days before planting them outside.
Make sure all danger of frost has passed and the soil has warmed up before setting them out.
Choose a sunny spot with well-draining soil, and prepare the soil by adding fertilizer and compost.
Dig a hole for each seedling that’s deep enough to cover the roots, and gently transplant the seedlings into the soil.
Water the soil lightly to help settle it around the plants.
Caring for the Plants
To ensure your dahlia plants thrive, you’ll need to provide them with regular care throughout the growing season.
This includes watering the soil regularly, fertilizing every few weeks, and providing support with stakes or cages as the plants get taller.
You’ll also need to monitor the plants for signs of disease or insect infestations and treat any issues promptly to prevent them from spreading.
As the plants begin to flower, deadhead regularly to promote continued blooming.
Dahlia Problems
")
Dahlia enthusiasts, while we all adore the spectacular blooms these plants produce, it’s important to recognize that they can sometimes face a few challenges.
In this section, we’ll delve into common Dahlia problems and discuss how to identify, prevent, and treat various issues to keep your Dahlias healthy and thriving.
Let’s work together to ensure your Dahlia garden remains a stunning and vibrant display all season long.
Are Dahlias poisonous?
Dahlias are not listed as toxic to dogs by the American Society for the Prevention of Cruelty to Animals (ASPCA), but the tubers can cause mild gastrointestinal upset if ingested in large amounts.
It’s always best to keep an eye on your pets when introducing new plants to your home or garden and consult with your veterinarian if you suspect any issues.
Dahlias Are Edible
Did you know that Dahlias are not just beautiful flowers, but also edible?
It’s true! Dahlias are actually related to sunflowers and Jerusalem artichokes, and their bulbs can be consumed as well as their petals.
So not only can you enjoy their stunning blooms in your garden, but also incorporate them into your culinary creations.
Dahlia Pests and Diseases
Dahlias may be beautiful, but they’re not immune to pests and diseases.
In fact, like any plant, Dahlias can fall victim to a range of pests and diseases that can quickly take a toll on their health and appearance.
Common pests and diseases:
Just like any other plant, Dahlias can be susceptible to a variety of pests and diseases that can affect their growth and overall health.
In this section, we’ll take a closer look at the most common pests and diseases that can afflict Dahlias, including spider mites, powdery mildew, and virus diseases. By learning to identify these issues, you can take steps to protect your Dahlias and keep them looking healthy and beautiful.
Dahlia Insect Pests
Spider mites:
These tiny pests can be difficult to spot, but they can cause significant damage to Dahlias by sucking sap from the leaves, causing yellowing and stunted growth.
Look for fine webbing on the undersides of leaves as a sign of infestation. To treat, wash the leaves with a strong stream of water, or apply insecticidal soap.
Aphids:
These small, pear-shaped insects can be found clustered on the undersides of leaves, sucking sap from the plant and causing distortion and yellowing of leaves.
To treat, wash the leaves with a strong stream of water, or use insecticidal soap.
Thrips:
Thrips are tiny, slender insects that feed on the leaves and flowers of Dahlias, causing silvery streaks and distorted growth.
To treat, use a systemic insecticide or release natural predators such as ladybugs or lacewings.
Mites:
Mites are similar to spider mites in their feeding habits, but they are even smaller and more difficult to spot.
Look for discoloration and stippling on the leaves as a sign of infestation. To treat, wash the leaves with a strong stream of water or use an insecticidal soap.
Leafhoppers:
These small insects can cause yellowing, browning, and curling of leaves by sucking sap from the plant.
To treat, use insecticidal soap or release natural predators such as ladybugs or lacewings.
Dahlia Diseases
Powdery mildew:
This fungal disease is characterized by a white or gray powdery coating on the leaves, stems, and flowers of Dahlias.
It can cause leaf drop and affect the overall health of the plant. To treat, remove infected plant parts and improve air circulation around the plant. You can also use a fungicide labeled for powdery mildew.
Virus diseases:
There are several virus diseases that can affect Dahlias, including mosaic virus and necrotic spot virus. S
symptoms may include stunted growth, distorted leaves, and discoloration. Unfortunately, there is no cure for virus diseases, and infected plants should be removed and destroyed to prevent spread to other plants.
Botrytis:
Botrytis blight can cause buds to rot and cover the plant with powdery gray mold.
Remove any affected parts and improve air circulation around the plant. Use a fungicide labeled for botrytis if necessary.
Stem rot:
This fungal disease occurs when Dahlias are growing in heavy, poorly drained, wet soil. Look for a white ring in the soil around the stem.
The rot will creep in and kill the stem and advance down into the soil to kill the tubers. Improve drainage around the plant and avoid overwatering.
Aster yellows:
This disease is transmitted by leafhoppers and causes leaf-like tissue to form where flower buds should be.
Unfortunately, infected plants are a loss and should be removed and destroyed to prevent the spread to other plants.
Pest And Disease Prevention
To prevent these pests and diseases from affecting your Dahlias, it’s important to maintain good cultural practices, such as providing proper soil drainage, avoiding overhead watering, and maintaining good air circulation around the plants.
Additionally, keep a close eye on your plants and treat any issues promptly to prevent them from spreading.
We will go into more detail in the next section.
Prevention and treatment strategies:
")
Prevention is always the best approach when it comes to pests and diseases, and we’ll provide tips for minimizing the risk of these issues in your Dahlia plants.
We’ll also discuss effective treatment strategies for addressing pest and disease problems if they do arise, including natural and chemical solutions.
By being proactive in your Dahlia care, you can help ensure that your plants stay healthy and vibrant all season long.
Preventing pests and diseases is always the best approach when it comes to Dahlia care.
Here are some tips to minimize the risk of these issues in your plants:
Plant healthy tubers: Starting with healthy tubers is the first step in ensuring healthy plants. Inspect your tubers for any signs of damage or disease before planting.
Proper planting and watering: Proper planting depth and watering techniques can help prevent many diseases, such as stem rot and fungal issues.
Ensure that the soil is well-draining and avoid overhead watering.
Clean gardening tools: Clean your gardening tools regularly to prevent the spread of diseases from one plant to another.
Regular inspections: Regularly inspect your plants for any signs of pests or disease. Catching problems early can prevent them from spreading and causing serious damage.
If you do notice pest or disease issues in your Dahlia plants, here are some effective treatment strategies:
Natural remedies: There are many natural remedies that can help control pests and diseases in your plants, such as neem oil and insecticidal soap for pests, and copper fungicides for fungal issues.
Chemical solutions: If natural remedies are not effective, chemical solutions may be necessary. Always follow the instructions carefully and use chemical treatments as a last resort.
By following these prevention and treatment strategies, you can help ensure that your Dahlia plants stay healthy and vibrant, producing stunning blooms all season long.
Can You Grow Hydroponic Dahlias
So do you want to know if you can grow hydroponic Dahlias? The answer is yes.
I have about 15 Dahlia roots inside my grow closet. Plants are in 1-gallon containers filled with coco coir.
They are irrigated automatically with a top-feed drip system on a timer. They are under LED lights and also on a timer.
These dahlias were not sorted for color so I will need to label each pot. But right now things are really overgrown and I think I am going to need to do some pruning just to get at the pots.
Here is a short video of my hydroponic Dahlias
Dahlia Care FAQs
")
If you’re considering growing Dahlias in pots, you probably have a few questions about how to get started and ensure your plants thrive.
Dahlias can be a stunning addition to any garden or indoor setting, provided they receive the appropriate care.
Here, we answer some of the most frequently asked questions about caring for Dahlias in pots, from the type of soil needed to watering schedules and more.
Q: What type of soil is best for Dahlias in pots?
A: Dahlias thrive in well-drained, rich soil. Use a high-quality potting mix that is slightly acidic to neutral (pH 6.5-7.0).
Q: How often should I water my potted Dahlias?
A: Water your Dahlias when the top inch of soil feels dry to the touch. Be sure not to overwater, as this can lead to root rot.
Q: Do Dahlias need a lot of sunlight?
A: Yes, Dahlias require at least 6 hours of direct sunlight per day. If grown indoors, place them near a south-facing window or use grow lights.
Q: Should I fertilize my Dahlias?
A: Fertilize your Dahlias every 4-6 weeks during the growing season with a balanced, water-soluble fertilizer. Be cautious not to over-fertilize, as this can lead to poor bloom production.
Dahlia Care in Pots: Final Thoughts

Congratulations, you’ve reached the end of our guide on how to care for Dahlias in pots!
By now, you should have a thorough understanding of the best practices for growing and maintaining Dahlias in containers, from selecting the right pot size and soil type to proper watering and fertilization techniques.
We’ve also covered common issues like pests and diseases, as well as tips for deadheading and pruning your Dahlias for optimal growth and bloom.
With this knowledge, you’re well on your way to creating a stunning display of Dahlias that will bring beauty and joy to your home and garden.
Remember, with a little bit of care and attention, these amazing flowers can provide a colorful and rewarding addition to your gardening experience.
Recap of Dahlia Care in Pots:
Throughout this guide, we’ve covered a wide range of topics related to growing Dahlias in pots.
- Caring for Dahlia in pots requires well-drained soil, regular watering, and at least 6 hours of direct sunlight daily.
- Use a large container with drainage holes for optimal root growth.
- Fertilize every 4-6 weeks during the growing season and deadhead spent blooms to encourage more flowering.
We’ve discussed everything from selecting the right container size and soil composition to proper watering techniques, pruning, and pest management.
As a quick recap, it’s important to remember to choose a well-draining potting mix, provide your Dahlias with plenty of sunlight, and water them regularly using proper bottom watering techniques.
Additionally, deadheading and pruning can help encourage healthy growth and beautiful blooms.
By following these guidelines, you can enjoy stunning Dahlias in your container garden all season long.
Encouragement for Growing Beautiful Dahlias:
Growing Dahlias in pots can be a rewarding and enjoyable experience, whether you’re a seasoned gardener or just starting out.
These beautiful blooms come in a wide range of colors, sizes, and shapes, making them a versatile addition to any container garden.
With a little patience, care, and attention to detail, you can create a stunning display of Dahlias that will be the envy of your neighborhood.
So don’t be afraid to try your hand at growing Dahlias in pots – with the right knowledge and techniques, you’ll be well on your way to creating a beautiful and thriving garden.
Did you know you can buy Dhalia tubers on Amazon?
Ready to upgrade your backyard? These expert guides will help you grow beauty, food, and function right outside your door.
🌼 Backyard Gardening Guides
- 🏡 Backyard Gardening Ideas (Pillar Guide)
- 🌳 Red Tip Photinia Privacy Hedge
- 🌸 Planting Dahlia Seeds
- 🪴 Best Soil for Dahlias in Pots
- 🫐 Growing Blueberries in Pots
- 🌿 Cold Hardy Tea Plant
- 🧄 Growing Goji Berries in Pots
- 🌱 How to Grow Creeping Thyme
- 🌺 Growing Balloon Flowers from Seed
- 🌼 Growing Penstemon in Pots
- 🐝 Growing Echinacea in Pots
- 🪻 Plant Creeping Phlox
- 🌞 Care for Verbena in Pots
- 🌾 Growing Poppies in Pots
- 🌷 Dahlia Care in Pots
- See all articles in our Backyard Gardening category

 Steve S. is the creator of