This post contains affiliate links. If you buy something from one of our links we may earn a commission. Thanks
Discover How to Grow Sweet Potatoes in Containers indoors! Master the art of container gardening with LED lights, coco coir, and simple steps for a bountiful harvest.
To grow Sweet Potatoes in containers, select a large pot with good drainage and fill it with well-draining, loamy soil. Plant the sweet potato slips about 12 inches apart, and place the container in a sunny location. Keep the soil consistently moist, but not waterlogged. Expect to harvest in about 4-5 months.
Would you like to learn How to Grow Sweet Potatoes in Containers?
If you’ve ever dreamed of harvesting your own delicious sweet potatoes but thought it was impossible due to limited space or unsuitable climate, we have some fantastic news for you.
Growing sweet potatoes in containers is not only possible, but it’s also an incredibly rewarding and enjoyable experience.
In this guide, we’ll show you how to cultivate these nutritious tubers indoors using LED lights, coco coir, and a few simple steps.
So, roll up your sleeves, and let’s get started on your journey toward a bountiful sweet potato harvest!
How to Grow Sweet Potatoes in Containers Indoors
I love sweet potatoes but growing them outdoors in Washington State’s cool maritime climate is a no-go.
Store-bought sweet potatoes are expensive and quality is variable from bag to bag.
So for me, I need to grow them indoors if I want to grow them at all. Actually, the vines also make an attractive houseplant.
I tried sprouting my own this year but they were obviously treated and after months there were no sprouts.
So I decided to break down and buy sweet potato slips and yes they are expensive but I think I will only need to buy them once.

I will be growing Okinawan purple sweet potatoes this year. I decided to try some and I like them better than regular sweet potatoes.
They are drier and sweeter and of course purple. They have a different taste that’s hard to describe but to me, they taste like roasted chestnuts.
So let’s get the show on the road!
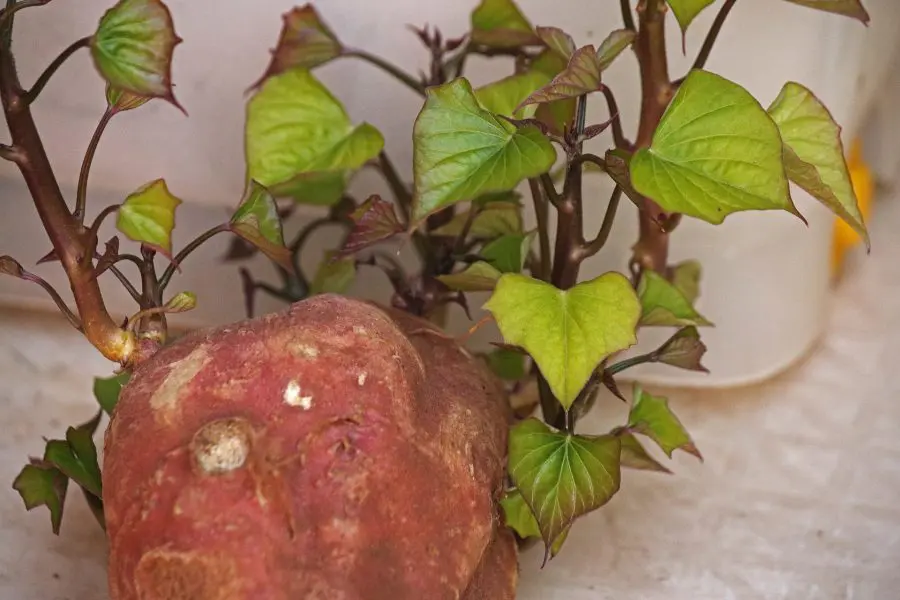
Okinawan Purple Sweet Potato Slips Finally!
I have been waiting a while for my Purple Okinawa Sweet Potato Slips to arrive.
The company I ordered from was slammed and I can see why. They arrived healthy and had some roots already.
They looked exactly like the picture on Amazon I ordered from. Buy yours here.
Planting Okinawan Sweet Potato Slips
I left my slips in water for a few days to rehydrate. I also pruned off most of the leaves just leaving a few on top.
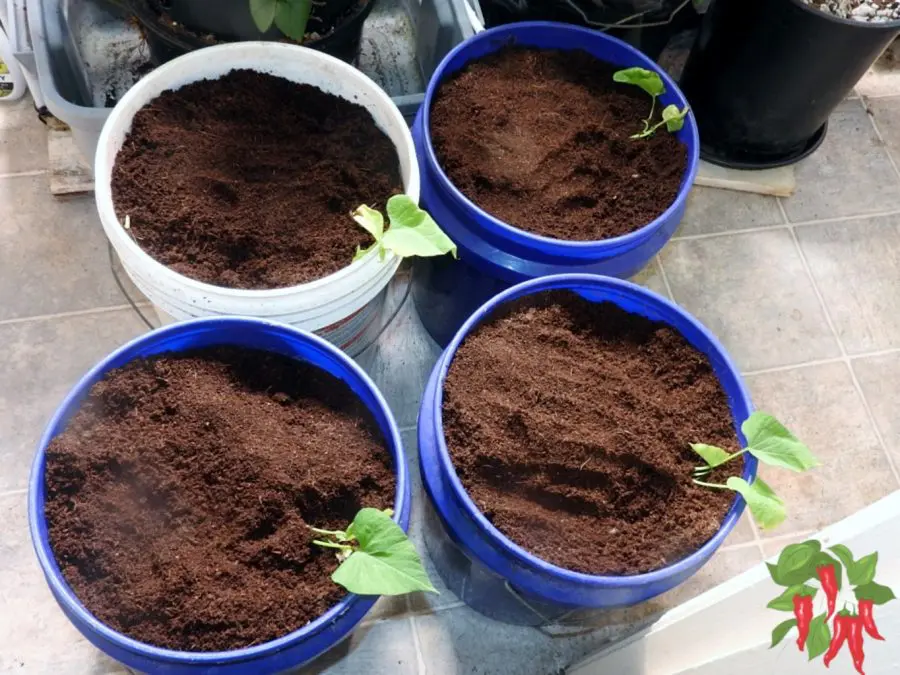
The slips will be set horizontally and each node should develop roots and fill the 5-gallon container.
Each 5-gallon bucket holds 5 gallons of Canna coco coir.
There are holes in the bottom of each bucket for drainage. I also add about an inch of grow stones (like perlite) to the bottom to keep the coco from draining out when pots are watered.
I precharge my coco with calcium and magnesium before planting. I use coco bricks and I add about 2 1/2 gallons of water for each brick along with 3 ml of CaliMagic per gallon of water.
These containers will be moved into a small closet grow room setup and watered with an automated top-feed drip system.
Lighting will be with an HLG 650R LED which will need to be dimmed down for this space. Here is my latest video:
How To Grow Sweet Potatoes In Containers – Planting Time
Growing Sweet Potatoes In Containers
Growing your own food is not only rewarding but also allows you to enjoy fresh, nutritious, and delicious produce.
Sweet potatoes are a fantastic choice for home gardening, thanks to their numerous nutritional benefits and versatility in cooking.
Rich in fiber, vitamins, and minerals, sweet potatoes can be prepared in numerous ways, from savory dishes to delightful desserts.
In this guide, we’ll explore the concept of how to grow sweet potatoes in containers.
It’s a perfect solution for those with limited spaces or living in urban environments.
Container gardening offers greater control over growing conditions, making it an ideal choice for those looking to cultivate sweet potatoes in less-than-ideal climates.
We’ll introduce you to the indoor container growing process, which includes using LED grow lights for optimal plant growth.
These energy-efficient lights provide the full spectrum of light necessary for your sweet potatoes to thrive.
Additionally, we’ll discuss the advantages of growing in coco coir, a sustainable and effective growing medium that retains moisture and nutrients while promoting healthy root development.
As you embark on your container gardening journey, it’s essential to set realistic expectations.
There’s a learning curve to mastering the art of growing sweet potatoes in containers, and you may encounter common challenges along the way.
But don’t worry! We’re here to provide helpful tips and guidance to ensure your success.
Ultimately, the joy and satisfaction of harvesting your own sweet potatoes will make your efforts worthwhile.
So, without further ado, let’s dive into the world of container gardening and start growing some amazing sweet potatoes!
Materials and Equipment
Are you ready to get started on your sweet potato container garden?
Before we jump into the planting process, let’s gather all the necessary materials and equipment.
Having the right tools on hand will make your gardening experience smoother and more enjoyable.
In this section, we’ll discuss the essentials, from LED grow lights and coco coir to the perfect containers and everything in between.
Don’t worry if this seems overwhelming at first; we’re here to guide you every step of the way.
So, let’s take a look at what you’ll need to begin your container gardening adventure!
LED Grow Lights: Shedding Light on Your Indoor Garden
• Types and specifications: LED grow lights come in various shapes and sizes, each with its own set of specifications.
Look for full-spectrum lights that emit a range of colors, mimicking natural sunlight to encourage healthy plant growth.
Pay attention to the wattage, too; higher wattage will cover a larger area, but keep energy consumption in mind.
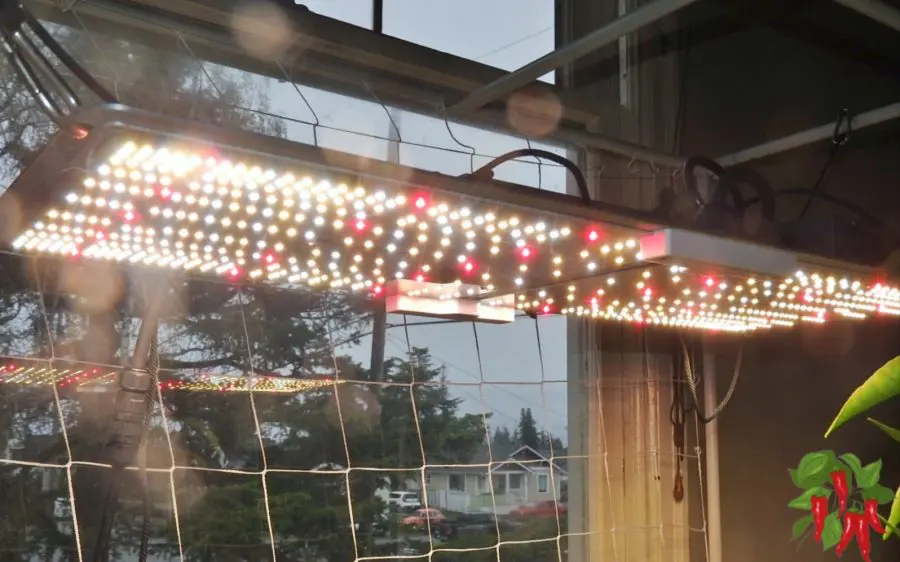
This is the Spider Farmer SF2000 that I use in my kitchen garden. I am very happy with this LED grow light and you can read my Spider Farmer Review for more info.
Proper lighting is the key to growing sweet potatoes or other vegetables indoors year-round.
• Placement and distance from plants: Position your LED grow lights at an appropriate distance from your sweet potato plants.
Generally, hanging them about 18 to 24 inches above the plants works well. but a lot depends on the strength of the light you use.
Make sure to adjust the height as your plants grow to avoid scorching the leaves.
Coco Coir: A Sustainable Growing Medium
• Benefits for container gardening: Coco coir, made from coconut husks, is an excellent growing medium for container gardening.
It’s lightweight, well-aerated, and retains moisture, ensuring your sweet potatoes have a healthy root environment. Plus, it’s environmentally friendly and reusable!
• Preparing and hydrating coco coir: Hydrate your coco coir with water and a nutrient solution before planting.
If using coco bricks soak it until it expands and becomes fluffy. Drain any excess water, and your coco coir will be ready for planting.
Canna Coco Is What I Use And Recommend
All coco coir is not created equally. Some cheaper brands contain high levels of salt making them unsuitable for growing plants.
I want you to get started on the right foot using a premium horticultural grade coco coir. Canna coco is prebuffered and very low in salts.
It also has consistently high quality and I have tried other brands but it still remains the best quality coco coir on the market.
It is available as coco bricks or loose and ready-to-use.
")


Coco has unique properties and requires a fertilizer made for coco for best results. Canna started the coco revolution and Coco A & B is still the best.
Containers and 5-Gallon Buckets: The Foundation for Your Sweet Potatoes
• Types and selection: Selecting the right container is crucial for your sweet potatoes’ success.
Look for containers that are at least 12 inches deep, with a similar width.
Five-gallon buckets are an excellent option, as they provide ample space for root growth.
• Drainage considerations: Ensure your containers have proper drainage holes to prevent root rot.
You can drill additional holes if necessary. Place a tray or saucer under the container to catch any excess water.
Additional Supplies: Tools for a Thriving Garden
• Nutrients and fertilizers: Sweet potatoes require a well-balanced nutrient solution for optimal growth.
Use a fertilizer specifically designed for hydroponics or container gardening, and follow the manufacturer’s instructions for application rates.
• Measuring tools (e.g., pH and EC meters): Maintaining proper pH and nutrient levels is essential for healthy plants.
Invest in a pH meter and an EC (electrical conductivity) meter to monitor and adjust these levels as needed.
• Trellis or support system (if necessary): Although sweet potatoes are primarily grown for their tubers, some varieties may need support for their vines.
Install a trellis or another support system to keep your plants upright and well-ventilated.
Starting Sweet Potato Slips staring vs buying slips
Now that we’ve covered the essential materials and equipment, it’s time to dive into the exciting world of sweet potato slips.
These young shoots are the starting point for your container-grown sweet potatoes.
You might be wondering whether you should start your own slips or buy them from a nursery.
While purchasing slips can save time and effort, starting your own is a fun and cost-effective way to get your container garden going.
Plus, you’ll have the satisfaction of knowing you’ve nurtured your sweet potatoes from the very beginning.
In this section, we’ll guide you through the process of starting your own sweet potato slips and getting them ready for planting in your containers. Let’s get growing!
Choosing the Perfect Sweet Potatoes: The First Step to Success
Starting with healthy, high-quality sweet potatoes is essential for growing robust slips.
Look for organic, locally grown sweet potatoes, as these are more likely to sprout.
Avoid store-bought sweet potatoes treated with growth inhibitors, as they may not produce viable slips.
Prepping for Sprouting: Setting the Stage for New Growth
Before sprouting, clean your sweet potatoes thoroughly and remove any blemishes.
Cut large sweet potatoes in half to increase the number of slips you can grow.
Place the cut or rounded end in a container of water, with toothpicks or small skewers to support the sweet potato, ensuring half of it is submerged.
Place the container in a warm, well-lit area to encourage sprouting.
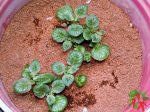
Alternatively, you can plant your sweet potato in coco coir. Just lay it down on the soil surface and cover it about halfway up. Keep the soil moist but not wet.
• Slip Care and Monitoring: Nurturing Your Future Plants
Keep a close eye on your sweet potatoes as they begin to sprout. Change the water every few days to prevent mold and bacteria growth.
In 3 to 4 weeks, you should see small green shoots emerging from the sweet potato. These are your slips, the start of your sweet potato plants.
• Harvesting Your Slips: Preparing for Planting
When your slips reach 4 to 6 inches in height, it’s time to harvest them for planting.
Gently twist and pull the slips from the sweet potato, taking care not to damage the delicate roots.
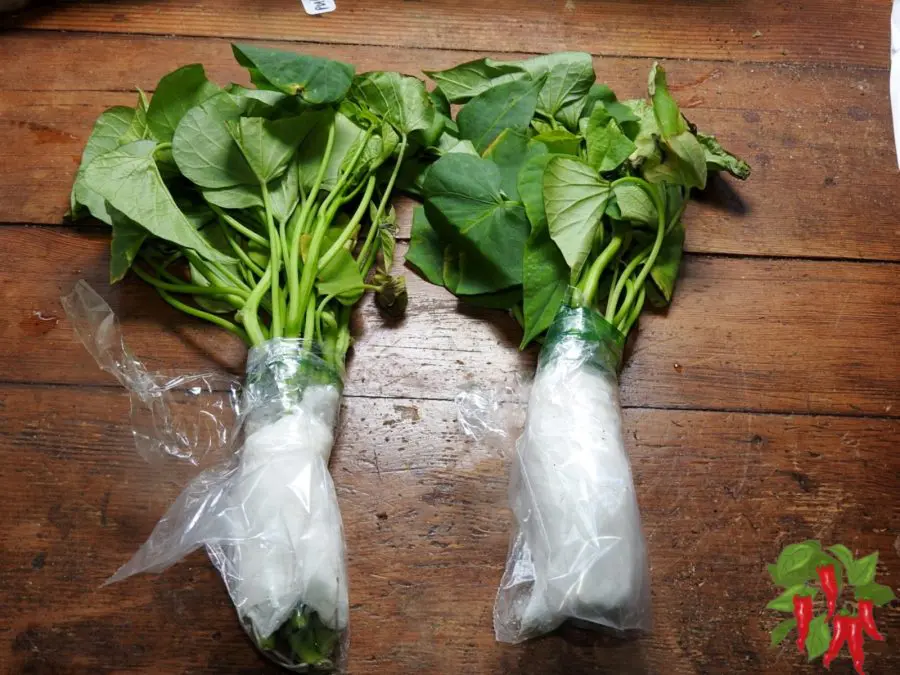
Place the slips in a container of water for a few days to allow the roots to grow and strengthen before planting.
• Buying Sweet Potato Slips: The Convenient Alternative
If starting your own slips seems too time-consuming or you’d like a head start, purchasing sweet potato slips from a reputable nursery is a convenient alternative.
Look for healthy, well-rooted slips with no signs of disease or pests.
Buying slips allows you to choose from a wider variety of sweet potato types and can provide a more predictable start to your container garden.
Planting Sweet Potato Slips in Coco Coir
Congratulations on successfully starting your sweet potato slips, or perhaps acquiring some from a trustworthy nursery!
Now comes the thrilling part – planting these slips in your coco coir filled containers.
This step marks the beginning of your sweet potatoes’ growth journey, where they will transform from small slips into flourishing plants producing delicious tubers.
In this section, we’ll share valuable tips and techniques for planting your sweet potato slips in coco coir, setting the stage for a bountiful harvest.
So, grab your gardening gloves, and let’s get those slips planted!
Laying the Groundwork: Prepping Containers and Coco Coir
Before planting your sweet potato slips, ensure that your containers are clean and have proper drainage holes.
Fill the containers with pre-hydrated coco coir, leaving about an inch of space from the top.
Make sure the coco coir is fluffy and evenly distributed, providing a welcoming environment for your slips to take root.
How Many Sweet Potato Slips In A 5 Gallon Bucket?
When growing sweet potatoes in containers, it’s important to provide adequate spacing between slips to ensure healthy growth and tuber development.
In a 5-gallon bucket, it’s best to plant only one slip, as sweet potato plants can have extensive root systems that require space to grow and produce tubers.
If you’re using larger containers, maintain a spacing of about 12 inches between slips to give each plant enough room to grow and develop properly.
Taking Root: Planting Your Sweet Potato Slips
Now it’s time to plant your slips!
Dig a small hole in the center of the coco coir, deep enough to accommodate the slip’s roots.
Carefully place the slip into the hole, ensuring the roots are fully covered. Gently pat the coco coir around the slip’s base to provide support and encourage root growth.
Space the slips about 12 inches apart if you’re using large containers or planting multiple slips in one container.
Quenching Their Thirst: Watering and Nutrient Requirements
After planting your slips, water them gently, ensuring the coco coir is thoroughly moistened without becoming waterlogged.
Monitor the moisture levels in your coco coir and water your plants as needed, keeping the growing medium consistently moist.
To supply the necessary nutrients for healthy growth, mix a balanced nutrient solution into your water according to the manufacturer’s instructions.
Check and adjust the pH and EC levels as needed, aiming for a pH of 5.8-6.2 and an EC of 1.5-2.0 mS/cm ( 750-1000 ppm on a 500 scale)for optimal growth.
Caring for Your Sweet Potato Plants
You’ve successfully planted your sweet potato slips in their coco coir-filled containers, and now it’s time to nurture and care for these growing plants.
Providing the proper care and attention is crucial to ensuring a bountiful harvest of delicious sweet potatoes.
In this section, we’ll discuss essential tips and best practices for caring for your sweet potato plants as they grow and develop.
From light and temperature requirements to pest and disease management, we’ve got you covered.
So, let’s dive in and learn how to keep your sweet potato plants happy and thriving!
Illuminating Success: Adjusting LED Grow Light Settings
• Light spectrum considerations: As your sweet potato plants grow, adjust your LED grow light settings to accommodate their changing needs.
Ensure your lights provide a full spectrum of colors to support healthy growth and development.
White full-spectrum LED lights will provide both blue light to encourage vegetative growth, and red light to promote tuber formation.
• Photoperiods and timing: Sweet potatoes thrive with a consistent photoperiod.
Set your LED grow light on a timer to provide 12-14 hours of light per day, followed by 10-12 hours of darkness.
This consistent light schedule will help your plants grow strong and productive.
Nourishing Your Plants: Maintaining Proper Nutrient Levels
• Feeding schedules: Establish a regular feeding schedule for your sweet potato plants, typically every 7-10 days.
Apply a balanced nutrient solution according to the manufacturer’s instructions, taking care not to overfeed your plants, as this can lead to nutrient imbalances and toxicity.
Tips For Feeding Coco Coir
Coco coir is actually an inert hydroponic medium. That means it needs to be fertilized before it can feed your plants.
With coco coir you don’t want it to dry out completely it works best when it stays moist. Don’t use plain water as it will throw off your nutrient balance.
You want to fertilize every time you water your plants and you should start with half-strength nutrients to avoid overfertilizing.
Always water until you have some runoff. This will prevent salt build-up.
Also, the addition of a calmag supplement will help balance the nutrient profile of your coco coir and should be added to your chosen nutrients.
• Monitoring and adjusting pH and EC: Regularly check the pH and EC levels of your nutrient solution to ensure optimal plant health.
Aim for a pH of 5.8-6.2 and a starting EC of 1.5-2.0 mS/cm. After that initial fertilizing of your container start to water with a half-strength solution.
Watch your plants. If they seem hungry increase nutrient strength if they are doing well continue what you’re doing.
Adjust the levels as needed using pH adjusters or by diluting the nutrient solution.
Vigilant Gardening: Pest and Disease Prevention
Keep a watchful eye on your sweet potato plants for any signs of pests or diseases.
Inspect the leaves, stems, and coco coir for signs of infestations or infections.
Employ organic pest control methods, such as introducing beneficial insects, using neem oil, or applying insecticidal soap.
Ensure proper air circulation and avoid overwatering to reduce the risk of fungal diseases.
Guiding Growth: Pruning and Training (if necessary)
Although sweet potatoes primarily grow for their tubers, some varieties may need pruning and training to manage vine growth.
Regularly check your plants and prune any excessive or damaged foliage to encourage proper air circulation and light penetration.
If your plants require support, gently guide the vines onto a trellis or other support structure, securing them loosely with plant ties.
Harvesting and Storing Sweet Potatoes
The moment you’ve been patiently waiting for has finally arrived – it’s time to harvest your homegrown sweet potatoes!
All your hard work, dedication, and tender loving care have led to this exciting milestone.
In this section, we’ll discuss the best practices for harvesting and storing your sweet potatoes, ensuring you can enjoy their delicious, nutritious goodness for months to come.
So, grab your garden gloves, and let’s uncover the fruits of your labor, as we guide you through the rewarding process of harvesting and storing your very own sweet potatoes!
Perfect Timing: When to Harvest
Knowing when to harvest your sweet potatoes is crucial for optimal flavor and texture.
Typically, sweet potatoes are ready to harvest 4-5 months after planting.
Look for signs of maturity, such as yellowing leaves and a thickening of the vines near the soil surface.
Harvest your sweet potatoes before the first frost if growing outdoors, as freezing temperatures can damage the tubers.
Gentle Hands: How to Harvest Without Damaging the Tubers
To harvest your sweet potatoes without causing damage, carefully dig around the base of the plant with a garden fork or trowel.
Gently loosen the soil, taking care not to puncture the tubers.
Once the soil is loose, lift the plant and tubers out of the container. Remove any excess coco coir and gently brush off the soil from the sweet potatoes.
From Garden to Table: Curing and Storing Sweet Potatoes
• Curing: Before storing your sweet potatoes, allow them to cure for 7-10 days.
Curing helps to heal any minor cuts or abrasions and improves the flavor and texture of the tubers.
Place your sweet potatoes in a warm, humid area (around 80-85°F and 80-90% humidity) during the curing process.
• Storing: After curing, store your sweet potatoes in a cool, dark, and well-ventilated space (ideally 55-60°F and 75-80% humidity).
Place them in a single layer, not touching each other, and check regularly for any signs of rot or decay.
Properly stored sweet potatoes can last for several months, allowing you to savor your homegrown harvest throughout the winter.
Troubleshooting Common Problems
Growing sweet potatoes in containers can be a truly rewarding experience, but like any gardening endeavor, it can also come with its fair share of challenges.
We’re here to help you navigate and overcome these obstacles. In this section, we’ll address some common problems you might encounter while growing sweet potatoes in containers and provide practical solutions to get your plants back on track.
With a little know-how and persistence, you’ll be well-equipped to tackle any issues that may arise and keep your sweet potato plants healthy and thriving.
So, let’s dive in and learn how to troubleshoot like a pro!
Solving the Mystery: Yellowing Leaves
Yellowing leaves can be a sign of several issues, including nutrient deficiencies, overwatering, or underwatering.
To address this, first, check the moisture level of your coco coir and adjust your watering schedule accordingly.
Next, ensure your nutrient solution is properly balanced and that the pH and EC levels are within the optimal range for sweet potato growth.
Reviving Your Plants: Wilting or Drooping
Wilting or drooping plants can also result from overwatering, underwatering, overfertilizing, or heat stress.
Assess the moisture levels in your coco coir and adjust your watering practices if needed.
If you suspect overfertilization check the strength of your runoff. If it is very high flush your coco with a very dilute nutrient solution until it comes back down to an acceptable level.
If heat stress is the issue, move your containers to a cooler location and adjust your LED grow lights’ intensity or distance to reduce heat exposure.
Boosting Growth: Slow Growth or Small Tubers
Slow growth or small tubers can be a consequence of insufficient light, improper nutrient levels, or overcrowding.
Ensure your LED grow lights are providing the proper spectrum and intensity for sweet potato growth.
Double-check your nutrient solution’s balance, pH, and EC levels, making adjustments as necessary.
Finally, make sure your plants have enough space to grow by providing proper spacing of about a foot between slips and using adequately-sized containers.
Tackling the Unwanted: Pest and Disease Issues and Treatments
Addressing pest and disease issues early is crucial to keeping your sweet potato plants healthy.
Spider mites, mealy bugs, and scale insects are common pests.
Spider Mites
Spider mites are tiny, eight-legged arachnids that are usually red, brown, or yellow in color.
They are very small, typically less than 1mm in size, and can be difficult to see with the naked eye.
Spider mites feed on plant sap, causing leaves to appear speckled or stippled, and can lead to yellowing, curling, and eventual leaf drop.
Treatment: To treat spider mite infestations, you can use several approaches:
- Wash the affected plants with a strong stream of water to dislodge the mites.
- Apply insecticidal soap or neem oil, which can help control spider mite populations.
- Use a miticide specifically designed to target spider mites, following the manufacturer’s instructions.
- Introduce beneficial insects, such as ladybugs or predatory mites, which can help reduce spider mite populations.
Mealybugs
Mealybugs are small, soft-bodied insects covered in a white, waxy, cotton-like substance.
They feed on plant sap, causing leaves to yellow and curl, and can lead to stunted growth and reduced vigor.
Mealybugs can also excrete honeydew, which can lead to the growth of sooty mold on plant surfaces.
Treatment: To control mealybug infestations, consider the following treatments:
- Manually remove visible mealybugs using a cotton swab dipped in rubbing alcohol.
- Apply insecticidal soap or neem oil to the affected plants, following the manufacturer’s instructions.
- Release beneficial insects, such as ladybugs or lacewings, which prey on mealybugs.
- For severe infestations, consider using a systemic insecticide, following the product’s instructions carefully.
Scale Insects
Scale insects are small, oval-shaped pests that can be brown, black, or white in color.
They have a waxy or armored coating, which protects them from many insecticides. Scale insects feed on plant sap, leading to yellowing leaves, stunted growth, and leaf drop.
Like mealybugs, they can excrete honeydew, which can result in sooty mold growth.
Treatment: To treat scale insect infestations, try the following methods:
- Remove visible scale insects manually by scraping them off with a soft brush, toothpick, or fingernail.
- Apply neem oil or insecticidal soap to smother the insects, following the manufacturer’s instructions.
- Encourage natural predators, such as ladybugs or parasitic wasps, which can help control scale populations.
- For severe infestations or persistent problems, consider using a systemic insecticide according to the product’s guidelines.
Inspect your plants regularly for any signs of infestation or infection.
Employ organic pest control methods like introducing beneficial insects, using neem oil, or applying insecticidal soap.
For fungal diseases, ensure proper air circulation and avoid overwatering.
Remove and dispose of any affected plant material to prevent the spread of disease.
In severe cases, consider using organic fungicides or pesticides according to the manufacturer’s instructions.
Sweet Potatoes in Containers FAQs
Growing sweet potatoes in containers offers gardeners with limited space the opportunity to enjoy this nutritious tuber.
While sweet potatoes are traditionally grown in the ground, container gardening can also produce a decent crop if done correctly.
The following FAQs delve into the specifics of this method, providing valuable insights for anyone interested in giving it a try.
Q: What type of container is best for growing sweet potatoes?
A: Choose a container that is at least 12-18 inches deep and equally wide to give the vines room to grow. Make sure the container has adequate drainage holes.
Q: What kind of soil should be used?
A: A well-draining, loamy soil rich in organic matter is ideal for growing sweet potatoes. A pH range of 5.8 to 6.2 is generally recommended. Coco coir is a suitable medium.
Q: How much sunlight do sweet potatoes need?
A: Sweet potatoes thrive in full sun, which means they need at least 6-8 hours of direct sunlight per day.
Q: When is the best time to harvest?
A: Sweet potatoes are generally ready to harvest in about 4-5 months. The tubers are mature when the leaves start to turn yellow. However, they can be harvested earlier for smaller, tender tubers.
How to Grow Sweet Potatoes in Containers Final Thoughts
Growing sweet potatoes in containers under LED grow lights can be a fun and rewarding journey, allowing you to enjoy homegrown goodness even in limited indoor spaces.
We hope this guide has provided you with valuable insights, tips, and techniques for successfully cultivating your own sweet potatoes in coco coir-filled containers.
As you nurture your plants from slips to harvest, remember that patience, attention, and a little love can work wonders in your indoor garden.
So, as you embark on this exciting adventure, embrace the challenges and enjoy the satisfaction of savoring the fruits of your labor. Happy gardening!
Recap of the Benefits of Growing Sweet Potatoes in Containers Indoors
Growing sweet potatoes in containers indoors offers numerous advantages, including space-saving, controlled growing conditions, and the ability to grow year-round.
By utilizing LED grow lights and coco coir, you can optimize your plants’ growth, leading to a bountiful harvest of delicious and nutritious sweet potatoes that you can enjoy in various recipes.
Keep Learning How to Grow Sweet Potatoes in Containers
As you gain experience and confidence in growing sweet potatoes in containers, continue to learn and experiment with different techniques, varieties, and growing conditions.
Each growing cycle provides an opportunity to refine your skills and discover what works best for your unique situation.
Share your knowledge and experiences with fellow gardening enthusiasts, and remember that the joy of gardening lies not only in the harvest but also in the process of nurturing, learning, and growing.
Read: Apartment Kitchen Garden (Apartment Gardening Tips For Beginners)