
Ever wondered how to grow fresh veggies in the smallest spaces? A closet grow room lets you turn unused space into a thriving indoor garden right at home.
Discover the magic of container gardening right within your closet! Our guide unveils how to create a closet grow room for fresh veggies year-round.
What Is a Closet Grow Room?
- Container gardening in a closet grow room involves utilizing a compact space to cultivate vegetables indoors.
- Use flood and drain hydroponics or drip irrigation
- Use LED lighting
- You can efficiently manage water and light, key elements for plant growth, making your closet a productive vegetable garden.
Find out how to turn a closet into a closet grow room for vegetables. If you have a closet you can have an indoor vegetable garden.
I will show you a simple and effective closet grow room using flood and drain hydroponics and LED lighting.
How To Turn A Closet Into A Closet Grow Room
Container gardening is not just an outdoor affair. It’s a creative venture that fits right in the heart of your home namely your closet.
Ever fancied having fresh vegetables right at your fingertips, regardless of the season?
The concept of turning a closet into a flourishing grow room is not just exciting but a step towards self-sufficiency.
It’s about utilizing what you have to create a little haven of greenery.
Let’s dive into the simplicity and effectiveness of setting up a closet grow room using the flood and drain hydroponics method paired with LED lighting.
It is not hard to build but you will need a flood table and a LED light. Flood and drain is also called ebb and flow.
You can buy a flood table and the smallest sizes they make are 3×3 and 2×4 feet.
That measures the inside of the flood tray so the overall size will be slightly larger.
If your closet is smaller than that you can use a 2×3 foot mixing tote sold at Home Depot. They are cheap and work well and cost about $13 the last time I looked.
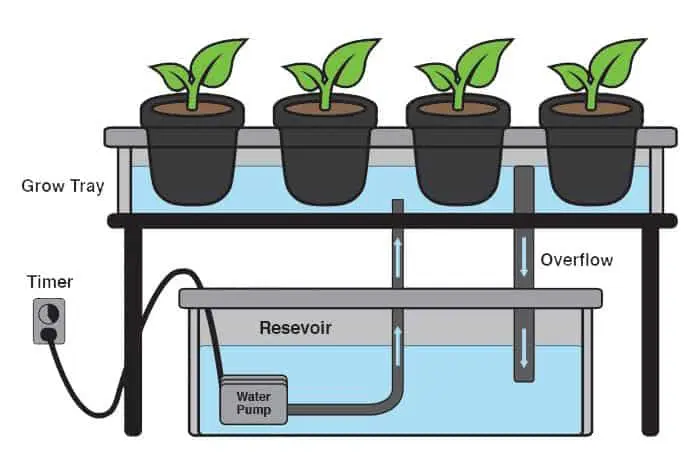
Your flood table needs to be above your reservoir so water can drain back to your reservoir.
Many people use a metal stand for their flood tables which is an added expense.
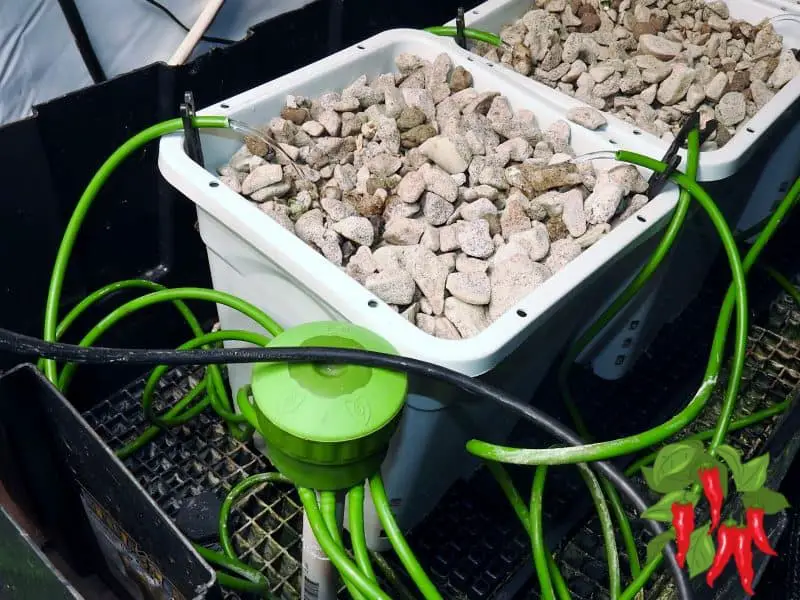
In my case I am using a 2×4 foot flood table it is set on 2 27 gallon totes. It is fed and drains into one tote and the other on the opposite end is empty.
Buying a flood table will cost more money but they last longer and work better.
You could also stack 2 storage totes and make a flood and drain system. The bottom one would be your reservoir and the top one your flood tray.
Any way you decide to go you will need to use flood and drain fittings to make it work.
Get Your Ebb And Flow Fittings Drill The Holes
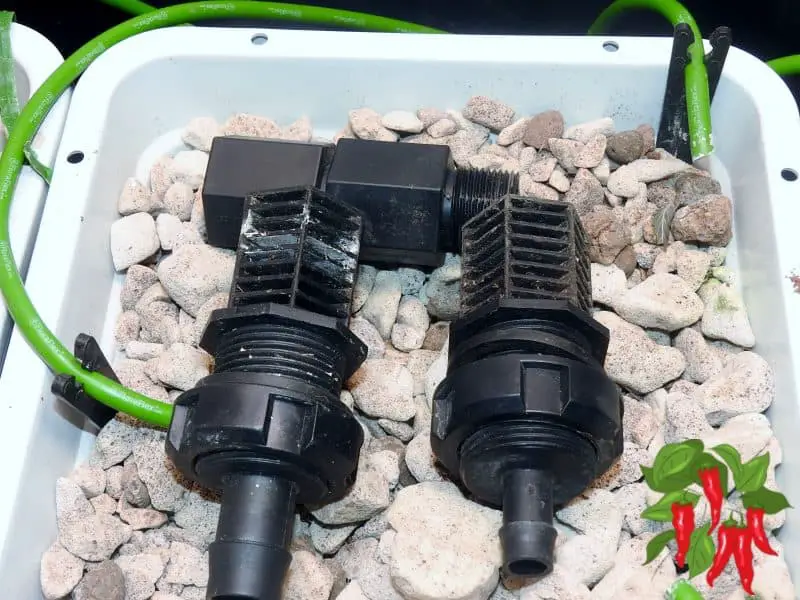
You will need a set of ebb and flow fittings. There is a 1/2 inch feed fitting and a 3/4 inch drain fitting.
Your set will include the screens and several extension fittings used to set the flood height. Use these.
You will need to drill a 1 1/8 inch hole using a hole saw. Most people drill the holes on the end of the flood tray but some like the fittings in the middle.
If you are using a flood tray on some there will be recessed spots for the fittings but not all flood trays have these.
There is a rubber gasket with each fitting. It goes on the outside of the tray.
Get A Pump And A Timer
You will need a pump to move water up from your reservoir to your flood tray. The water drains back to your reservoir by gravity.
The pump will need to be on a timer and it will run every few hours for a few minutes to flood your plants.
I am using a submersible pump in my reservoir. It is an ECO 396. It comes with a variety of fittings. I have found these pumps to be very reliable and they last for years.
You will want a timer and I use this one. I would choose a digital timer because most analog timers work at 15 minute intervals.
That is too long a time to be flooding. A 15 minute flood time might drain your reservoir and you don’t want to run your pump dry.
So choose a digital timer that allows you to use one minute intervals.
Reservoir Size
Flood and drain systems use a lot of water to fill the tray so you will want a fairly large reservoir.
Mine is 27 gallons and works well with my 2×4 foot flood tray. It should be enough for your closet grow room.
The water is recirculated back to the reservoir and reused. You will want to monitor the water level in your reservoir and refill it as needed.
I use a simple dipstick made from a piece of PVC pipe. It is marked in 5-gallon intervals and helps me fill and measure my reservoir.
I don’t fill it all the way to the top instead I add 20 gallons to it to start.
Use Hydroponic Nutrients In Flood And Drain
Because nutrients are recirculated and reused you will want to use hydroponic nutrients that are designed for a recirculating system.
There are many good nutrient brands out there but House And Garden Aqua Flakes have worked really well for me. You can get them here on Amazon.
You will use the same 2 bottles in equal parts for your entire grow. One ml of A and B together is 100 ppm per gallon.
I use about 300 ppm for new plants and about 600 ppm for medium-sized plants and about 800 ppm for full-sized plants in flower. I never go above 1000 ppm.
Use LECA As Your Grow Medium
LECA stands for Lightweight Expanded Clay Aggregate it is also called hydroton or clay pebbles. It is made from heat-expanded clay.
It is lightweight and porous. Because it is not organic it does not decompose so it can be used over and over.
Because it is porous it can hold and absorb nutrients. Its round shape leaves air spaces in your pot.
Plant roots require nutrients and also oxygen to grow well and LECA provides both.
Because it is not soil insects are not attracted to it and there are fewer soil-borne pests or diseases.
Although it can hold moisture it can be flooded often because its structure prevents waterlogged grow media.
Flood and drain systems typically use hydroton also called LECA in net pots. LECA needs to be washed before using it to remove all the dust from it.
Some brands seem to be dirtier than others and some are prewashed but still need another rinse. I have had good results with this one.
It will float so you will want to set flood height only about halfway up the sides of the pot.
Make sure both fittings have a screen on them to prevent LECA from getting into your reservoir. If they get into your pump it could break it.
Other media can be used but are more problematic so when starting out go with the clay pebbles.
Pot Size In Flood And Drain
In the video I show you a 6-inch net pot it probably is about half a gallon but you can use larger pots.
Net pots are commonly used because with the slotted sides they flood and drain easily.
But you can use regular plastic pots too. You probably don’t need anything larger than a gallon pot.
In this system, roots don’t need to search for water and nutrients like plants in soil so a smaller pot is fine. It is also cheaper to fill.
The bigger your plant is the more often it will need to be watered. Also bear in mind flood height is limited so wider rather than taller pots work better.
When you use taller pots you will want to top water them at first until they develop roots further down in the pot.
Always fill your pots with media that has been moistened first.
Flood And Drain Advantages
Flood and drain systems have several advantages.
- They are probably the easiest hydroponic system to set up.
- Fewer parts are needed. You only need a set of flood and drain fittings.
- Your pump is the only moving part in your system.
- They provide automated watering by using a timer.
- You can move plants around in a flood and drain system.
- Using LECA means you never need to buy and replace your media
- You will have fewer disease and insect problems.
- Flood and drain is versatile too.
Convert Your Flood And Drain System To Drip
A flood table is versatile and in the video, I showed you a top feed drip manifold.
This can be installed and screwed into the intake fitting. The threads inside will take 3/4 inch PVC fittings and my manifold is built with one so it can be screwed in.
Top feed drip systems are a bit more difficult to set up and use but in my opinion, they provide better results.
You need to run individual feed lines to each pot and lines can clog so if you are just starting out you will have a much easier time using flood and drain.
Here is an article I wrote about building a top feed drip system for a closet.
Providing Ventilation For A Grow Closet
Your closet grow room will need proper ventilation too. I like tower fans for moving air in my closet but you can use fans mounted on the wall too.
You want to have a gentle breeze inside your closet and not a strong one because your plants could get wind damage.
You will also need an exhaust fan. Any light will give off heat even a LED. You must have a way to exhaust this heat along with humidity from your plants.
So you need fresh air coming in and stale air going out. Without proper ventilation, you will not be able to control the temperature and humidity in your grow closet.
Also without fresh air coming in your plants won’t grow well. Vegetables need fresh air that brings in oxygen and CO2.
Without incoming air, your plants would quickly use up all the CO2 in the closet.
They need CO2 because they use it along with light for photosynthesis to manufacture their food.
Use Full Spectrum LED Grow Lights
Full spectrum LED grow lights will be the best lighting source for your closet grow room. They are as close as you can get to natural sunlight indoors.
They give off less heat than other lighting methods and they also produce more light per watt of electricity.
Forget what manufacturers say about their lights. They often use misleading titles. Instead, find out how many watts a light pulls from the wall.
Here is a review of a 200w LED that I use for a 2×4 grow space. You can see this light on Amazon here.
For most grow closets you should be OK with a light that puts out 200-250 watts at the wall. A big walk-in closet will need more light obviously.
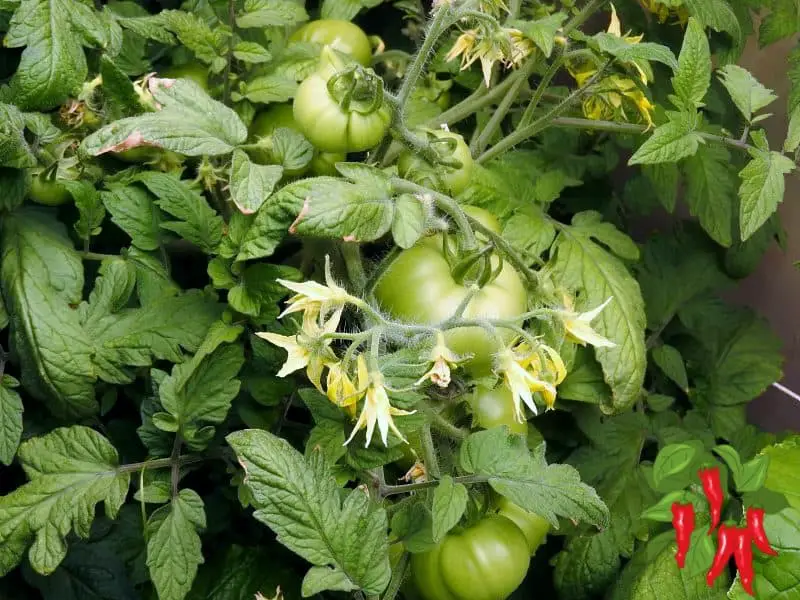
For high-light plants like tomatoes, 25-30 watts per square foot is a good guide. Measure the square footage of your closet and multiply by 30.
If you are growing lettuce and other greens you can get by with less light. I prefer a larger light than I need.
I would rather dim a light down than turn a light up all the way and find out it is not putting out enough light for my closet.
Watering Cycles In Flood And Drain
I can’t give you exact watering cycles because there is so much variation in pot sizes, pump sizes, plant sizes and even the temperature and humidity in your grow closet.
You will need to figure this out for yourself but a good place to start is running your system and measuring how long it takes to get to flood height.
Flood height should be about half the height of your net pot. When you know this you will know how long to run each cycle.
From there a lot depends on the size of your pots. Small plants will only need 1 or 2 floods. As plants grow more roots you will need to increase this.
Full-sized plants in flower may need an irrigation every 2 hours. In general, try running a flood cycle 3 to 4 hours apart for medium or large plants.
Checking to see if the pebbles are still moist can help you determine the number of cycles you need.
It is hard to over-water plants in LECA but you don’t want them to ever dry out completely.
Also, most growers do not water their plants after the lights go off. Just make sure your timer kicks in when the lights come on.
Closet Grow Room FAQs
Starting a closet grow room comes with its share of queries. It’s a realm where curiosity sprouts as lushly as the veggies you aim to grow.
From understanding the basics of hydroponic systems to the nitty-gritty of lighting and ventilation, our FAQ section is geared toward nurturing your green thumb. Let’s tackle some common questions to ensure your closet-turned-garden thrives!
Q. What is the ideal size for a flood table in a closet grow room?
A. The ideal size hinges on your closet space. Common sizes are 3×3 and 2×4 feet, but a 2×3 foot mixing tote is a great alternative for smaller closets.
Q. What kind of lighting is best for a closet grow room?
A. Full spectrum LED grow lights are the top choice as they mimic natural sunlight, are energy efficient, and emit less heat compared to other lighting types.
Q. How often should the watering cycles be in a flood and drain system?
A. It varies with plant and pot sizes, but starting with flood cycles 3 to 4 hours apart for medium to large plants is a good rule of thumb.
Q. What kind of grow medium is recommended for this setup?
A. LECA (Lightweight Expanded Clay Aggregate) or hydroton is recommended due to its lightweight, porous nature which is ideal for flood and drain systems.
Closet Grow Room Final Thoughts
If you have a spare closet or one you can clean out you can turn it into a closet grow room. This will allow you to grow vegetables indoors all year round.
This setup not only allows you to enjoy fresh produce but also engage in a fulfilling and sustainable hobby right within your home. It’s time to clean out that closet and make room for a green adventure!
We need to make the best use of our indoor space.
Using a closet to grow vegetables will perform better than just having them somewhere else in our apartment.
It also helps keep them out of sight.
So clean out that old closet and turn it into a closet grow room for vegetables. You will be glad you did.
💧 Indoor Hydroponic Gardens
Want fresh veggies year-round in small spaces? Explore beginner-friendly hydro systems, closet grow setups, self-watering hacks, and gear reviews that make indoor gardening simple.
-
- 🚪 How to Grow Vegetables in a Closet
- 🧰 How to Turn a Closet into a Grow Room
- 🏕️ Using a Grow Tent for Vegetables
- 🎪 Are Grow Tents Worth It for Vegetables?
- 🏢 Apartment Kitchen Garden: Smart Space Ideas
- 🏙️ Hydroponic Apartment Garden: How to Start
- 🥔 Growing Sweet Potatoes Indoors
- 🧱 Small Closet Grow Room Setup
- See all articles in our Indoor Hydroponic Gardens category

 Steve S. is the creator of